A blog after a long break and it’s not as easy as it seems. My son is sitting next to me chattering as he is eating this “chuda” (as we call it in konkani) and he’s asking me to write that it’s so yummy 😍😂 He calls me the best chef in the world. It was actually best “cooker” (which used to remind me of Prestige cookers 😅) till few months back but then he learnt the word chef at school. So nowadays cooker has become chef 😄
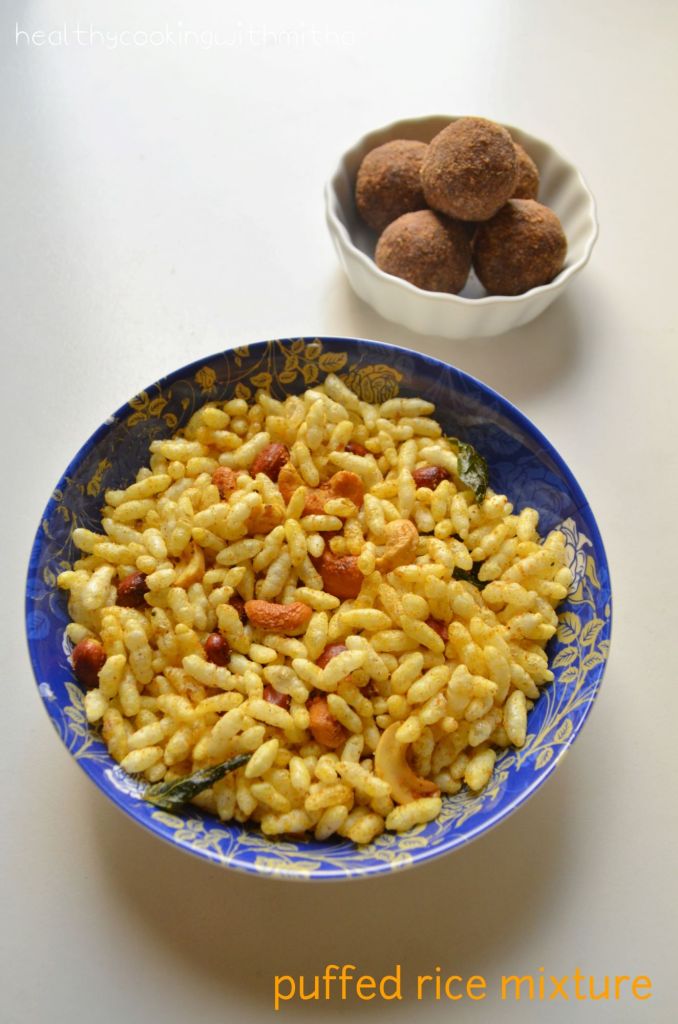
Today is Vijayadashami and Dussehra, so I had made ragi ladoos to celebrate the festival. My kids love it a lot and I make it regularly for them. Along with that, I planned to make this puffed rice mixture for their evening snack and also for their snack box at school tomorrow. It’s so easy and hardly takes few minutes to make. I too love it a lot.
So decided to share the recipe with all of you on this festive occasion. Hope I can share more such healthy recipes for you all. Wishing you a very happy Vijayadashami and Dussehra. Happy and healthy cooking!
RECIPE:
Ingredients:1 Cup = 240 ml
2 Tbsp Coconut Oil
1/4 Cup Peanuts
1/4 Cup Cashews
1 tsp Mustard seeds
1 tsp Cumin seeds
A sprig of curry leaves
Pinch of Hing/ Asafoetida
1/4 tsp Turmeric powder
1 tsp Rasam powder (or Red Chilli powder)
4 Cups Puffed Rice / Charmburo / Murmuro
1 Tbsp Jaggery powder
Salt to taste
Step by step recipe:
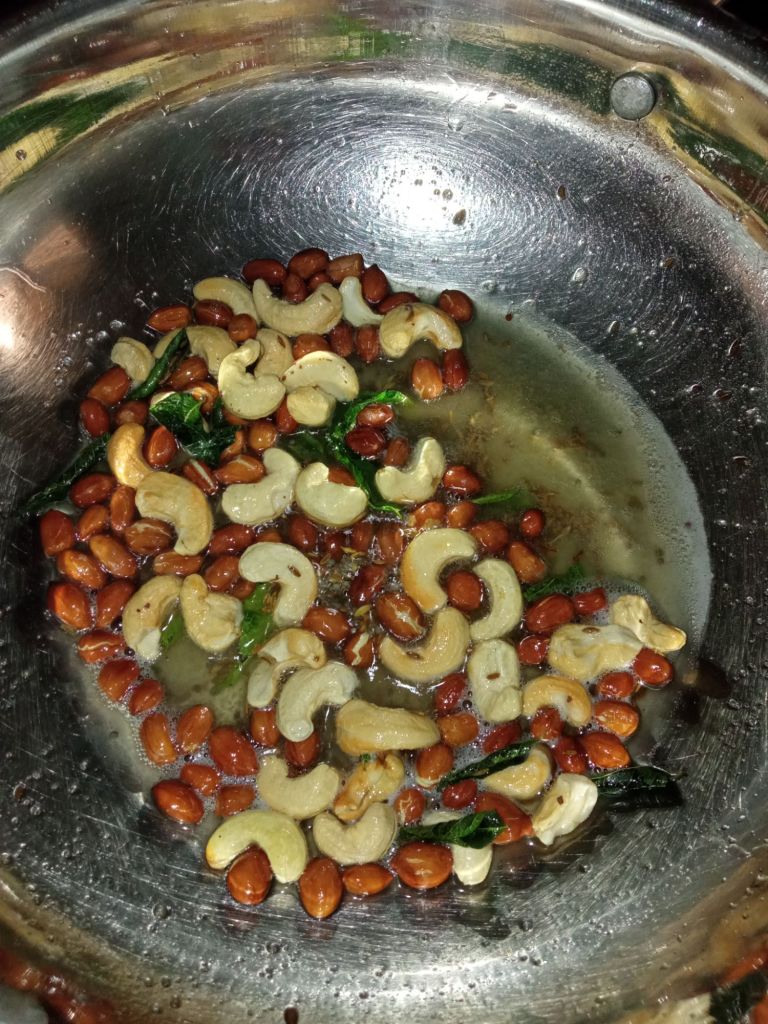
Heat Coconut oil in a pan and add peanuts. Fry till peanuts gets roasted and slightly brown. Now add cashews and fry till they turn light brown. Keep the flame on medium.
2. Add mustard seeds, cumin seeds, curry leaves and hing. Allow mustard seeds to splutter and curry leaves to turn crisp.
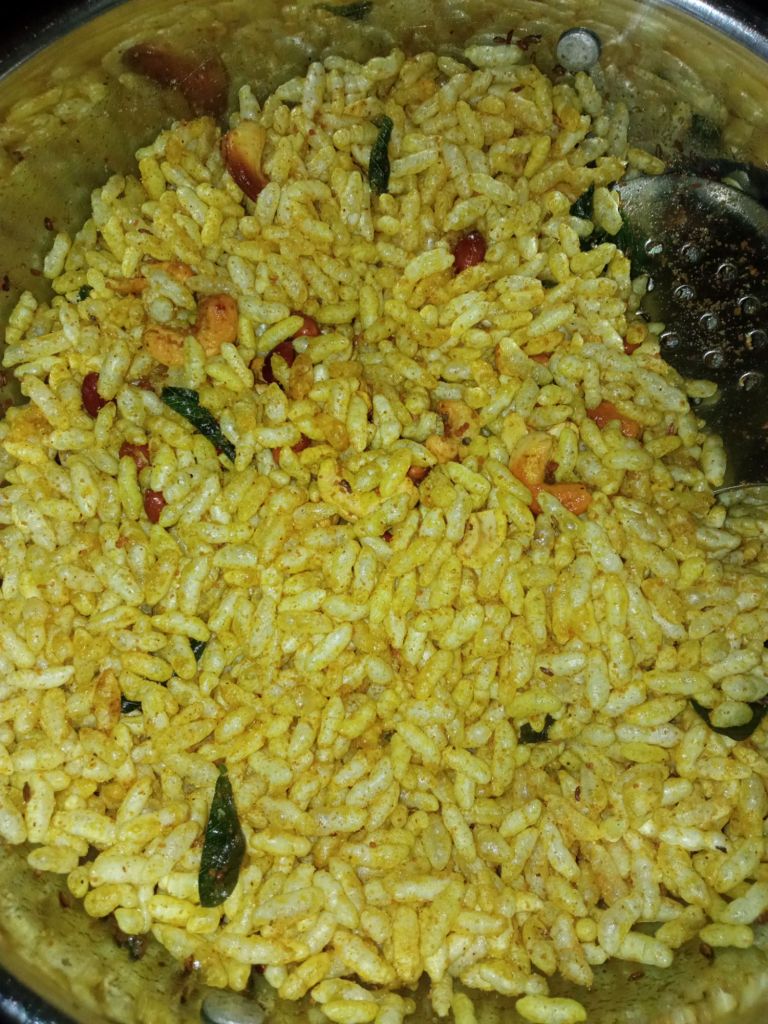
3. Add turmeric powder and Rasam powder. Fry for few seconds.
4. Now add puffed rice, one cup at a time and keep frying continually to medium to low flame for two minutes. When the masala has coated all the puffed rice kernels well, add jaggery powder and salt. Mix well. Done.
Serve warm puffed rice mixture as an evening snack or for kids’ snack box. Stays well in a moisture free air tight container for even till a week.
Notes:
Instead of coconut oil, you can use the oil you regularly use in your kitchen.
If making for first time and want to make less quantity, just use 1 Tbsp Oil, few peanuts and cashews along with 2 Cups of puffed rice.
For less spicy mixture, use rasam powder and for spicy mixture, use red chilli powder.
Store in an airtight container and use a moisture free spoon every time you remove it. It will last even till a week. My kids finish it even before that.
For Ragi Jaggery Ladoos, you can see the recipe here:
Click on the image to save the recipe on Pinterest
Having grown up now (though I would love to be a child 😍), I realize how much my food choice has changed over the years. From loving hotel food as a kid to now, loving all the dishes that were made at home by my Amma and Grandma, recreating them in my kitchen and remembering my childhood memories with the dishes, I have come a long way. ❤️
Even though I still like to enjoy restaurant dishes occasionally, my comfort will always be the simple dishes that I make daily. We have pej or matta rice gruel for dinner and any kind of stir fry or upkari (as we call in Konkani) is a must with it.
So whenever I get good ivy gourd, I make this tendle kajjubi upkari which is an alternative to the famous Konkani dish called Tendle Bibbe upkari which is made with Bibbo or Fresh Cashews. They are available during our new year festival or Ugadi and in every Konkani household, either Bibbe upkari or Tendle Bibbe upkari is made.
Since I live in Qatar and we don’t get fresh cashews here, I make this upkari with regular cashews and it tastes delicious too. I made it yesterday and decided to share this easy recipe with all of you too. I know Konkanis already know this easy recipe but I am sure it will be new to atleast some of my readers.
So here’s sharing the recipe. Hope you all try and love this yummy dish. Happy and healthy cooking! ❤️
RECIPE:
Ingredients:
1 1/2 Tbsp Coconut Oil
1 tsp Mustard seeds
A sprig of Curry leaves
3 Green chillies
About 20 Ivy Gourds/ Tindora/ Tendle (2 Cups sliced)
3/4 to 1 Cup Cashews (regular ones)
Salt to taste
2 Tbsp freshly grated Coconut for garnish
Step by step recipe:
1. Wash ivy gourds well, then chop off the ends and slice them as shown. You can slice one ivy gourd into 6 long pieces.
2. Heat oil in a pan, add mustard seeds, allow it to splutter. Now add curry leaves and green chillies. Fry for few seconds.
3. Now add the sliced ivy gourds and cashews together. Mix well.
4. Add little water ( about 1/4 cup) along with salt. Cover and cook on medium flame for about 10 mins. Check in between if the water has evaporated. Add little more if needed.
5. Once the ivy gourds change colour to light green and turns soft along with cashews turning soft too, the upkari is done. If water is remaining in the stir fry, just keep the flame on high and fry till the mixture turns dry. Now garnish with freshly grated Coconut. Done 🙂
6. Serve with rice meals or with congee (pej/rice gruel). Tastes so yum ❤️
Click on the image to save the recipe on Pinterest
Notes:
* The ratio of ivy gourd to cashew is upto you. We love cashew in this upkari. So I add 1 Cup for 2 Cups sliced ivy gourd. You can also add just a handful. Tastes good even then.
* Remember to cook both the ivy gourd and cashews till soft. Ivy gourd takes time to cook, so keep the flame on medium, add little by little water and cook till it changes to light green and soft.
* We Konkanis make this with Bibbo or fresh, tender Cashewnuts during our New year festival called Ugadi. But since I live in Qatar and am here during Ugadi, I make it with cashews.
Click on the image to save the recipe on Pinterest
Hello dear readers, I am back after a very long break. I know I have been taking many breaks now and then but I also know you all will understand me. I had travelled to India, to my hometown Udupi in Karnataka, last month which was after a period of 2.5 years and had a wonderful time with my Amma along with my dearest family members. ❤️
After coming back to Qatar, my kids started school, with my son joining kindergarten too. I miss the kids specially my son a lot as he was always stuck to me (fevicol ka jod 😄) but as they say, we have to accept whatever life brings and I have got accostomed to his absence in the mornings too (though I get teary eyed each time he leaves 😁 #motherhood).
When he comes back though, I get smothered with hugs and kisses from him which compensates for everything 😍😍. My daughter comes a little later and then an hour goes by with her narrating what happened at school. Her stories remind me of my younger self who used to tell each and everything to my mother after she came back from work. ❤️
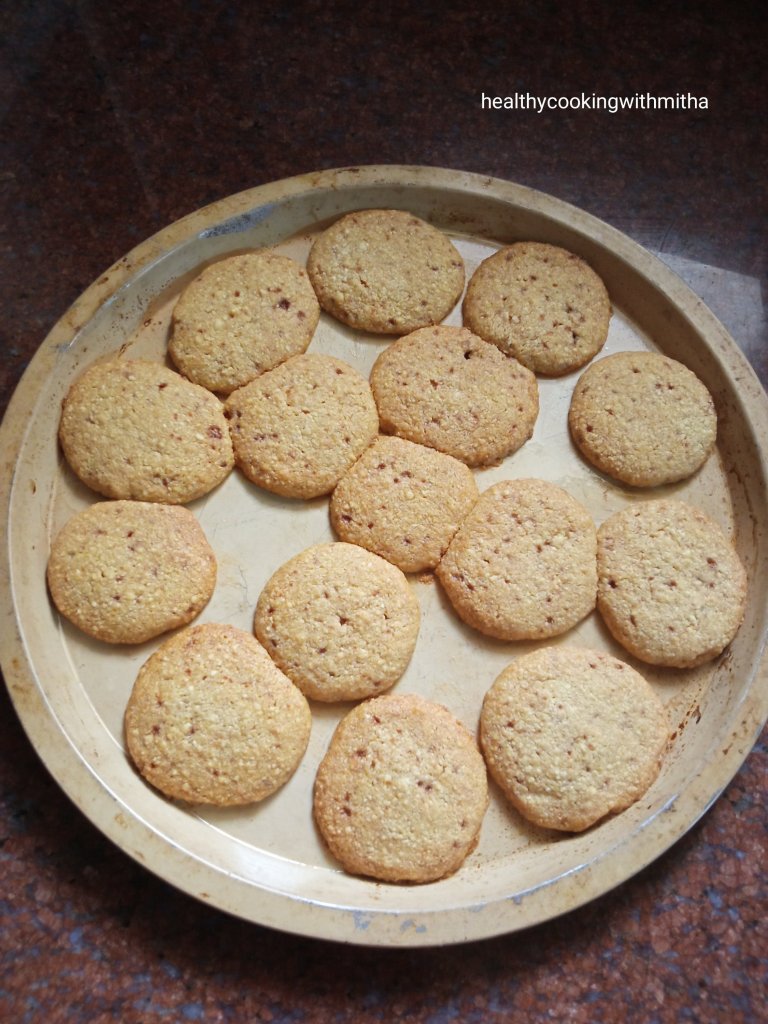
When they are at school, I cook or bake something special just to see their excitement and the way they enjoy it. 😍 That’s how I baked these Cashew Butter Cookies which both the kids loved a lot.
These cookies are healthier as compared to store bought ones and very tasty too. Once you get the trick on how to make it well, it’s very easy and hardly takes 30 mins to bake a batch of cookies.
Hope you all try and love these cookies. Do let me know if any doubts and it will be a pleasure to help. Happy and healthy baking! ❤️
RECIPE: { My 1 Cup = 250 ml }
Ingredients: { Makes about 15 cookies }
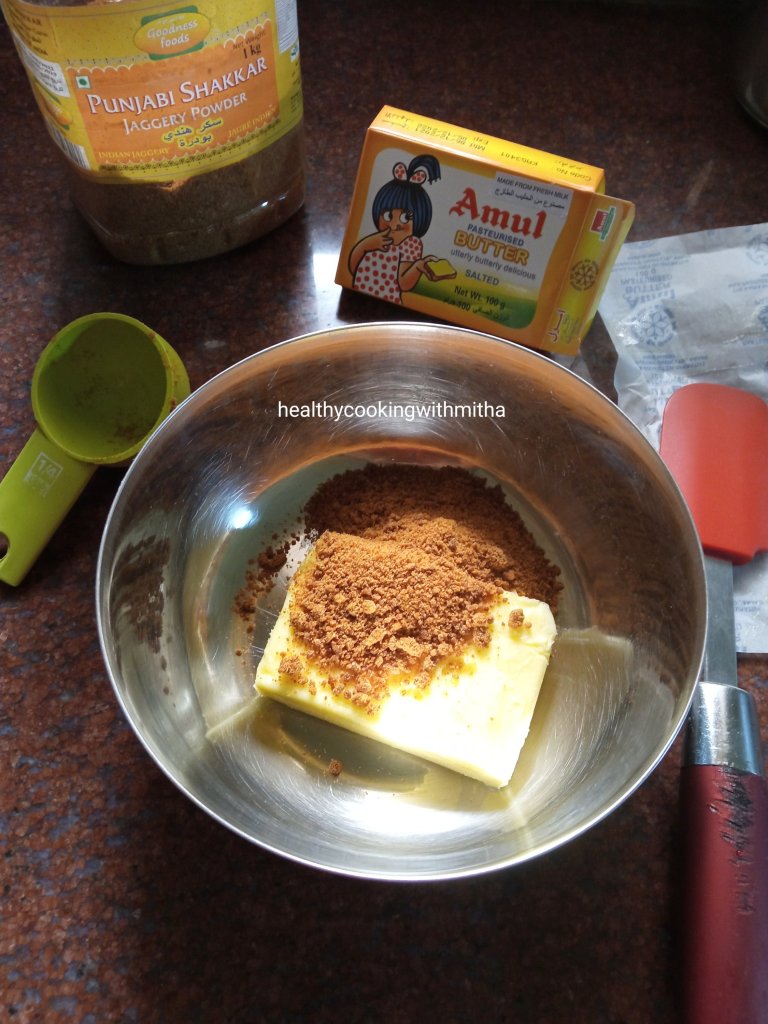
100 grams Salted Butter ( 1/4 Cup + 3 Tbsp) (Add a pinch of salt if using unsalted butter)
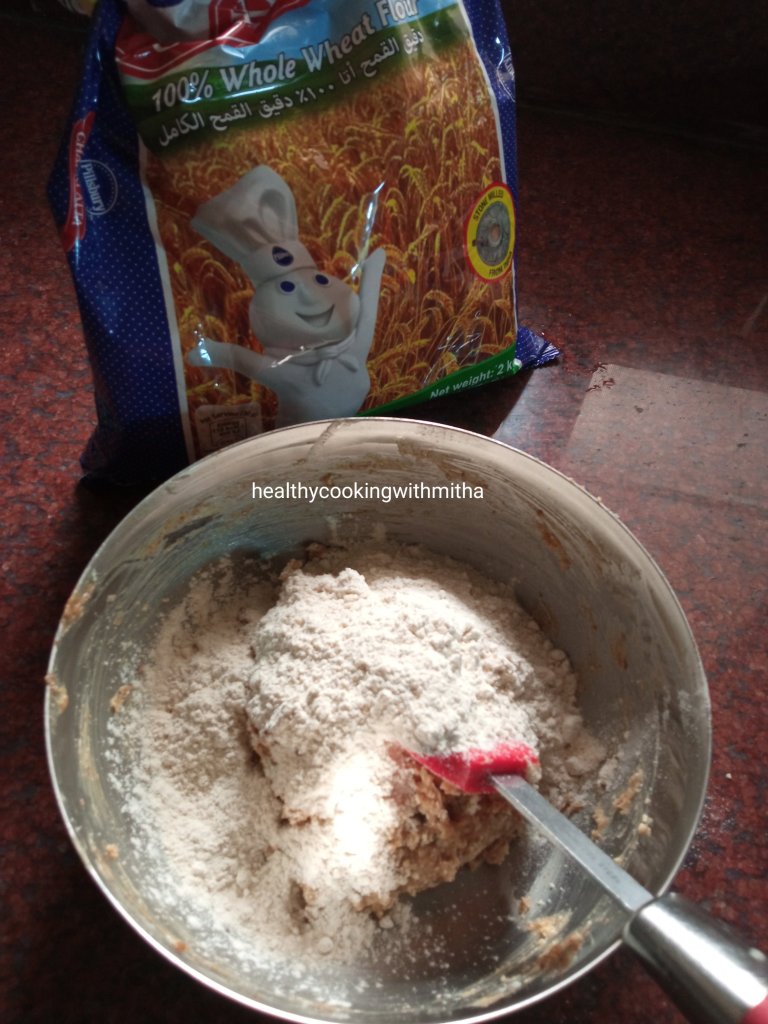
3/4 Cup Whole wheat flour or Atta
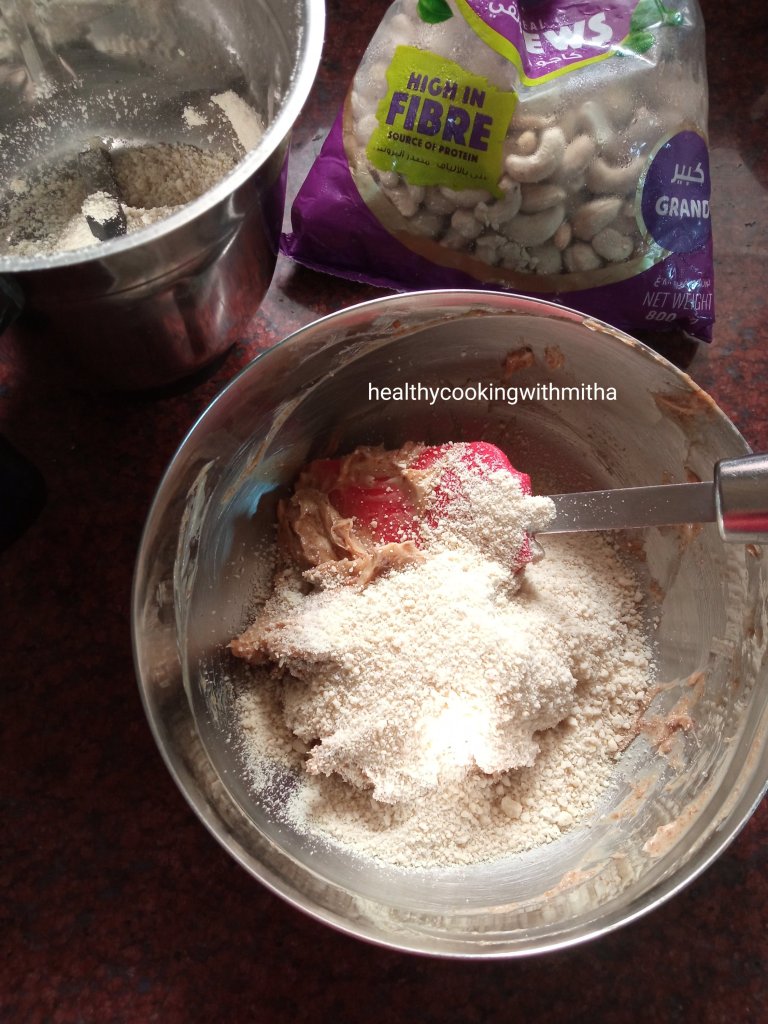
1/2 Cup finely powdered Cashews ( + 2 to 3 Tbsp if needed)
1/4 Cup Jaggery powder
Step by step recipe:
1. Soften butter by keeping it at room temperature for little time. (Do NOT melt it in microwave or so.) Just place it at room temperature till it turns soft. Now add jaggery powder.
2. Combine both well with a spatula till jaggery powder blends with the butter.
3. Add cashew powder and mix well using the spatula.
4. Now add wheat flour.
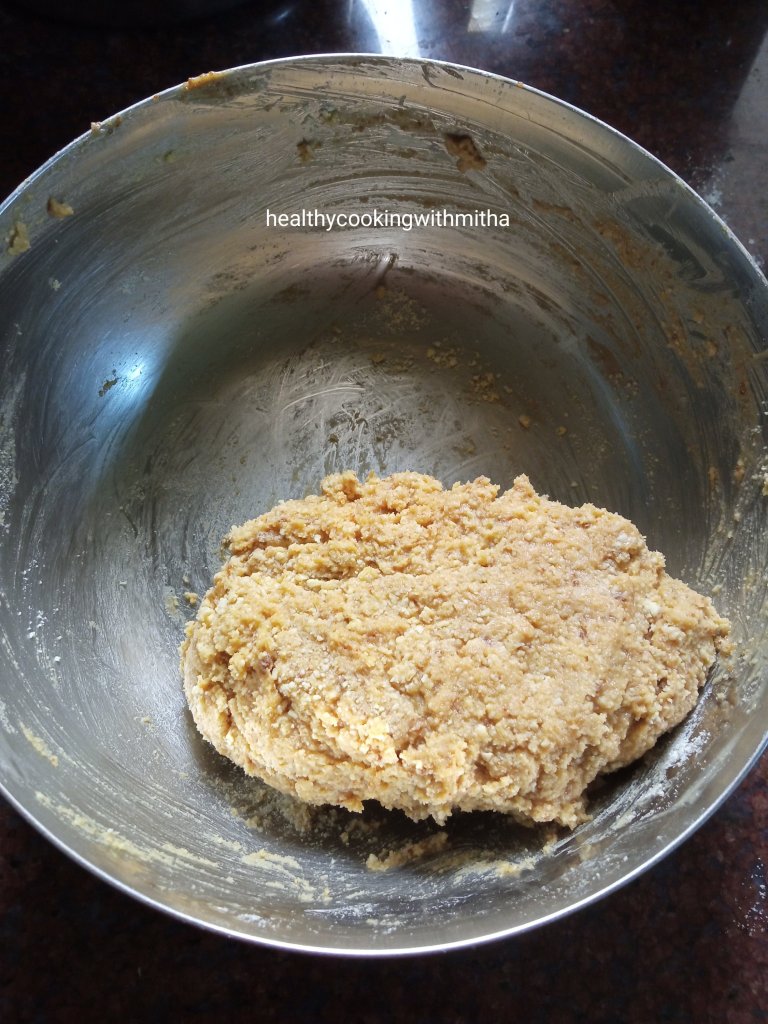
5. Combine well to form a non sticky dough. At this step, if needed add extra cashew powder or wheat flour if the dough is very sticky. The dough should not be very hard but should not be sticky too. It sometimes takes me extra 2 Tbsp of cashew powder to get non sticky dough. Depends on your wheat flour/ butter brand.
6. Cover and refrigerate the dough for 10 to 15 mins so that the dough becomes firm. After that Preheat the oven for 180 C for 10 minutes in the center rack of the oven.
7. Now make roundels using your palm and place on a greased (with butter or ghee) oven proof plate. Grease your palm too if needed.
8. After the oven finishes pre heating, place this plate in the center rack of the oven and bake at 180 C for 12 to 15 mins. My cookies get done at 14 mins.
9. When done, the cookies turn slightly brown at the edges and are hard to touch in the center. If the cookies look underdone, bake for couple of mins more.
10. Once baked, allow the cookies to cool completely. As they cool down, they start getting firmer but these cookies are more on the soft side and not the crispy kind of cookies. Enjoy soft, melt in the mouth homemade cookies! ❤️
Notes:
* Store the cookies in a dry, air tight container and it lasts well for two to three days. Mine gets finished off by my family before that. Will last longer if handled well, free from moisture.
* They are very soft and break upon touching on warm. As they cool down, they will harden but still not very hard like store bought ones as we have used only butter. The texture is melt in the mouth softer version of cookies.
* These cookies do not need baking sodanor baking powder. They still grow in width during baking process. I too was amazed the first time I tried it as I always thought cookies needed either baking soda or powder.
* Baking time depends on your oven. In some ovens, it can be done at 10 mins while in my OTG, it takes 14 mins. So keep an eye but don’t open the oven door before atleast 10 mins into the baking time. Else it will lead to uneven baking.
* Do refrigerate the dough for atleast 10 to 15 mins as it helps combine the ingredients well and also helps us form cookies well without sticking in our hands.
* Place the cookies in the center rack of your OTG or with both rods on if using microwave with conventional mode oven.
* I have not replaced butter with ghee or oil in this recipe. So can’t say about the outcome.
* I use Pillsbury brand of wheat flour for my bakes and it works very well for me.
* For making powdered Cashews, just put the cashews in a mixer and pulse it in regular intervals till it turns into fine powder. Keep checking in between so that it does not leave oil and become a paste.
* Leave space between cookie dough while keeping on the tray as they increase in width as they bake.
* When they fully bake, you can see the surface is free of raw dough and edges are slightly golden in colour. It is enough. You can remove the cookies out of the oven.
I have tried to note down as much points as possible so that it’s easy for you all to follow but if you still have any doubts, either comment here or message me on my Facebook page Healthy cooking with mitha or on my Instagram handle and I would be happy to help.
Click on the image to save the recipe on Pinterest
Click on the image to save the recipe on Pinterest
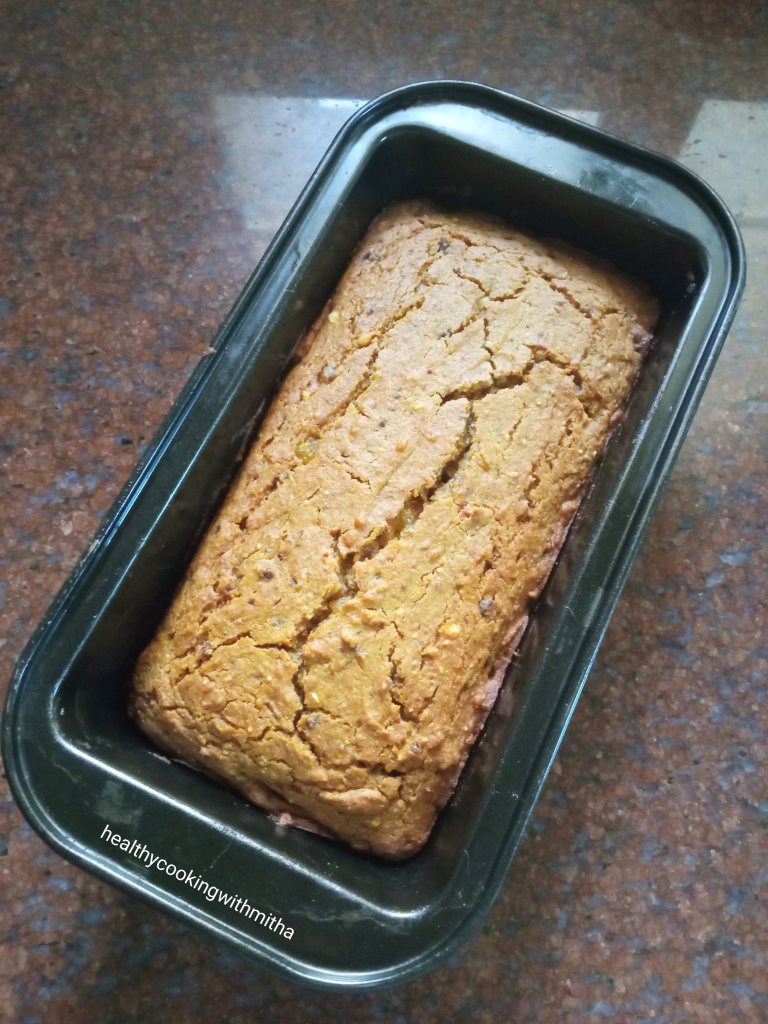
It has been so long that I have posted a cake recipe, in fact the last one was in February which was this delicious Chocolate Sponge cake. The cake is so amazing that I have been making it regularly, mostly as cupcakes for my kids. It is also a great snack box option for my daughter who’s school has started regularly now (after months of online classes, my butterfly is happy to be flying again 😄).
Apart from chocolate cake and other cakes, I have also learned to make this healthy Dry fruit Cake which she takes to school and my 3 year old son too enjoys it as his morning snack. In fact I made it again today on their request and decided to take step by step pictures to share the recipe with all of you too. 😍
My son could not wait for me to complete taking pictures and he came to take a slice. I captured the moment and it came out so cute. Those tiny hands. 😍
Click on the image to save the recipe on Pinterest
He gobbled up two slices of the cake and the rest of them are waiting for my daughter to come back from school. It’s her favorite and I am sure she will be very happy to see it. ❤️
Hope you all try and love this cake too. They are a great way to add the healthy dry fruits in the kids’ diet and since it has wheat flour and ghee along with the nuts, they are filling too. Specially great for the winters now. I have also been making these easy Sesame seeds Burfi and Dry fruits ladoo for them which you can try as well. Happy and healthy cooking! ❤️
RECIPE:
Makes a single loaf cake in a loaf pan of length 20 cm and width 7 cm
Ingredients:
Dry Ingredients: { 1 Cup = 240 ml }
1 Cup Whole wheat flour (Regular Chapati atta)
1 tsp Baking powder
1 tsp Baking soda
1/4 tsp Salt
Wet Ingredients:
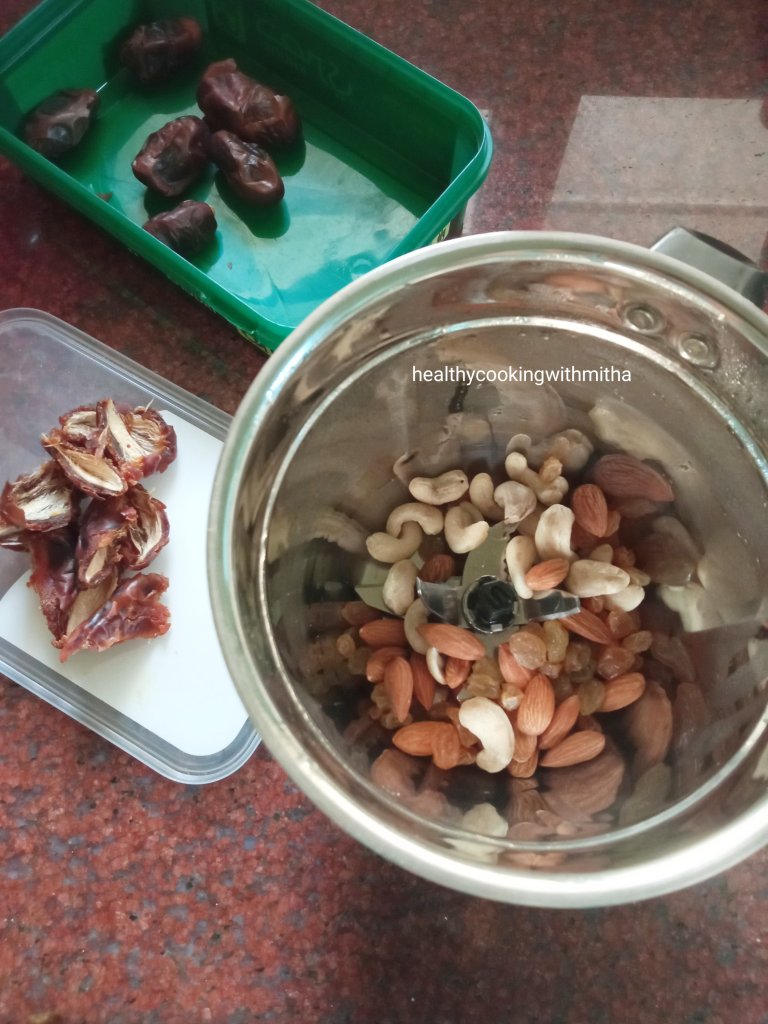
1 Cup Mixed nuts, raisins and dates (I take about 10 cashews, 10 Almonds, some raisins and 5 seedless dates which make a total of 1 Cup)
1 Cup Orange Juice (I use freshly squeezed)
1/4 Cup Jaggery powder
1/4 Cup Ghee
Step by step recipe:
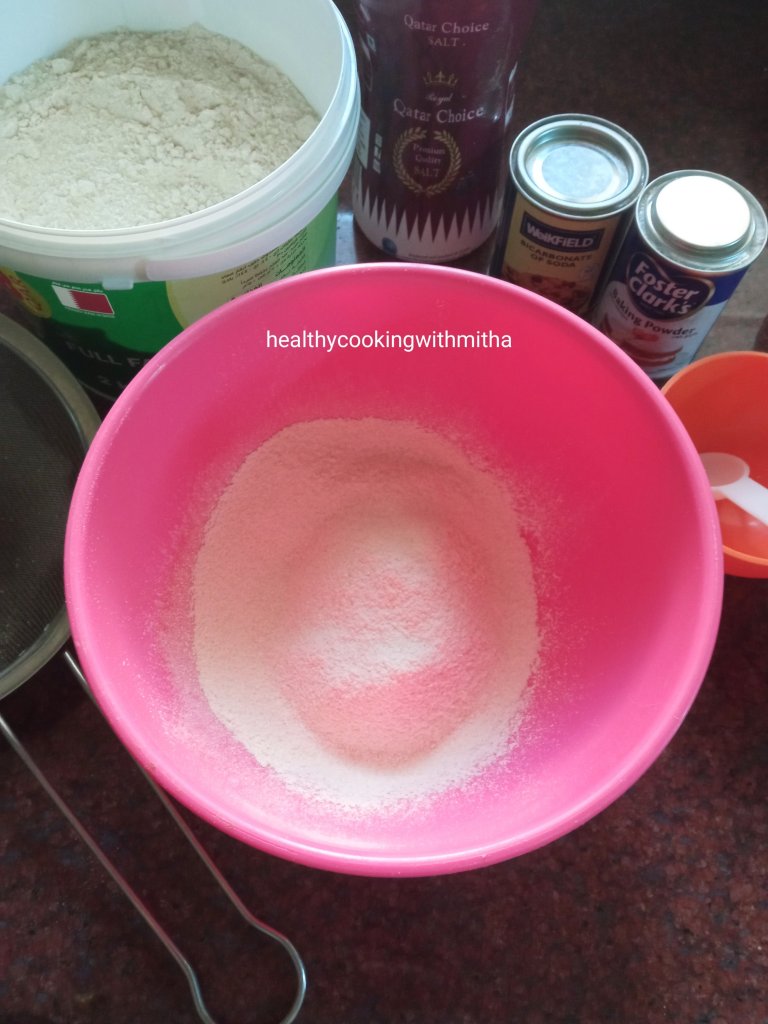
1. Sieve together 1 Cup wheat flour, 1 tsp baking powder, 1 tsp baking soda, 1/4 tsp salt into a mixing bowl.
2. Take mixed nuts and raisins in a mixer. Deseed dates and halve them (Fine chop them if they are not very soft. It helps when you pulse later in the mixer). Keep aside.
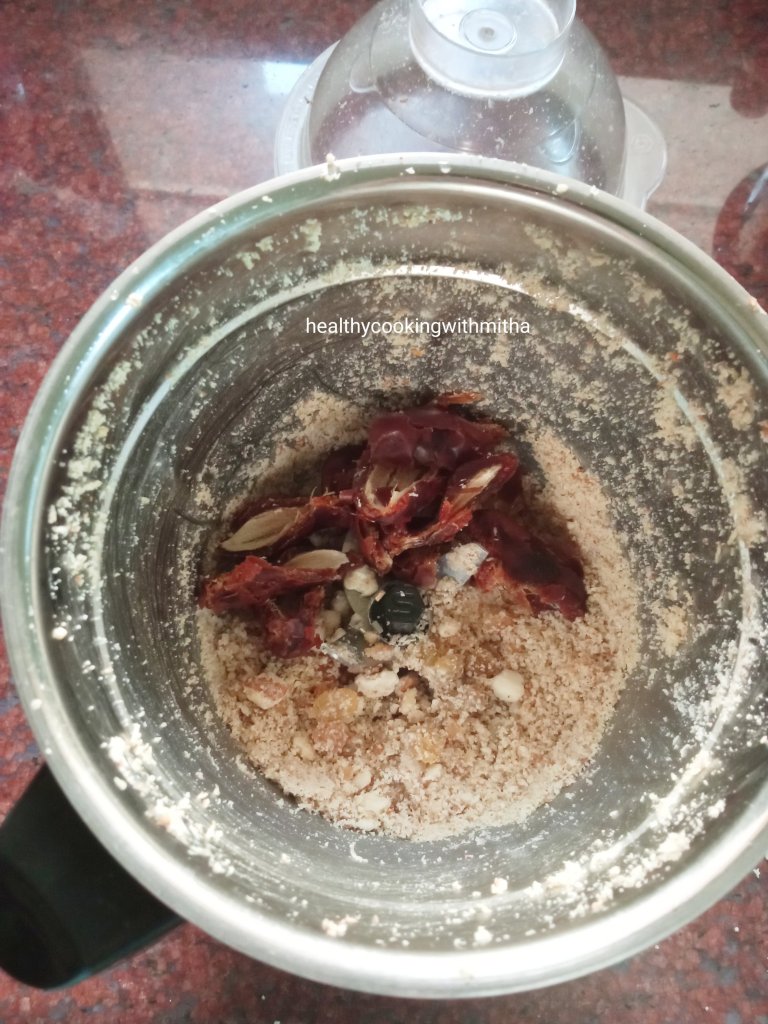
3. Coarsely powder the nuts and raisins together using Pulse mode of the mixer. Don’t grind at one go or you will get a paste. Just pulse few times till the nuts turn into coarse powder. Now add the deseeded dates to it.
4. Pulse again till the dates blend together and it forms a coarse mixture as shown. (Small pieces of dates left in the mixture is fine. Gives a great bite in the cake.) Note that this mixture is in powder form and not paste. Pulse the mixer few times to get this. Don’t grind all at once as the nuts leave oil and the mixture becomes a paste.
5. Now preheat the oven at 180 C for 10 mins.
6. Meanwhile take this dry fruit mixture in a mixing bowl, along with jaggery powder and ghee. Keep orange juice ready too.
7. Add orange juice and mix well. Remember to sieve the orange juice if using fresh ones so that it does not have the pulp.
8. Now add the dry ingredients to the wet Ingredients. Mix well using light hands till you don’t see any dry flour specks. Don’t overmix or you will get a dense cake. Just few mixes till you don’t see dry flour is enough.
9. Add to a greased cake pan. I grease my pan with ghee. The size of my loaf pan is 20 cm length and 7 cm width. Using a spatula, flatten the surface.
10. Bake in a preheated oven at 180 C for 30 mins. Might take between 25 to 35 mins depending on your oven type. Keep an eye after 25 mins. Don’t keep opening the oven door before that. Using a skewer or toothpick, insert in the center of the cake. If it comes out clear or with dry crumbs, it is done. If it comes out wet, keep again for 5 mins and check again.
11. Allow it to cool for sometime. Once cooled, loosen the edges of the cake using a knife and invert onto a plate.
Click on the image to save the recipe on Pinterest
12. Slice and serve. Store in a moisture free container.
Notes:
* This cake lasts well at room temperature for a day. Mine gets over within that time but if yours lasts, you can refrigerate it. Microwave for few seconds before serving if needed.
* I always use Pillsbury wheat flour and it works well for all my bakes. Recently though I started baking with Lulu brand of wheat flour and they come out great as well. This particular bake was with Lulu wheat flour and I was happy to see the cake come out soft and tasty.
* I have used freshly squeezed and sieved orange juice for this cake. It enhances the flavour of the cake so much. You can use store bought ones too.
* Regarding the mixed nuts, raisins and dates, as I have mentioned above, I have used about 10 cashews, 10 Almonds, few raisins and 5 dates. This made 1 Cup. You can use other nuts too if you like but I prefer this combination. Don’t skip dates though as it adds to the sweetness of the cake.
* You can also finely chop all the nuts and dates but I prefer coarsely powdering it as my kids don’t like the bite of nuts in their cakes.
* I have used 1/4 Cup Jaggery powder. It makes the cake sweet like bakery ones. You can skip if you want to make it completely sugar free and also substitute with brown sugar if you want.
* I always use ghee or butter in my bakes as I make it mainly for my kids. So, not sure about the texture and flavour if oil is used instead.
* Don’t overmix the dry and wet Ingredients. Mix slowly with light hands till the mixture is free from dry flour specks.
* My cake gets done exactly at 30 mins. Since each oven type is different, please keep an eye on the cake after 35 mins. Mine is an OTG. In microwave convection oven, the time required to bake will be less. So keep an eye after 20 mins into the baking time.
* This cake is very soft and slightly moist due to the orange juice and dates. So be careful while slicing it and start slicing only after it cools completely. Else it can break apart as it’s very soft in texture.
* If you are new to baking, I have written an article combining all notes and pointers that I learnt in my decade long baking journey. You can check that if needed – Baking Basics for Beginners
I have tried to note down as much points as possible so that it’s easy for you all to follow but if you still have any doubts, either comment here or message me on my Facebook page Healthy cooking with mitha and I would be happy to help. Happy baking!
Click on the image to save the recipe on Pinterest
Click on the image to save the recipe on Pinterest
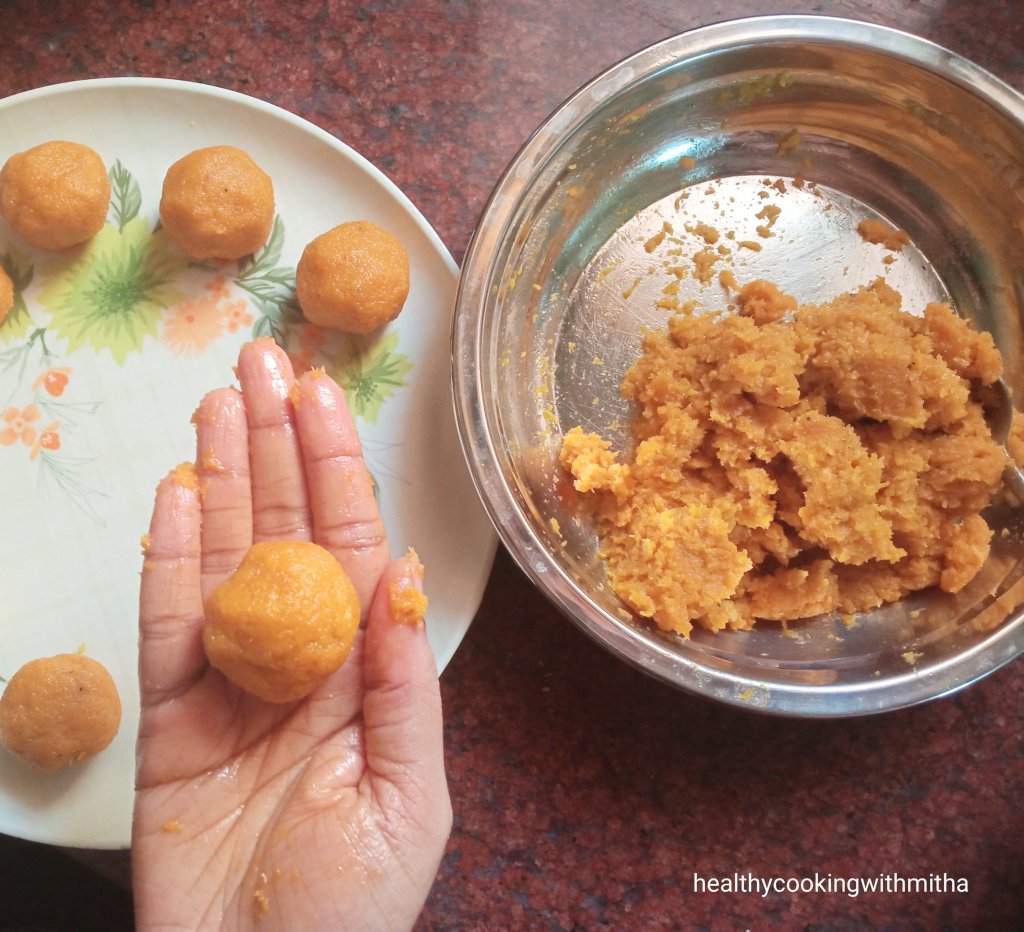
Don’t the ladoos look pretty? I loved how this picture came out. 😍 Even though I have been making these ladoos since some time now, the cashew bits idea came while presenting them for the blog and they looked so cute that I felt so happy. ❤️
I have a Microwave Mango Coconut ladoos recipe on the blog which many of my readers have tried but the recipe is with condensed milk which they wanted to avoid and I got requests for alternatives. So, I started experimenting and substituted condensed milk with cashew paste. And it worked very well. 😍
The ladoos come out very soft yet melt in the mouth delicious. I still remember the first time that I made it, I shared it with my neighbor Trinita and she showered me with so many wonderful words saying it tasted really delicious. Happiness is sharing, everything tastes much more yummier once you have shared it with your loved ones! ❤️
Wish I could share with all of you too 😍
Similar is with my daughter. She can’t colour alone and needs me (only me, mind you! Mr daddy is invisible to her 😅😁) to colour along with her. I guess sharing the colouring page and pencils make it much more pleasurable an activity. So, we both colour together listening to our favorite songs. Her current favorite is “Mere Sohneya” from Kabir Singh movie. Listening with her, I too love the song now (super cute music and lyrics ❤️) which is coming very close to “Tujhe kitna chahne lage” which has been my most favorite from the movie. How kids change our song choices too! 😍
On the note, sharing this sweet recipe made from my favorite Mango. Hope you all try and love it. Happy and healthy cooking! ❤️
RECIPE:
Ingredients: { About 15 small ladoos }
2 Cups Freshly grated/ Desiccated Coconut
1 Cup thick Mango Pulp (fresh/canned)
1/2 Cup Cashews
1/4 Cup Milk
1/4 Cup Jaggery powder
1 Tbsp Ghee
1/4 tsp Cardamom powder
Step by step recipe:
1. Grind 1/2 Cup Cashews with 1/4 Cup Milk to a smooth paste.
2. In a pan, add 2 Cups desiccated Coconut, 1 Cup Mango pulp, 1/4 Cup Jaggery powder along with cashew paste.
3. Now mix everything well into an even mixture.
4. Keep this pan on medium flame and cook till moisture evaporates and the mixture turns dry. Takes about 10 mins depending on the moisture content of the mango pulp. Now add ghee.
5. Remove from pan and allow to cool. Add cardamom powder and mix well.
6. When it cools, using your palms form ladoos. It will be very soft and you can make ladoos easily. If the mixture sticks to the palm, apply ghee on your palms while making ladoos.
7. Repeat the same with the rest of the ladoos. Garnish with bits of cashews for it to look pretty. 😍
Click on the image to save the recipe on Pinterest
Notes:
* If using freshly grated Coconut, dry roast in a pan first to remove the moisture and then mix in mango pulp, jaggery and cashew paste like in step 2. Do not brown the coconut though. Just light toasting will do.
* You can use both fresh or store bought mango pulp during off season. If using fresh pulp, do not grind using water. Just slice mangoes and grind the mixer without water for a thick pulp.
* During off season, I use Mother’s recipe brand of Alphonso mango pulp. It works really well for this recipe.
* You can skip jaggeryif the mangoes are very sweet. You can taste the mixture slightly and then add jaggery only if needed.
* You can use grated Jaggery in place of jaggery powder as anyhow it will melt when we cook it.
* For a Vegan version, you can skip milk and grind cashews with equal amount of water. Also you can skip ghee and use any neutral flavoured oil while greasing your palms while forming ladoos.
* Cook the mixture really well such that the moisture evaporates. Else it will be difficult to form ladoos is the mixture is sticky. But don’t cook a lot that mangoes lose flavour. It took me about 10 mins on medium flame in my cooktop.
* These ladoos are not like regular ladoos and very soft but tastes delicious.
* If you have difficulty forming ladoos even after applying ghee on your palms, then refrigerate the mixture for an hour or so. You can form ladoos easily after that.
* After a day, refrigerate the ladoos in a moisture free container.
Click on the image to save the recipe on Pinterest.
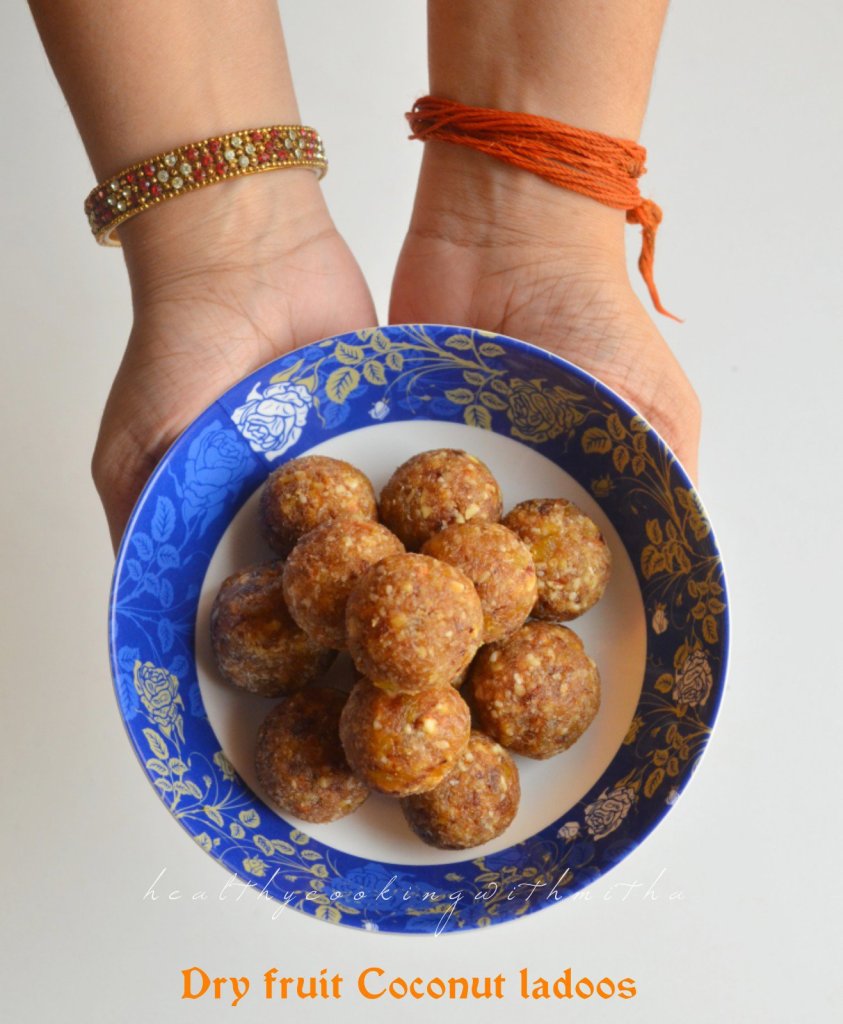
So happy to be posting this super healthy, easy to make, heavenly tasting ladoo recipe on Hanuman Jayanthi today. The thread you can see above in my hand is from Shri Hanumantha temple in Moodbidri near Udupi. It’s been around 2 years that I got it as a prasad from the temple but I am happy that the thread has not deformed nor lost its beautiful colour. Grateful to God for that. This thread is a constant reminder to me that I have Hanumanji’s blessings always and it has removed fear completely from my mind. 🙏
My devotion to Hanumanji started when we shifted to Elamakkara, Kochi when I was in 9th std. Elamakkara is a place with so many temples located very close to each other. My dad used to go to each of these temples on weekends and I would accompany him too. In the Dattatreya Swamy temple, there is a Hanumanji gudi ( a smaller temple) where I started going quite often and I always felt so peaceful standing in front of that gudi while sharing both my happiness and sorrows with Hanumanji. 🙏
During college days, I also started wearing his pendant which had Shree Ram on one side and Hanumanji on the other. Found this picture from exactly 10 years back and sharing with all of you along with the pendant’s picture as it not clear from my photo.
This picture brought back so many memories of our house in Elamakkara. ❤️ Our mandir which you can see behind, the showcase with photos and soveigners, our old computer in which I used to do my college work, the wooden sofa with velvet seating and a glimpse of our kitchen where my grandmother and mother used to make so many dishes very lovingly for me. One photo, hundreds of memories. 😍😍
Talking about photos, my devotion to Hanumanji also was through collecting his pictures, his books, his keychains, in fact anything with Hanumanji in it. I have saved all of it even now and had brought them along with me to Qatar. Looking at them makes me so so happy. Sharing a glimpse with all of you.
My treasure. ❤️🙏
There is a story behind Hanuman chalisa book in my life. During my final college trip to Hyderabad, my Amma was very scared to let me go. But for my happiness, finally she agreed reluctantly. Alongside, she prayed to Hanumanji that if I come back safely, we would give Hanuman chalisa books to my Hindu classmates (I know it might sound childish but a mother’s love is something which only a mother can understand ❤️). And you know the most divine part?
On the way to Hyderabad in the bus, while my friends were dancing, me being a very bad dancer (😅), just sat looking outside the window and what do I see! Small Hanumanji temples in every few kms!! It made me feel so happy that I wanted to call Amma then and there to share my happiness. I saw so many idols of Hanumanji together that evening that I have not seen in my entire life. Such a blissful and unforgettable experience it was! 🙏 And yes, I did reach back safely and we distributed the Hanuman chalisa books to my classmates, much to their surprise. ❤️ My best friend Sunanda still has that book which made her a Hanumanji devotee too. 🙏
Sorry for so many nostalgic stories today but Hanumanji is so close to my life that I just went on writing. Thank you so much for reading. Here’s wishing all of you a very blessed Hanuman Jayanthi. 🙏
Hope you all try these delicious ladoos for your family. Happy and healthy cooking! ❤️
Click on the image to save the recipe on Pinterest.
RECIPE:
Ingredients: { Makes 20 small ladoos }
1 Cup deseeded Dates (I used Khudri variety)
10 dried Apricots
3/4 Cup Mixed Nuts { I took 1/4 Cup each of Cashews, Almonds and Walnuts }
1/4 Cup Raisins
1/2 Cup Desiccated Coconut
Step by step recipe:
1. Soak dried apricots in hot water for about 10 mins. Also soak dates if using hard variety of dates.
2. Meanwhile, dry roast the Desiccated Coconut in a pan on medium flame till it starts changing colour and turns light brown. Immediately transfer to a bowl. (Don’t allow it to turn dark brown. Just a light colour change as shown below is sufficient.) Keep aside till use.
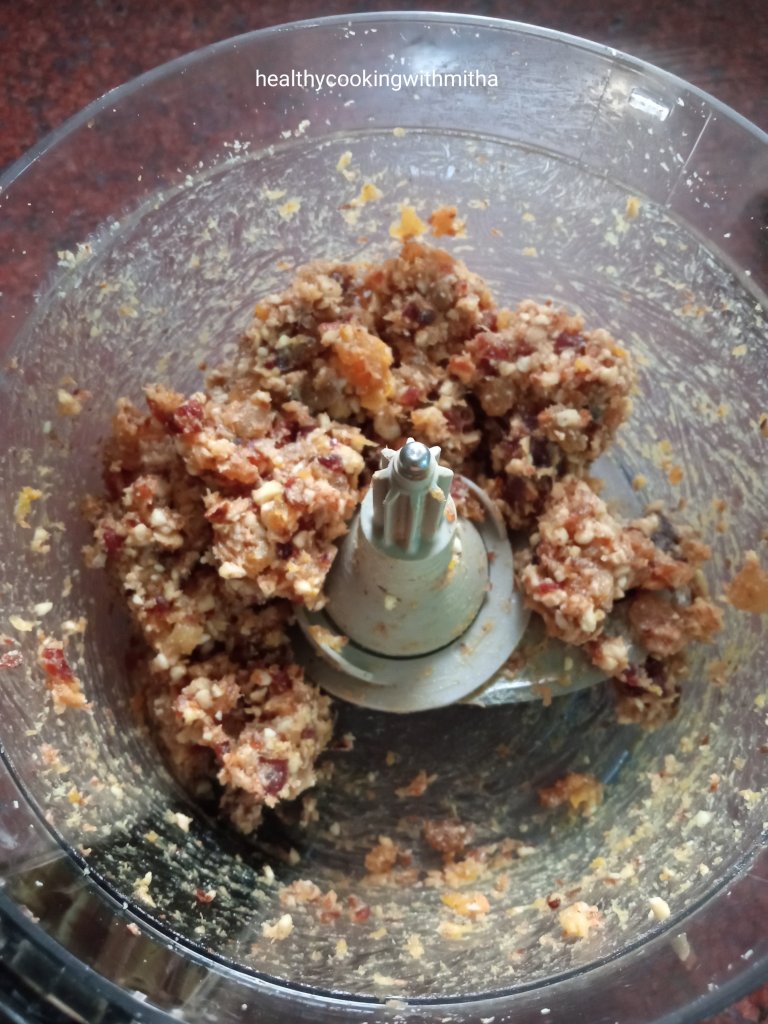
2. Add the nuts to a mixer or food processor. Also keep the apricots, dates and raisins ready.
3. Powder it coarsely, not grinding continually but pulsing in regular intervals. Took me about 5 pulses for 15 seconds each for it to get powdered coarsely. { If ground continually, it will turn into paste as nuts release oil when ground too much. }
4. Now add the drained apricots, dates and raisins.
5. Again pulse in the food processor till the mixture gets blended together to almost like a coarse paste. { Do not add water while grinding.}
6. Now add to a frying pan and heat it for two mins just till it becomes dry. Remove and keep aside.
7. Now add the mixture to the dry roasted coconut and mix well using a spatula.
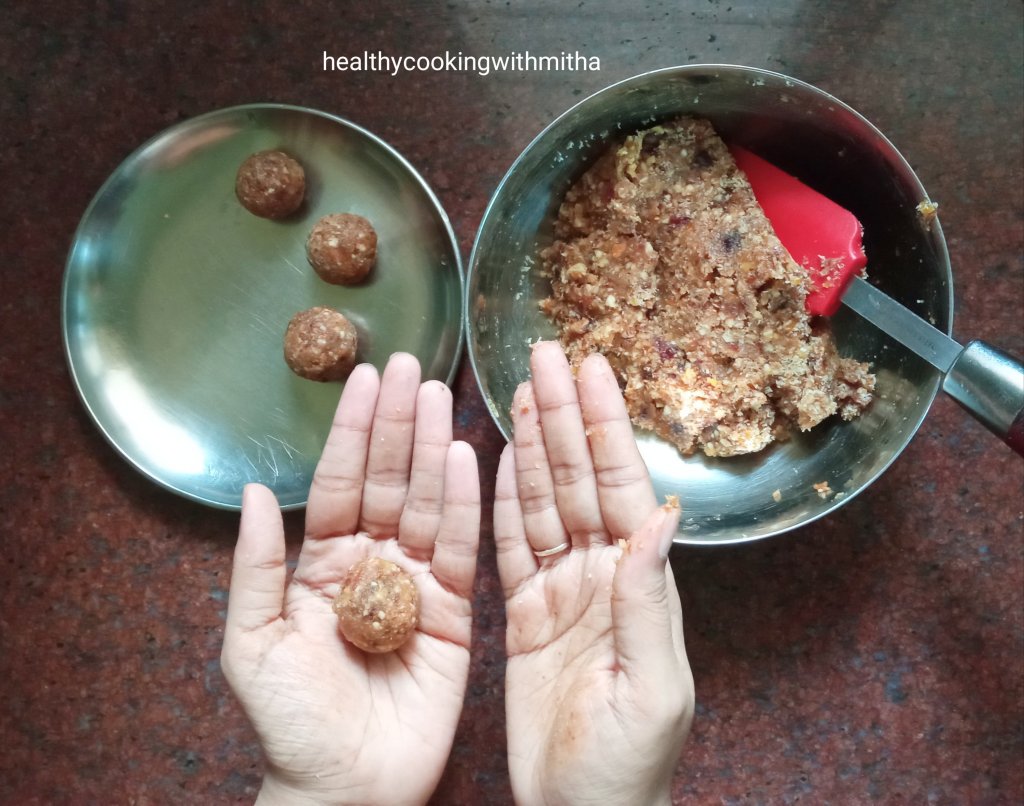
8. Once mixture has cooled slightly, make ladoos by taking little portions and shaping between your palms. These ladoos can be easily shaped by anyone as the mixture is not dry.
9. Repeat the same with the mixture. Enjoy these guilt free healthy ladoos!
Click on the image to save the recipe on Pinterest.
Notes:
* Store them in an air tight container free from moisture and it will last well atleast for couple of days in room temperature. Refrigerate after that.
* Desiccated Coconut can be substituted with freshly grated coconut. Just that it will take a little while longer to get brown colour.
* If using hard variety of dates, soak it in hot water for about 10 mins or till it turns soft.
* If you don’t have dried apricots, substitute with 1/2 Cup more of Dates. So total 1 1/2 Cup Dates in the recipe.
* In the 3/4 Cup nuts, you can use any variety of nuts. I used a mix of Cashews, Almonds and Walnuts.
* You can use either golden or black raisins.
* If you don’t want to use coconut, just skip it like I do for my Dry fruit bites.
* If you don’t want to make them as ladoos, spread onto a plate and cut once it gets hard. I do that for my Dry fruit bites.