Click on the image to save the recipe on Pinterest
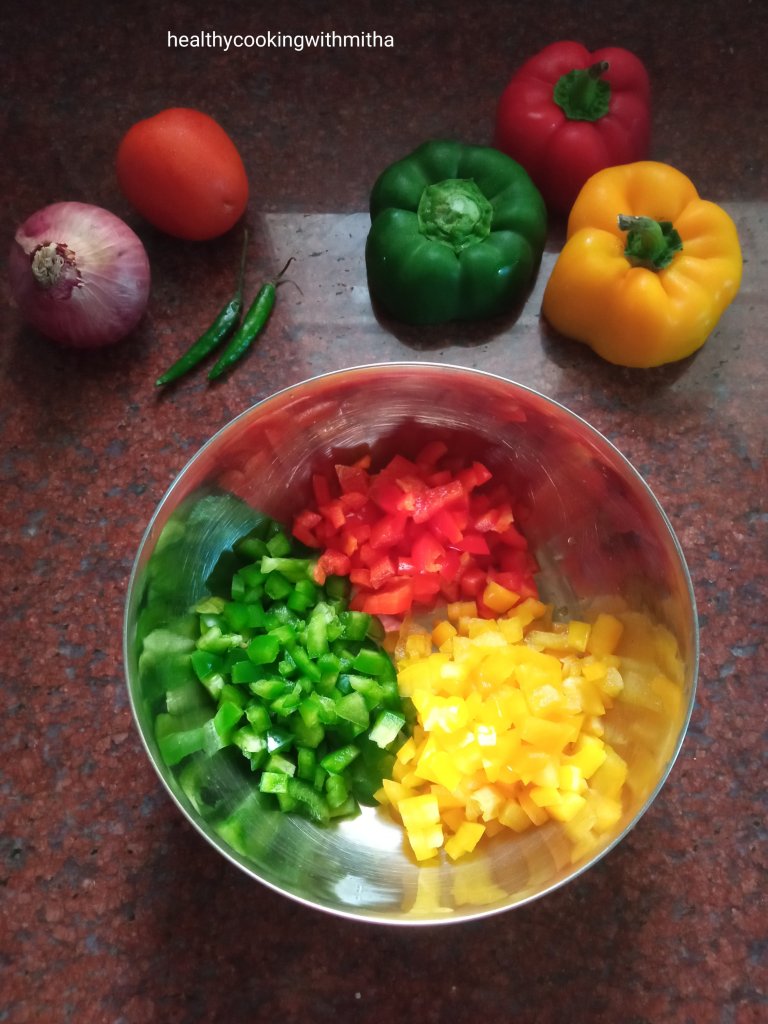
Tri colour Capsicums always attracted me when I went for grocery shopping but it used to be super expensive and I never felt like buying it. Recently Qatar has been growing a variety of veggies locally and hence we have been getting even expensive vegetables like Broccoli and coloured capsicums considerably cheaper. Also just see how fresh they are! 😍
So, whenever I get my hands on them, it’s either this salsa or fried rice. Both ways, it is consumed happily by my kids which is most important for me whenever I cook something. With salsa, I present it to them with nachos for evening snack and they munch it on happily. ❤️
Also, these capsicums are best when they are had raw with their flavours intact. Cooking them leads to make it soft and is not as fresh. So my preferable way to use these capsicums is by making this salsa which we have as an accompaniment with rice meals as well. Tastes so yum. ❤️
Hope you all try and love it too. Happy and healthy cooking ❤️
RECIPE:
Ingredients:
1/2 a medium sized Green Capsicum
1/2 a medium sized Yellow Capsicum
1/2 a medium sized Red Capsicum
1 medium sized Onion
1 medium sized Tomato
3 Green chillies
1/4 tsp Pepper powder
Salt to taste
Juice of 1 Indian lemon or half of large lemon
Finely chopped Coriander leaves, for garnish
Step by step recipe:
1. Finely chop the three capsicums and add to a mixing bowl.
2. Now add finely chopped Onion, tomatoes and green chillies to it.
3. Add finely chopped Coriander leaves, salt, pepper powder and lemon juice. Mix well. Taste and adjust the lemon juice and salt as needed.
4. Done! Enjoy as a salad or as a salsa with Nachos. ❤️
Click on the image to save the recipe on Pinterest
Notes:
* The above measurement serves 4. If you are making for more people, just use three whole capsicums and about two tomatoes and two onions.
* You can skip green chillies if making for small kids. I remove green chillies before giving to my kids.
* You can also add a dash of red chilli powder for more spice but we love this as it is.
* I also serve it as a side along with rice meals and the salad gives a nice, fresh crunch to the meal.
Click on the image to save the recipe on Pinterest
It’s been more than two months that I have blogged a new recipe (Too long a break, I know!😀). But sometimes you just want to get away from the same schedule of life and do something different. For me, in these two months, I enjoyed a lot with my kids. I made reels with them with funny Instagram filters (did not post them but made it just for fun.. their smiles on seeing them as Tigers and Donkeys were super cute 😍😍), played football with my son, did a lot of drawing and colouring with my daughter, danced like crazy everyday with both the kids and cooked whatever they wished for. ❤️
Since it was my daughter’s vacation, I made it my vacation as well 😅. Had a fun couple of months sleeping till late in the morning and watching my favorite songs on repeat. ❤️
So now that her classes have started with alternate weeks of online and physical classes, I said enough of my break and restarted blogging. What’s better to start than this salad which both my kids love a lot. ❤️
Purple cabbage has this unique flavour and crunch which tastes so good when made as a salad. Usually coleslaw recipes use Mayonnaise but I have substituted it with yogurt to make it vegetarian and of course healthy. Hope you all try and enjoy it. Happy and healthy cooking! ❤️
Special thanks to those who missed me and pinged me to ask why am I not blogging. It was so nice of you all and I appreciate it with all my heart. Loads of love. ❤️
RECIPE:
Ingredients:
1/2 Cup Purple cabbage, finely chopped
1/2 Cup regular cabbage, finely chopped
1/2 Cup Carrots, peeled andgrated
1/2 Cup Capsicum, finely chopped
2 Tbsp thick yogurt (or hung curd)
1 tsp Vinegar (or lemon juice)
Pepper powder to taste
Salt to taste
Step by step recipe:
1. Take the finely chopped cabbages, Capsicum and grated carrots in a mixing bowl.
2. Now add thick yogurt, salt, pepper powder and vinegar. Mix well.
3. You are done. Serve immediately or chilled as it is or as an accompaniment with rice.
Click on the image to save the recipe on Pinterest
Notes:
* You can also add onions, lettuce or coloured capsicum if you want but I make this way.
* This salad is best consumed the same day when made as when kept in refrigerator and consumed next day makes it taste slightly bitter due to the purple cabbage.
* Make sure to use thick yogurt. If your yogurt or curd is thin, sieve it to remove water content and add to the salad.
* Pepper powder and vinegar are to taste. You can add as much or as less as you desire.
* This salad acts as an excellent sandwich filling. My kids love it a lot. ❤️ I add a little more yogurt to it, a little ketchup and fill in sandwiches.
This salad recipe is so simple that I thought twice before adding on the blog wondering if anyone would actually even look at this recipe. But then I thought, even if one person benefits by it, then the blog is worth it. So here is sharing the easiest salad recipe ever and definitely very healthy too since it has so many vegetables in it. ❤️
Click on the image to save the recipe on Pinterest
My kids are huge fan of this salad and this whole bowl that you can see above is finished mostly by them only. They enjoy it as it is and then add puffed rice or Bhel to it, calling it “Charmbure Upkari” or Bhel Puri in Konkani. Whatever they call it, I am very happy that all these vegetables go into their tummy without a fuss. ❤️
When I was a child, my grandmother used to make a simple salad with just tomatoes, onions, green chillies and coriander leaves. After a while of making it, it would leave water due to salt in it and I used to love to slurp that water. 😍 Now my son is the same. The water left by the salad is reserved only for him and he enjoys drinking it. Like mother, like son. ❤️❤️
Today, I also want to share a glimpse of my mother’s window which is her view of the outside world. Suffering from muscular dystrophy in her legs, she’s mostly sitting on her bed and this window is her best friend which offers her beautiful views of mother nature, the gleaming sky, different varieties of birds and butterflies, also of cows grazing. This picture was clicked by Amma today. Isn’t it beautiful! ❤️
Also, here is a picture of a pigeon, one among the many who come to visit Amma. How sweet is that! 😍
During my vacations, I used to lie on this bed, chatting with Amma while looking outside at nature, enjoying the beautiful scenery. Major missing since close to two years now. But really happy that Amma has this window as her friend, which makes her feel close to nature, even from within her room. That’s so blissful! ❤️
On this note, here’s sharing the recipe with all of you. Hope you all try it too. Happy and healthy cooking! ❤️
RECIPE:
Ingredients:
2 English Cucumbers (about 2 cups chopped Cucumbers)
1 medium sized Carrot (1 Cup grated Carrot)
1/2 Cup grated Cabbage
1/4 Cup finely chopped Capsicum
3 Lettuce leaves, chopped into small pieces
1 medium sized Onion
1 medium sized Tomato
3 Tbsp finely chopped Coriander leaves
2 Indian lemon or to taste
1/4 tsp Cumin powder
Salt to taste (I use rock salt/ kaala namak)
Step by step recipe:
1. Get all the veggies for the salad ready. I love to keep everything set at first so that I don’t forget any of the Vegetable and also love how colourful it looks. 😍
2. First chop the cucumbers into small pieces and add to a large mixing bowl. Then peel and grate carrots, finely chop cabbage, capsicum, onion and tomato. Make small pieces of lettuce and add to the bowl too.
3. Now add lemon juice along with salt, cumin powder and coriander leaves. Mix well and serve.
Click on the image to save the recipe on Pinterest
Notes:
* If using Indian cucumbers, it will need peeling and removing the core. Since I used English Cucumbers, I do not peel it.
* You can skip any Vegetable in this if you don’t have. I add as per what I have available.
* You can also add green chillies or pepper powder. I skip both as I make for my small kids.
* This salad acts a good base to make Mixed Vegetable sandwiches. Just take little of this salad and mix either hung Curd or cream cheese along with little tomato ketchup. Mix well and spread between bread slices. Toast on a pan and delicious sandwiches are ready.
* Also you can use this salad to make Mixed Vegetable Bhel Puri. Just take a little of this salad and mix in red chilli powder to taste along with little curd, puffed rice/ Bhel and Bhujiya/ Sev. Add Date Tamarind chutney too if you have.
* These are the other Salads that I make regularly:
Click on the image to save the recipe on Pinterest
There was a time when I used to make only one or two curries for our matta rice meals. Since I cook the matta rice very soft like a gruel, a side dish would be sufficient to enjoy a simple dinner. Don’t know when I started cooking more, maybe lockdown effect 😄 or to deviate my mind 😅 or listen to more music 😍, I now make atleast 3 to 4 varieties of curries daily. It makes me very happy to see the thali with different colours and nutrients too.❤️
My son is also a huge fan of his plate filled with curries and says, “Amma, Wow 😍” when I bring his meal to feed him. I am glad that this boy needs no extra efforts to make him eat veggies. He already loves vegetables (even traditional ones) so much that I am sure he was a farmer in his past life and a Konkani for sure. 😅
As for me, due to him, I too have learned to like these vegetables which I did not like as a kid (Amma, true na? 😂). So, as a mother, at 31 year old, I am learning healthy eating habits from my 2.5 year old son ( how cool is that 😄). But honestly, not only this, if I have learned to be happy at the simplest things, it is through my kids, if I have learned to enjoy life with whatever we have, it is through them. Even if I scold them, they still come back to me with the same amount of love and hug me saying, “Love you, Amma”. That forgiving, non judging, free thinking, trusting nature of kids and the innocence, which gets lost as we grow up, have to be learned from kids. Maybe that’s what is a part of the circle of life. ❤️
So, on this thoughtful note, sharing the recipes with Banana stem. Hope you all like it. Happy and healthy cooking!
RECIPE:
Ingredients:
Banana stem (inner pith)/ Gabbo as available {mine was 35 cm in length}
For Kosambari:
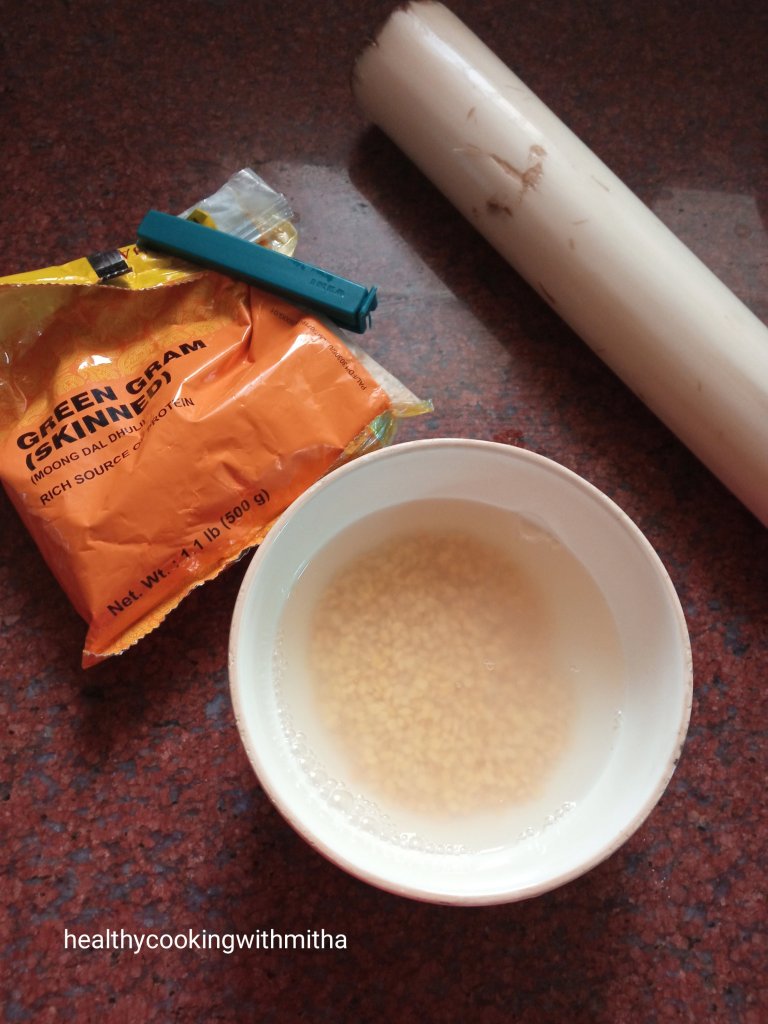
1/4 Cup Moong dal
1 Cup finely chopped Banana stem
3 Green chillies
2 Tbsp Coriander leaves
2 Tbsp grated Coconut
A pinch of Hing/ Asafoetida
1 tsp Oil, 1 tsp Mustard seeds, A sprig of Curry leaves – for seasoning
Lemon juice from 1 Indian lemon for garnish
Salt to taste
For Salad:
1 Cup finely chopped Banana stem
1 Cup Curd / Yogurt
2 Green chillies
Salt to taste
1 tsp Oil or ghee, 1 tsp Mustard seeds, 1/2 tsp Cumin seeds, A sprig of Curry leaves – for seasoning
Step by step recipe:
1. First wash well and soak the moong dal in enough water and keep aside till use. This is for the kosambari.
2. Next, wash the Banana pith well. I get the outer parts of the stem already removed. So I don’t have pictures of how to remove that. Please check YouTube videos on how to use banana stem if using for the first time. Cut into roundels while removing any fibres which may come out. Immediately put in a vessel filled with water as shown.
3. Now finely chop these roundels and add little to a bowl for the salad. Also add finely chopped green chillies.
4. Now add curd and salt. Mix well.
5. Season oil or ghee by spluttering mustard seeds and adding cumin seeds and curry leaves. Pour this seasoning over the salad. Mix well. Salad is ready.
6. For the Kosambari, now again finely chop the banana stem and add to the soaked, drained moong dal along with green chillies and coriander leaves.
7. Now add coconut along with the seasoning of mustard seeds and curry leaves in oil.
8. Add lemon juice and salt. Mix well. Kosambari is ready.
9. For the Gabbe Upkari, cut the rest of the Banana stem into long pieces. Heat about 2 tsp Oil in a pan. Add a pinch of Hing along with 3 to 4 broken red chillies and the chopped Banana stem pieces with salt and little water. Cover and cook till the stem pieces turn soft. Garnish with grated Coconut and mix well.
10. Serve the Banana stem salad, Banana stem Kosambari and Upkari with rice meals.
Notes:
* I also make a simple sambar along with these three dishes as it makes a great combination and a very wholesome meal.
* Remember to remove the outer parts of the Banana stem if you have the stem with outer parts intact. Check YouTube videos on how to use Banana stem. I get it with the innermost pith in my nearest supermarket.
* While chopping the pith, you will get some fibres come out. Discard it.
* Keep the chopped pieces in plain water or tumeric water till use, else the pieces turn black very quickly.
* Don’t worry about using banana stem without cooking it in salad and Kosambari. It can be had raw and tastes really good too. Just chop it very finely.
Click on the image to save the recipe on Pinterest.
Click on the image to save the recipe on Pinterest
As my kids are finally asleep, I can sit to write a new recipe now. A recipe I had been wanting to add to the blog since long but could not find time. With Eid holidays going on here, kids sleep till late in the morning and thus, my son skips his evening nap. Him skipping his nap = I don’t get time to sit for long in a place = I can’t blog. So night time is blog time as of now. 😄
Is night time also a time for deep thoughts for any of you? (or is it just me 😅) I find the silence of night so peaceful and comforting that I get time to talk to the divine, to understand myself, to over think (😄), to listen to my favorite music and to relax too. After all this, when I finally sleep, I dream a lot, also remembering my dreams completely when I wake up. I see myself going back to my school days, my college days, the tension of exams, the fun of enjoying with my friends, chatting with Amma along with seeing people close to my heart, in my favorite places like the mountains and beaches, every night in my dreams. ❤️ I feel very happy when I wake up that, so what if I can’t see them for real, atleast they visit me in my dreams. 😍 So, thank you my dream companions for coming in this crazy girl’s dream world. 😄❤️
So that was about night time which is my own “me” time. And what about my day time? Here is a glimpse into it:
My son making towers, cars, trucks, ships, tents, caves, houses, see saw, slides and what not with our sofa cushions. 😂😂 These cushions are his inhouse park and me being a child with them, don’t stop him too 😅 (I just see that he does not go overboard and is safe.) He has taught his elder sister as well and both of them enjoy making their own creations with these cushions. 😍
By the way, did any of you notice his dress? Yes, he loves wearing his Akka’s frock, specially this red one. Reminds me of how my brother used to love wearing my dresses too as a kid. Such wonderful memories. ❤️ His sister also adorns him with necklaces and accessories to doll him up. One of their favorite games. Look at him admiring his bangle. 😍
My daughter also loves to draw and colour, which can be clearly seen from the first picture above. Almost all of our walls are stuck with her paintings. She also likes to create various dress designs and here is one among them. I admire her for her creative ideas in art and craft, which I lack completely. 😂
So these two bundles of joy (sometimes also the reason for my 1 minute angers 😂😂) make my mornings worth waking up and are huge entertainment in my daytime. I don’t realize how my day passes with them. Also, I am so glad they have each other for company in these home bound times. ❤️❤️
Finally after my long chatter, here’s sharing the recipe of this simple yet very delicious Cabbage Kosambari which I learnt recently from my dear friend, Ambratha Shenoy. This is too tasty for words and definitely a must try recipe. Hope you all like it too. Happy and healthy cooking! ❤️
Thank you Ambratha for sharing this recipe! ❤️🙏
RECIPE:
Ingredients:
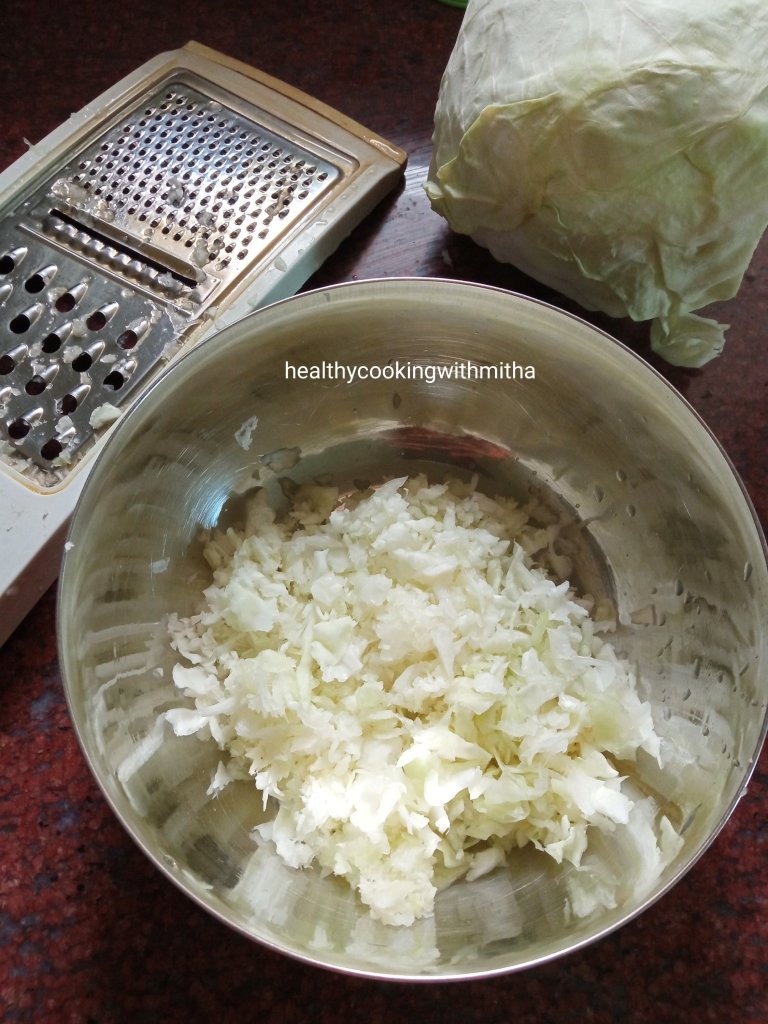
2 Cups grated Cabbage
1 medium Onion, finely chopped
3 Green chillies
1/4 Cup finely chopped Coriander leaves
3 Tbsp freshly grated Coconut
Juice from 1 Indian lemon or to taste
Salt to taste
Step by step recipe:
1. Take the grated Cabbage in a mixing bowl. { I grated the cabbage as much as possible and finely chopped the end pieces}
2. Now add finely chopped onion, green chillies, coriander leaves, coconut and salt.
3. Add lemon juice and mix well.
4. Mix well and serve as an accompaniment to meals.
Click on the image to save the recipe on Pinterest
Notes:
* Try to serve freshly made as much as possible as onions may start to leave water if kept for long as it has salt in it. Else you could salt just before serving.
* You could increase or decrease lemon juice and coconut as per your taste.
* Instead of grating cabbage, you could also very finely chop it. I combine both ways. Grate as much as I can and then finely chop the end pieces.
* Tastes very good as an accompaniment to rice meals.
* You could also try these three South Indian style salads that I make regularly:
Click on the image to save the recipe on Pinterest
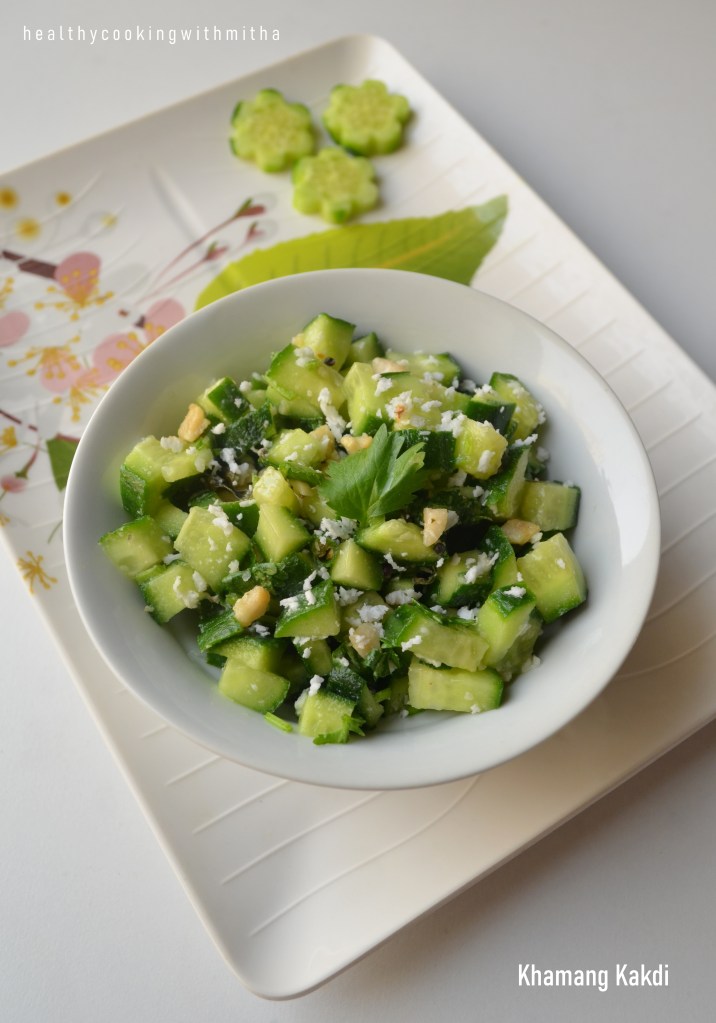
Mr Google says Khamang means savory, tasty, spicy in Marathi and Kakdi means cucumbers. That’s exactly what this salad is! Savory spicy tasty cucumber salad. I have been making Khamang Kakdi since many years now and it is my 2.5 year old son’s favorite salad. Whenever I make it, he has to eat it as soon as it is done, along with his meal and afterwards, with my meal too. 😅😅 In short, most of this salad goes into his tummy. 😍
My mother will not be pleased to read this, I know, 😅 as she always wants me to eat well. That’s why I keep updating her over voice messages whatever I eat all throughout the day. It makes her happy and she sends all the possible love smileys in the world to show her joy. 😍❤️
We can’t talk for hours like before or video call as her grandkids snatch the phone from me to talk to their “moga mamama” (loving grandma). So we just send voice messages to each other. I give her updates regarding what I am doing every hour and she does the same. Our day starts with good morning to each other and ends with good night kisses. That’s what is called true love, being far from each other physically, yet closest to one another, in thoughts, in feelings and in heart, not separated ever. ❤️
Writing the above line just overwhelmed me to tears and I won’t be able to write anymore.. This girl with loads of thoughts, feelings, memories is never going to change.. ❤️
Hope you all try this easy cucumber salad, Khamang Kakdi. Happy and healthy cooking!
RECIPE:
Ingredients:
3 regular sized English Cucumbers (or 1 Indian Cucumber)
1/4 Cup Peanuts
1/4 Cup freshly grated Coconut
3 Green chillies
3 Tbsp finely chopped Coriander leaves
Lemon juice from 1 Indian lemon or to taste
Salt to taste
For seasoning:
2 tsp Coconut oil
1 tsp Mustard seeds
5 to 7 Curry leaves
A pinch of Hing/ Asafoetida
Step by step recipe:
1. Dry roast the peanuts in a pan till it browns. Allow it to cool. Now using a mortar pestle, crush it to a coarse mixture. Keep aside.
2. Take chopped cucumbers, green chillies, coriander leaves and coconut in a bowl. Add salt.
3. Now add the crushed peanuts to this. Also, heat oil in a pan. Splutter mustard seeds, add curry leaves and hing. Pour this seasoning over the cucumbers.
4. Add lemon juice and mix well. Do a taste test for salt and also add more lemon juice if you like.
5. Serve with rice meals or enjoy as it is!
Click on the image to save the recipe on Pinterest
Notes:
* I used English Cucumbers which do not need peeling. If using Indian cucumbers, peel and remove seeds. Then chop and use.
* You can make ahead and keep at room temperature. Maybe add salt later if your cucumber leaves a lot of water after adding salt.
* I also make this Moong dal Kosambari regularly with cucumbers and carrots. You can check that.
Click on the image for the recipe
* Another Konkani style salad that I make always is Carrot Kismuri.
Click on the image to save the recipe on Pinterest
Soup takes me back to the piping hot tomato soup in paper cups that used to be served during our 3 day long train journey to Bombay. My uncles lived there and we used to be so excited, waiting for the train to reach the destination yet enjoying every bit of the journey too. Me and my brother would sit close to the window seat, watching trees, fields and mountains pass by, counting the number of bogies in goods trains while waiting for food hawkers to come, to buy their snacks. 😍
Among them, tomato soup used to be sold early in the morning and I specially would wake up early for it (sacrificing my precious sleep for that delicious soup 😅). As soon as they started calling out, soup.. soup.. I would wake up my father asking him to buy one for me (spoiling his sleep too 😬). But the feel of drinking that tasty hot soup while looking outside the window of the train, enjoying nature come alive early in the morning with the background music of birds chirping, is something which can’t be replicated at all. Which is why even after so many years, it is as fresh in my memory. ❤️
After that, if there is any soup I loved, it is my mother’s tomato soup. I can never forget how lovingly she made it and we used to enjoy it together in small steel bowls with mickey mouse spoons (😍) sitting together chatting away (major missing 😭).
It is the same recipe that I am sharing today but have included barley in it too. Barley was brought home by my husband as he wanted me to taste it after eating it in his company “canteen” (as he calls it but it is no less than a restaurant which offers so many delicious options in the buffet). He said soup and salad with it tastes delicious and I looked through few recipes on how to cook it and combined it with Amma’s soup recipe.
It tasted really good and I loved the soft texture of Barley. Funniest part is when I made the soup for the first time and was serving my son, he asked me what was in the other bowl too. I said salad. He asked me to mix both in his bowl. I told him that’s not the way to eat it but he still was confident he wanted to eat it that way. 😅 So I gave in and served him exactly that way. (Tip to survive motherhood: Give in if it’s safe to do before tantrums start. 🤣)
And he could not stop saying “Amma, yummy!!” with every bite while I was very surprised at this weird combo. 🙄 Then, when we tried it, it was delicious for real. 😄 The bite of cucumber, carrots and onion gave a great texture as well as flavour to the soup. Since then, we have been eating this soup the same way. 😀 Huge credits to my two year old boy for showing us the right way to enjoy this soup. 😍
Sorry for the super long write up. Did not realise how lengthy this turned out to be but don’t feel like cutting it short too. You can always skip if it bores you. 😁 Hope you all try this healthy, filling and tasty soup. Happy and healthy cooking!! Happy winters too. The best time to enjoy soup! ❤️
RECIPE:
Ingredients: { Serves 4 }
1/2 Cup Barley (I make both soup and salad using this measure)
1/2 a large Carrot (about 1/2 Cup chopped)
1 medium sized Tomato
1 small sized Onion
Red chilli powder to taste
Salt to taste
Step by step recipe:
1. Wash barley well and soak in about three times water overnight or for 6 to 8 hours. This makes barley soft and aids in digestion too.
2. Then drain water from it and add to a pressure cooker. Add water a little above the level of barley (about 2 cm) and pressure cook till soft. It takes me 1 whistle on high flame and then reduce to medium flame and keeping for 10 mins. It gives me perfectly cooked barley.
3. At this point, I remove 1/2 Cup of this cooked barley and add to my salad (will share the recipe of that in the notes towards the end of the recipe.) It leaves me with 1 Cup of cooked barley. Just add chopped carrot, onion and tomato along with 1/2 Cup water.
4. Pressure cook for about 3 whistles on high flame or cook till the carrots turns soft. Allow it to cool.
5. After it cools down, puree it in a mixer. Leave some cooked barley without pureeing as it gives a wonderful bite to the soup. I leave about 1/2 Cup of cooked barley.
6. Now add the blended puree back into the pressure cooker and add red chilli powder and salt. Also add water to make it into your desired consistency. Bring to a boil and cook for about two mins. Soup is ready! Garnish with Coriander leaves. Serve with croutons or bread sticks.
Notes:
* You can garnish with butter, cream or pepper or anything you like. I make it very basic as my kids love it this way.
* My son enjoys this soup along with salad in one bowl. It makes for a tasty and filling snack or a meal in itself.
* For the barley salad, add finely chopped cucumbers, onions, tomatoes, carrots, coriander leaves and green chillies (optional) in a bowl. Add cooked barley with salt, pepper powder and lemon juice. Mix well.
* Barley absorbs a lot of water when pressure cooked. So add atleast about 2 cm level of water more while pressure cooking it.
* I soak Barley when I remember. Drain the water after 8 hours and refrigerate. This lasts well for couple of days. So when I need to make it, I already have the soaked barley. So can make both the soup and salad instantly.
* Adding more carrot or onions can make the soup very thick and sweet. So if you are not a fan of sweet soups, you can reduce the amount of both.
* Don’t add all the barley while pureeing. Save half of it as it gives a good bite to the soup.
* The soup thickens as you keep it. So if you are making ahead, you might need to add little water to bring it to desired consistency.
* These are the other soups that I make regularly.
Click on the image to save the recipe on Pinterest
Most days, our dinner is just ukde pej (matta rice cooked soft, eaten with its gruel) and couple of accompaniments to go with it. As much as it may seem from my posts that I cook a lot, our daily meals are very simple and basic.
One of the reason why I don’t (or rather can’t) cook elaborate meals are my kids who hardly give me time in the kitchen (I know it’s hard to believe 😀). My son pulls my dress (he literally roams around behind me with his fingers clutching my dress 😂 #fevicolkajod 😅) asking me to play football with him while my daughter who loves colouring asks me to draw something for her to colour (One is making me a footballer and the other, an artist 😬😬).
But my time passes very well and both the activities are so good to calm the mind. Never knew drawing is such a stress reliever. And about football, try playing it with a two year old who knows only to laugh when you kick the ball. It’s such precious source of happiness that I can’t thank God enough for blessing me with both of them. ❤️
And on days when they don’t leave me to cook at all, this carrot kismuri or Konkani style salad is our accompaniment for the day. Very quick to make, hardly taking 10 mins and tastes heavenly with pej and some pickle to go with it. The kids love it very much which makes it a perfect side dish for busy days.
Hope you all try and love it too. Happy and healthy cooking!
RECIPE:
Ingredients:
2 large Carrots, peeled and grated (about 2 Cups grated carrots)
3 Green chillies or to taste
1/4 Cup freshly grated Coconut
3 Tbsp finely chopped Coriander leaves
Juice from 1 1/2 Indian lemons
Salt to taste
For seasoning:
1 tsp Coconut oil
1/2 tsp Mustard seeds
A pinch of Hing or asafoetida
One sprig of curry leaves
Step by step recipe:
1. Take the grated carrots in a large mixing bowl. Add grated coconut, green chillies, salt and lemon juice.
2. Now heat oil in a pan and splutter mustard seeds, add Hing and curry leaves. Fry till curry leaves turn crisp. Pour seasoning over the carrots. Mix everything well. Done!
3. It’s really that simple. Serve along with white rice and rasam or matta rice gruel with some pickle. Trust me, it tastes delicious!
Notes:
* You can add finely chopped onions to this too but I skip as after a while, it starts smelling. If made without onions, I can make even couple of hours beforehand and keep at room temperature.
* Some people add a tsp of Urad dal to the seasoning but I prefer only mustard seeds in it.
* If you add soaked moong dal and cucumbers to this, it becomes Kosambari which is another accompaniment that I make regularly. You can check the recipe here.
Click on the image to save the recipe on Pinterest
Click on the image to save the recipe on Pinterest.
I have been blogging continually for a week now and my readers must be wondering what kind of energy has got into me 😅. Actually I realized how much time I was wasting in overthinking and felt it was best if I deviate my time towards something productive. So here I am with my son sleeping in my arms completing his evening sleep while I am blogging with my favorite songs in the background on spotify instead of random browsing or feeding my moody thoughts (which are sometimes too much to handle for the sensitive me 😬).
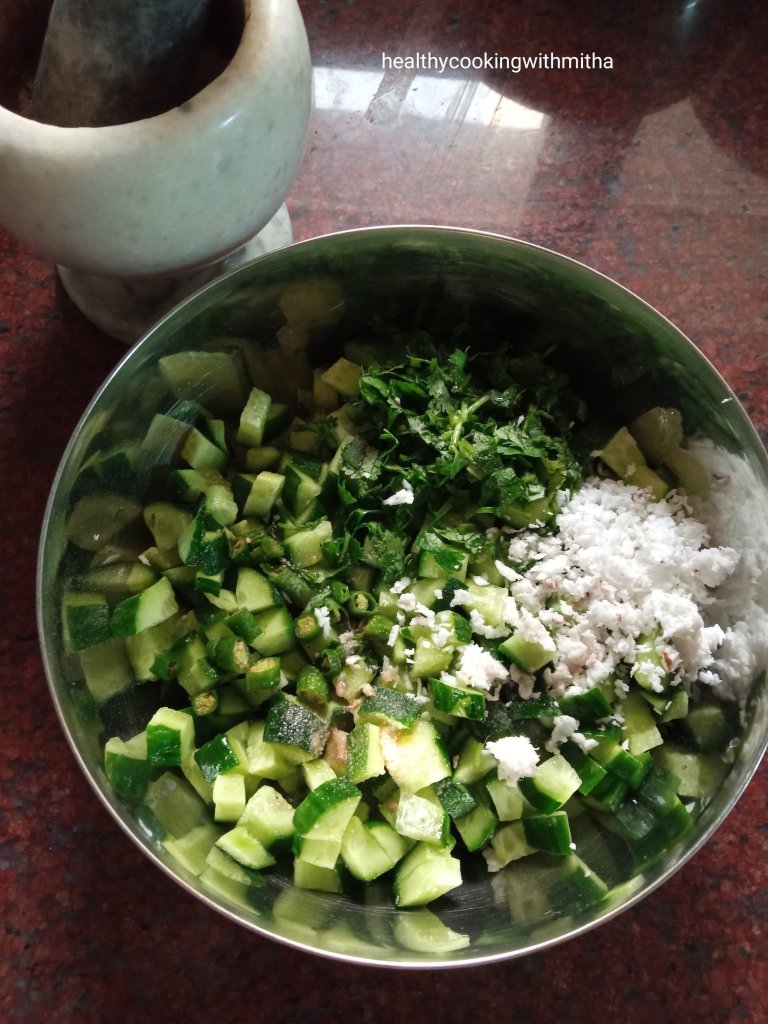
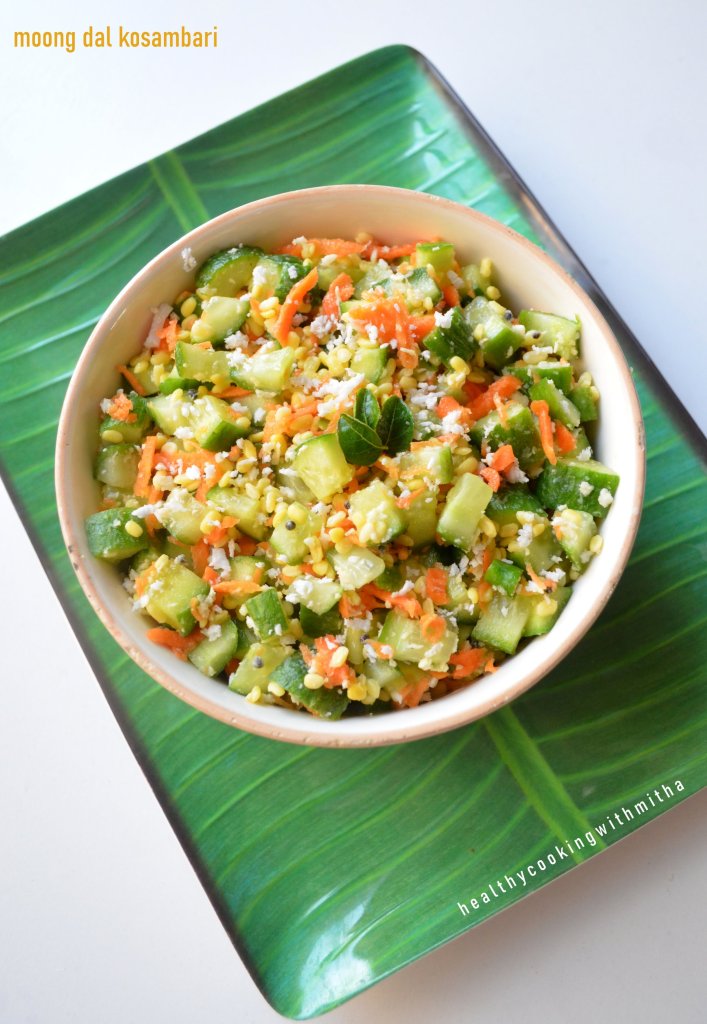
This kosambari is my favorite accompaniment to our rice meals. It is quick to assemble, very healthy with protein rich moong dal and tastes yummy too. People from Karnataka and Konkanis know this as they have grown up eating it at home, in temples and even in weddings.
There are many variations but this is how I make kosambari. It can beat any exotic salad in terms of taste and I am sure will won’t be able to stop eating it. It’s a favorite of my family and I have to make a huge bowl of it. Even then I hardly get to eat couple of spoons of it (my son comes when I eat my dinner and finishes off my share of the kosambari too 😂).
Hope those who don’t know will try and love it. Happy and healthy cooking!
RECIPE:
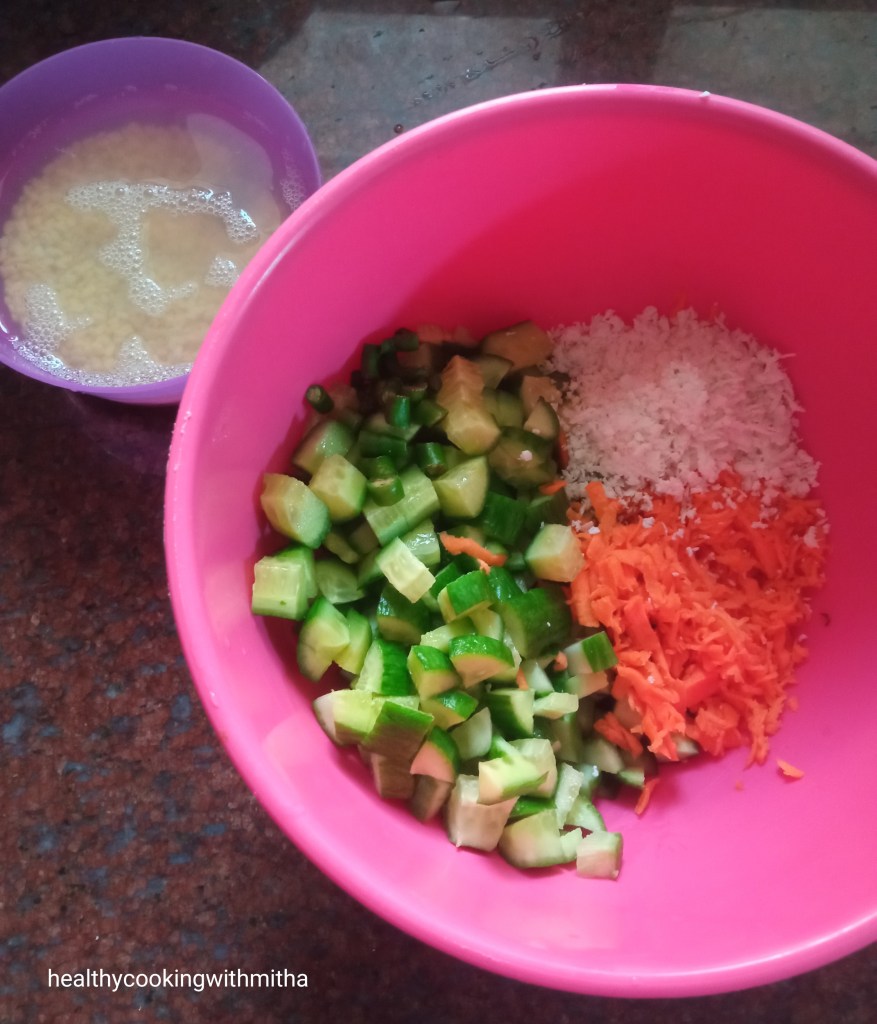
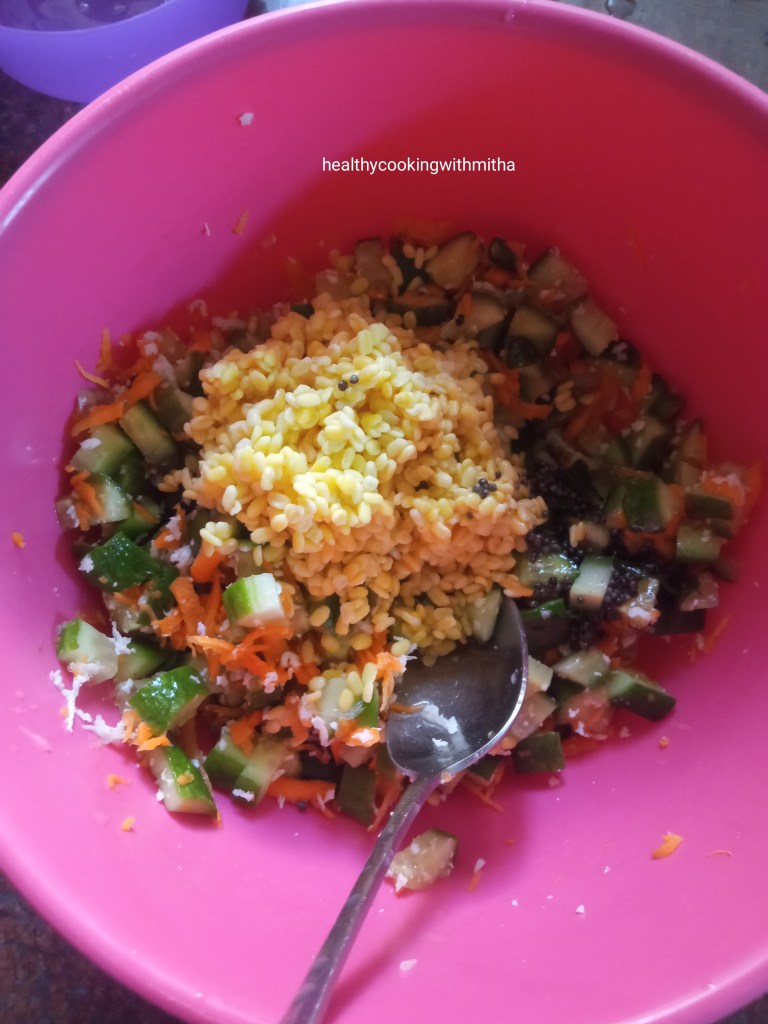
Ingredients:
1/4 Cup Moong dal
3 English cucumbers ( I use them as Indian ones are rarely available here)
1 Carrot, peeled and grated
3 Green chillies or to taste
3 Tbsp freshly grated coconut
Juice of one Indian lemon
Salt to taste
For seasoning:
1 tsp Coconut oil
1 tsp Mustard seeds
Few curry leaves
A pinch of Hing powder
Step by step recipe:
1. Soak moong dal in almost double the amount of water for about 30 to 45 mins. It will swell in size and when you bite, there will be no rawness in it. Then you can use it. Meanwhile, also wash well and chop cucumbers. Add cucumbers, grated carrot, green chillies and grated coconut in a mixing bowl.
2. When the moong dal is soaked, drain water from it completely and add to this along with salt.. Also heat oil in a pan, splutter mustard seeds and fry curry leaves slightly in it. Add Hing powder too. Then pour the seasoning over this.
3. Finally add lemon juice and mix well.
4. Serve with rice meals or enjoy as it is.
Note:
* Make sure to soak the moong dal well. When you taste and see by 30 mins, you will know whether it has rawness or can be eaten. If you feel it’s still raw, soak for more time. Anyhow, by maximum one hour, it will swell well and will be ready to be added to the salad.
* You can make this with cucumber alone or carrot alone but I love mixing both as it gives a good flavour and looks good too.
* Goes well as an accompaniment with rice and rasam.
Click on the image to save the recipe on Pinterest.
After my last post of Vastad rotti (pan fried version of Mangalore Buns), I was reminded of another Konkani delicacy which I used to literally beg my grandmother to make. It is this Vaingana bhajji. She used to make with green brinjals (or gulla in Konkani/Kannada) and it tasted so heavenly that I could eat it as it is without rice.
Since we hardly get green brinjals here, I use purple ones for making Bajji. Also traditionally, the brinjal is roasted over gas or wood fire and then mashed after removing skin. If you have the option, then you can do it too. But since we have an electric cooking range, I boil it in water and mash it. My grandmother did this way too and as Amma says, this is much easier (mothers always want less work for their kids and Amma told me to try this way 😁). Life became easier after that and Bajji became our regular dish when we got fresh brinjals.
We love simple meals and this is an accompaniment which is very flavorful yet very basic. Hope you all try and love it too. Happy and healthy cooking!
RECIPE:
Ingredients:
1 large Purple Brinjal or 2 medium sized Green Brinjal or 3 small purple brinjals (about 2 cups chopped)
1 medium sized Onion, finely chopped
2 to 3 green chillies, finely chopped
1/2 tsp Hing or Asafoetida powder
2 tsp Tamarind paste
1 Tbsp Coconut Oil
Salt to taste
3 Tbsp chopped coriander leaves
Step by step recipe:
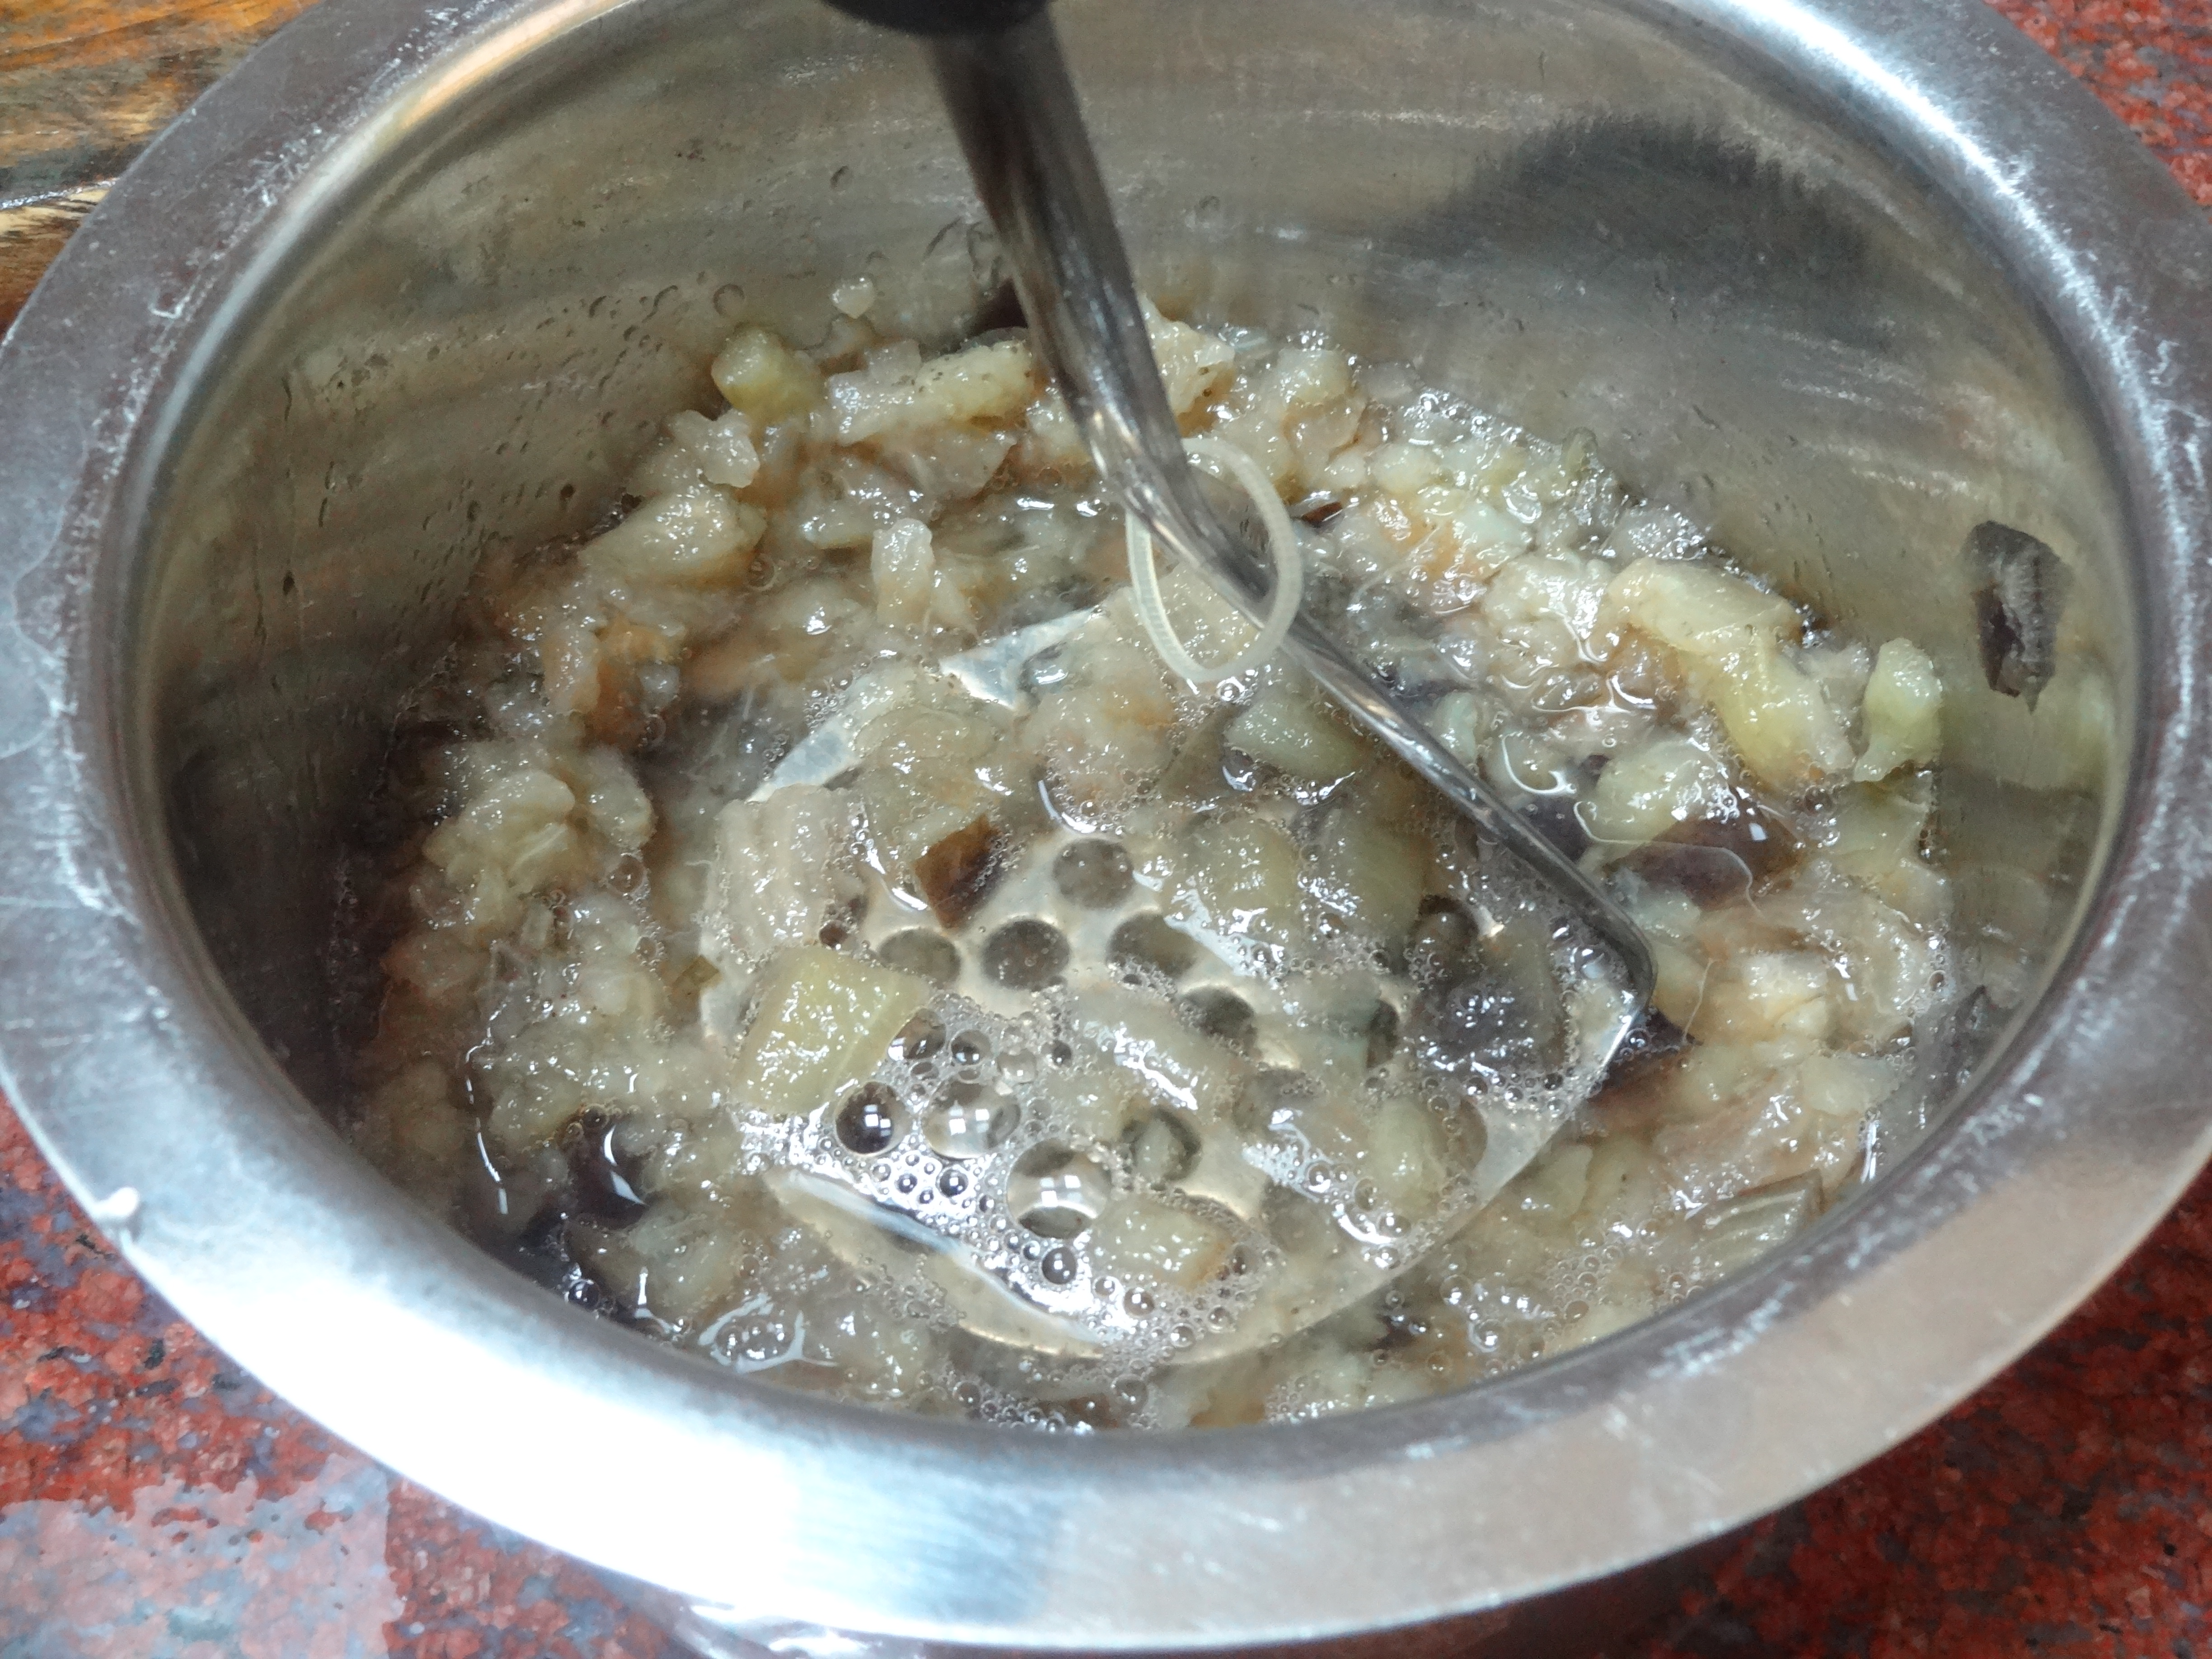
1. Take chopped brinjals in a vessel.
2. Add little water and cook till it turns very soft. Water should be absorbed too.
3. Mash the brinjal very well using a masher.
4. Now add chopped onions, green chillies, tamarind pulp, hing, salt and coconut oil.
I have used pink salt or rock salt or kaala namak here. Hence the colour pink.
5. Mix well and garnish with coriander leaves.
Serve immediately as an accomplishment with rice meals.
Notes:
* I have made it with all varieties of brinjals and it tastes great with any variety of them.
* Traditionally bhajji is made by roasted over gas or wood fire but my grandmother made this version too and I make this because I don’t have gas stove here (nor wood fire 😅).
* Don’t add a lot of water while cooking the brinjals and make sure the water is absorbed well and brinjal is cooked well too.
* You can skip onions if following satvik diet but onions does add a wonderful bite.
* I usually make this with our Matta rice congee and it tastes heavenly with it.
* With white rice and rasam, bhajji makes an excellent accompaniment.
Advertisements
Join me in my journey with a foodie husband and hungry kiddos while I make them eat healthy!