Tag Archives: Snacks

Whole wheat cheesy garlic bread

We have still not started eating from outside much to the surprise of our friends here. But honestly, after learning to cook clean and delicious food at home, we don’t actually feel like ordering from outside. For me, the main turn off is the oil. I am so used to either coconut oil or ghee in my cooking that when I am reminded of the oily restaurant foods (mostly sunflower or some mix of refined oils), I don’t feel like eating out at all. I can’t believe I used to find it tasty. Life has changed so much in every way.

Not only curries, even pizza and garlic bread are homemade now. This Whole wheat Pizza is not only easy to make but tastes so yummilicious apart from being healthier too. I also happened to try cheesy garlic bread sometime back and we all loved it. So it had to be on the blog as well. I made it many times to recheck the recipe (also to devour it 😁) but could not get good clicks as the kids are always in urgency to gobble it up. 😀

I finally gave up and decided to share these somewhat okay pictures itself on the blog. Don’t go by the picture, it’s really very tasty and much better than outside ones. We absolutely love it. It’s not very difficult to make too if you follow the step by step pictures well.

Hope you all try and love it too. Happy and healthy baking! ❤️

RECIPE:

Ingredients:

1 and 1/2 Cups Whole wheat flour or gehun ka Atta (I use Pillsbury brand)

About 1/2 Cup Water to knead the dough (depends on the flour brand)

1 tsp Instant yeast (or 1 and 1/2 tsp dry active yeast)

1/2 tsp Sugar

1/4 tsp Salt

About 1/2 Cup grated Mozzarella cheese

For the garlic dressing:

2 Tbsp salted Butter (if using unsalted, add salt to this dressing)

5 Garlic pods

2 Tbsp finely chopped Coriander leaves

1 tsp Dried mixed herbs seasoning

Step by step recipe:

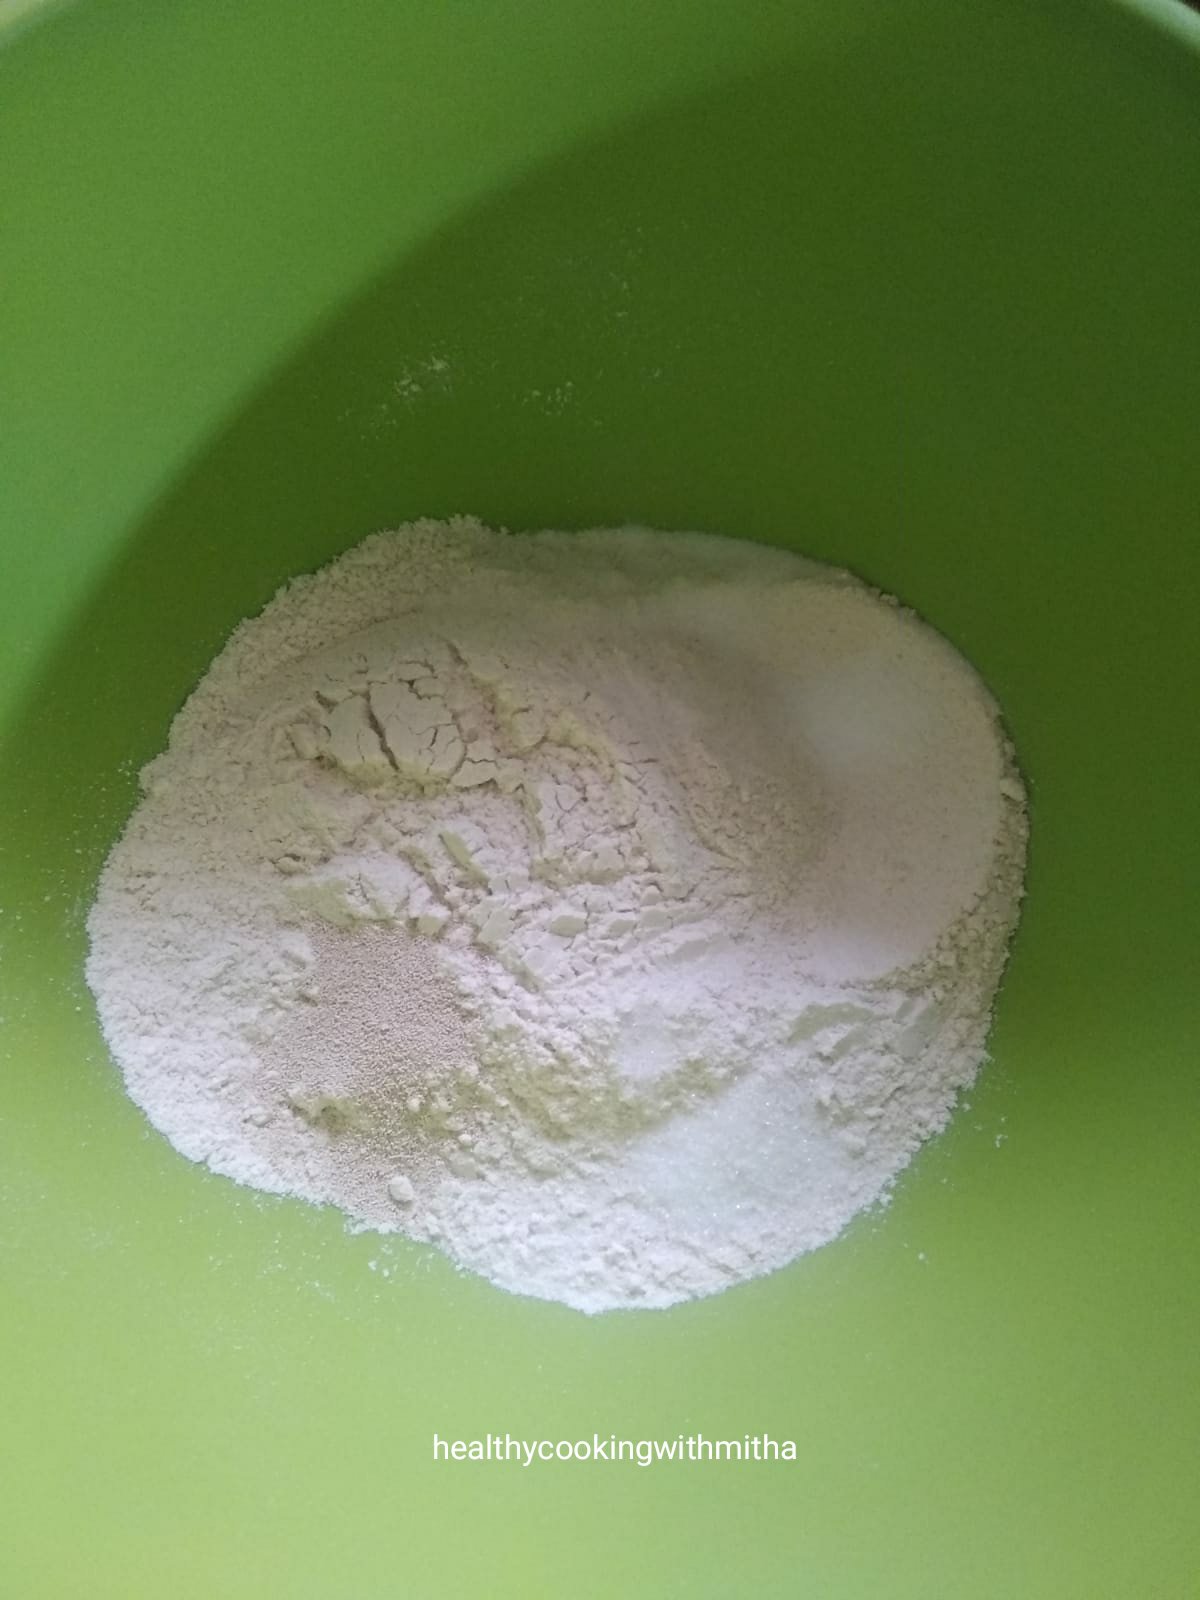
1. Take wheat flour, instant yeast, salt and sugar in a mixing bowl.

Note: If using dry active yeast, it needs proofing ie put the yeast along with sugar in lukewarm water and then add to the flour and salt once the yeast has risen (takes about 5 mins).

2. Now add water little by little and form the dough like regular chapati dough – Soft and smooth. No need to knead.

3. Keep for rest covered in a warm place for an hour.

Note: It might not rise much but that’s fine, it will have a yeasty smell to it which shows it has acted in the dough. In cold places, keep for 2 hours since it will take longer for the yeast to act.

4. While it’s kept for rest, prepare the dressing. Melt the butter in a microwave or in a pan. Add finely chopped garlic, coriander leaves and herb seasoning. Also add chilli flakes if you like (I avoid for my kids)

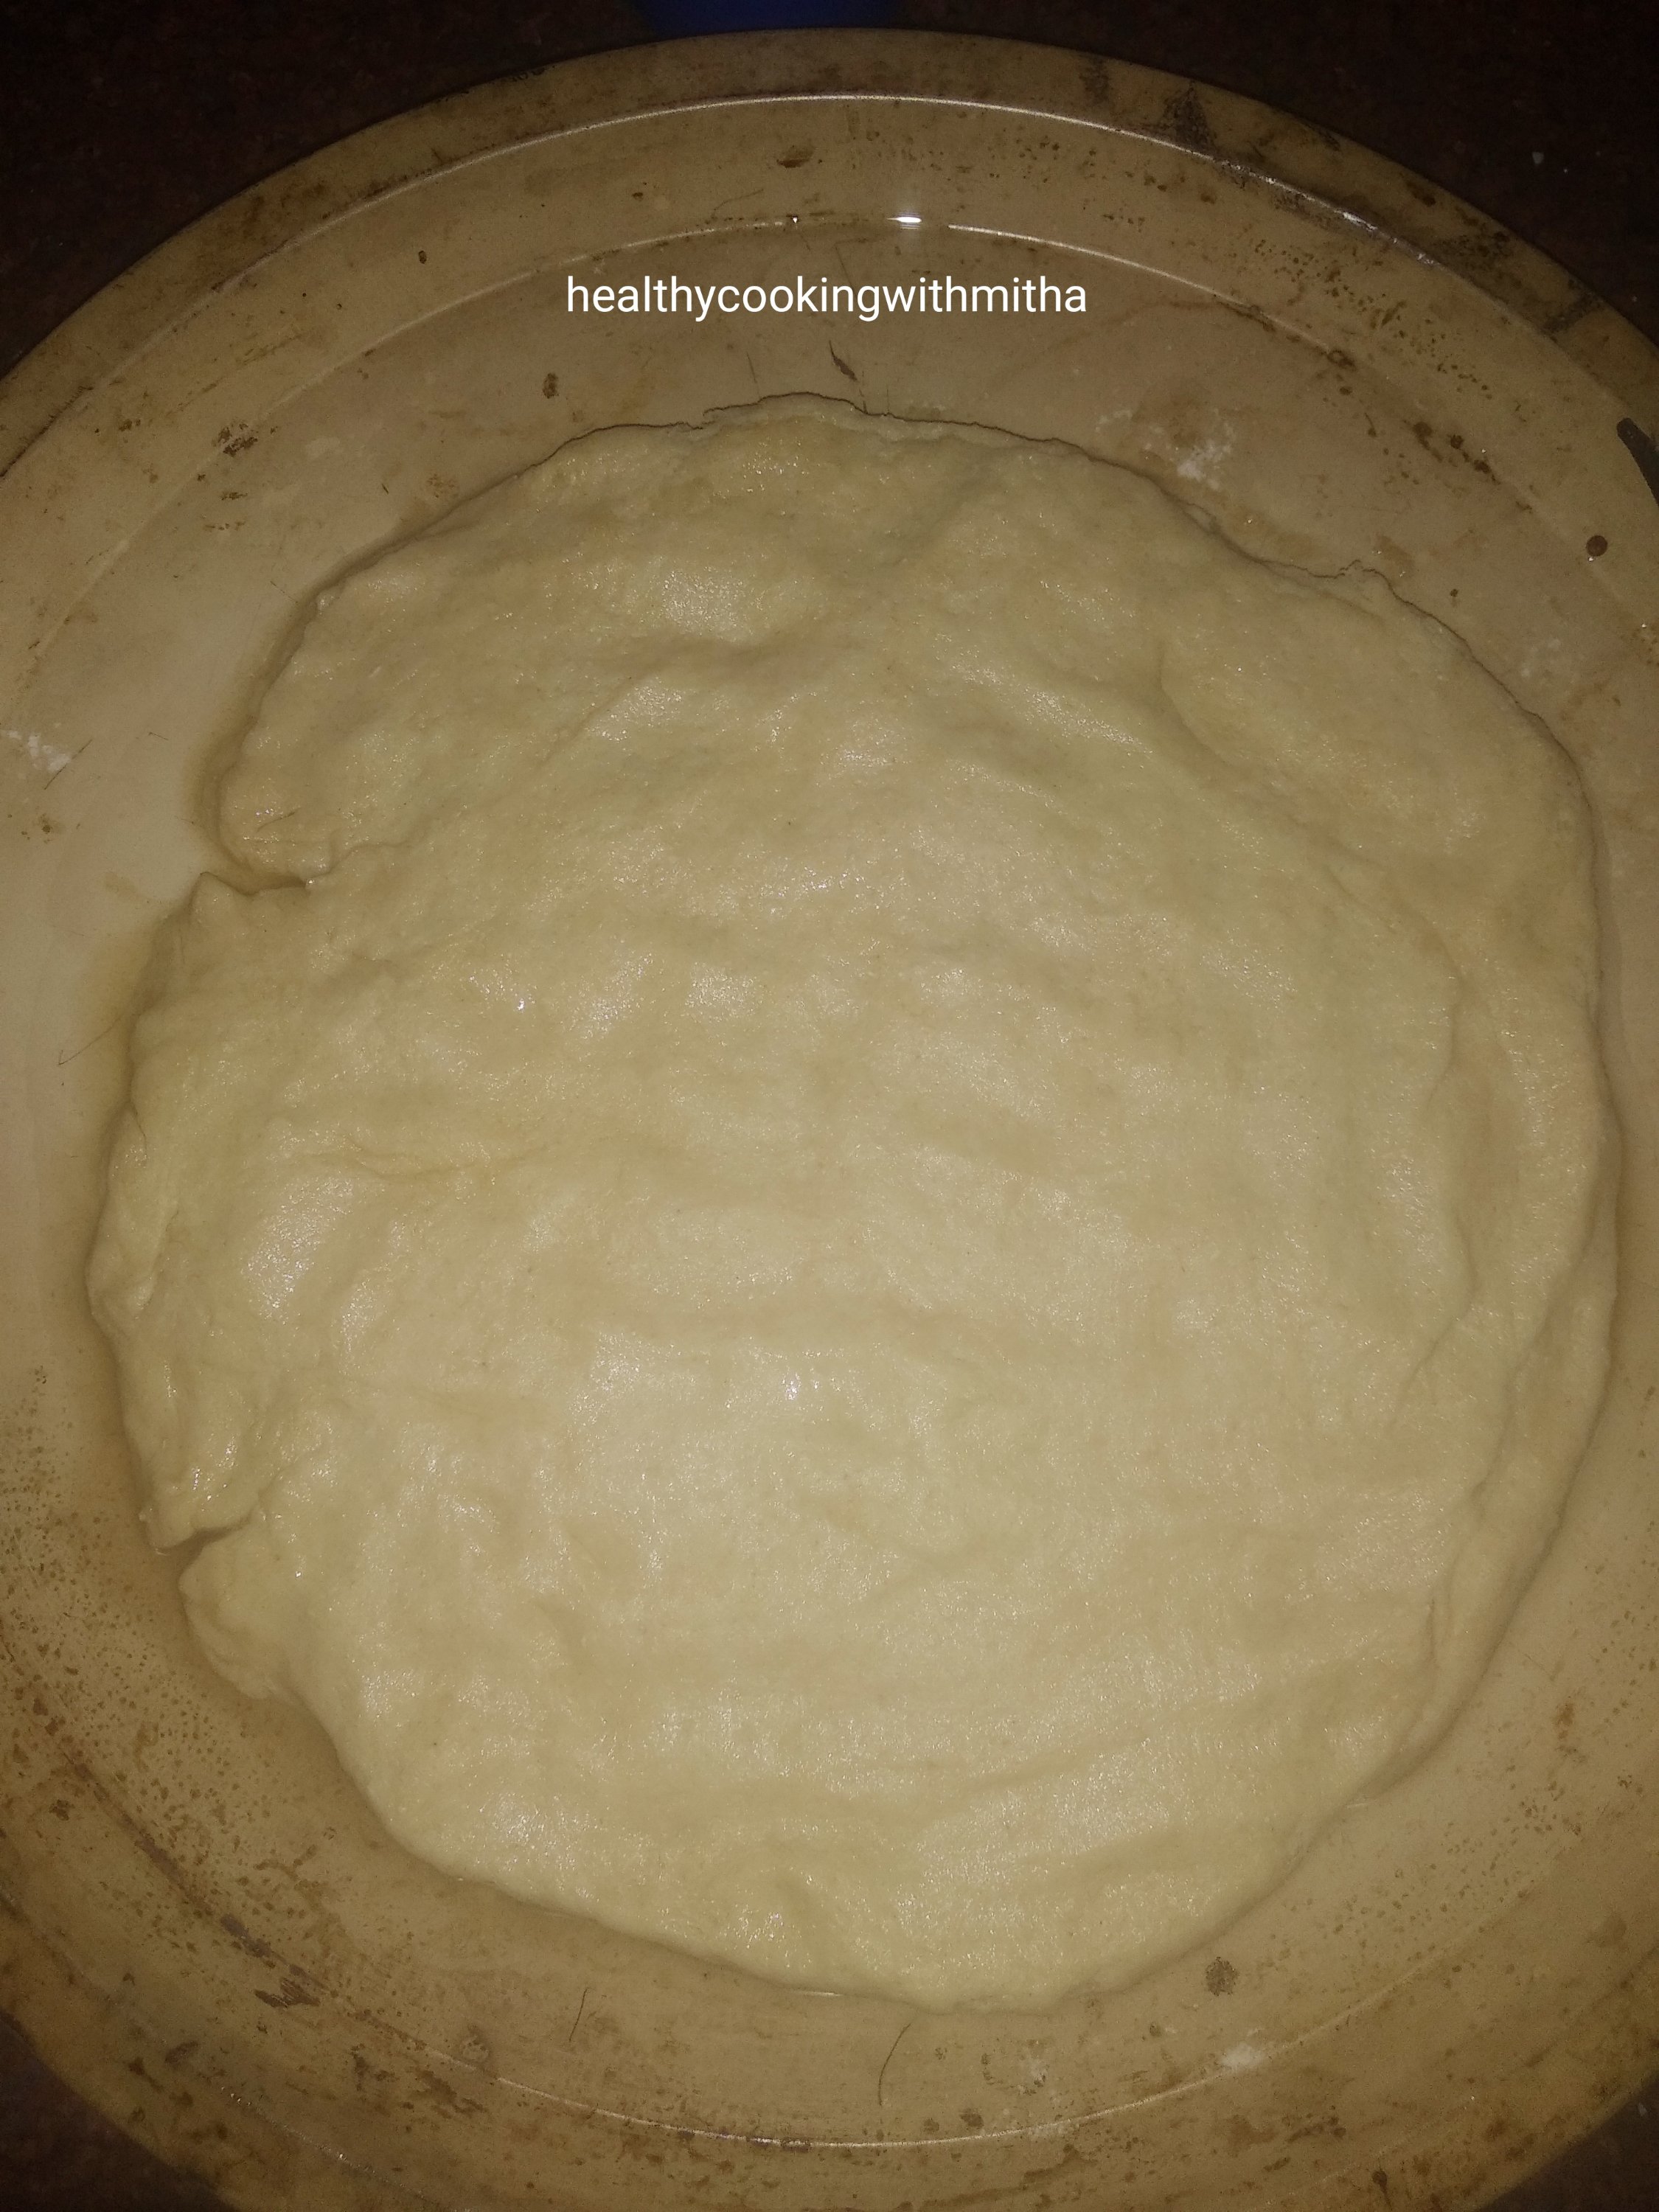
5. Once the dough has finished resting, preheat the oven at 200 C for 10 mins. Take a oven proof plate. Grease with oil and sprinkle dry wheat flour over it. Spread the dough in circle shape over it as shown.

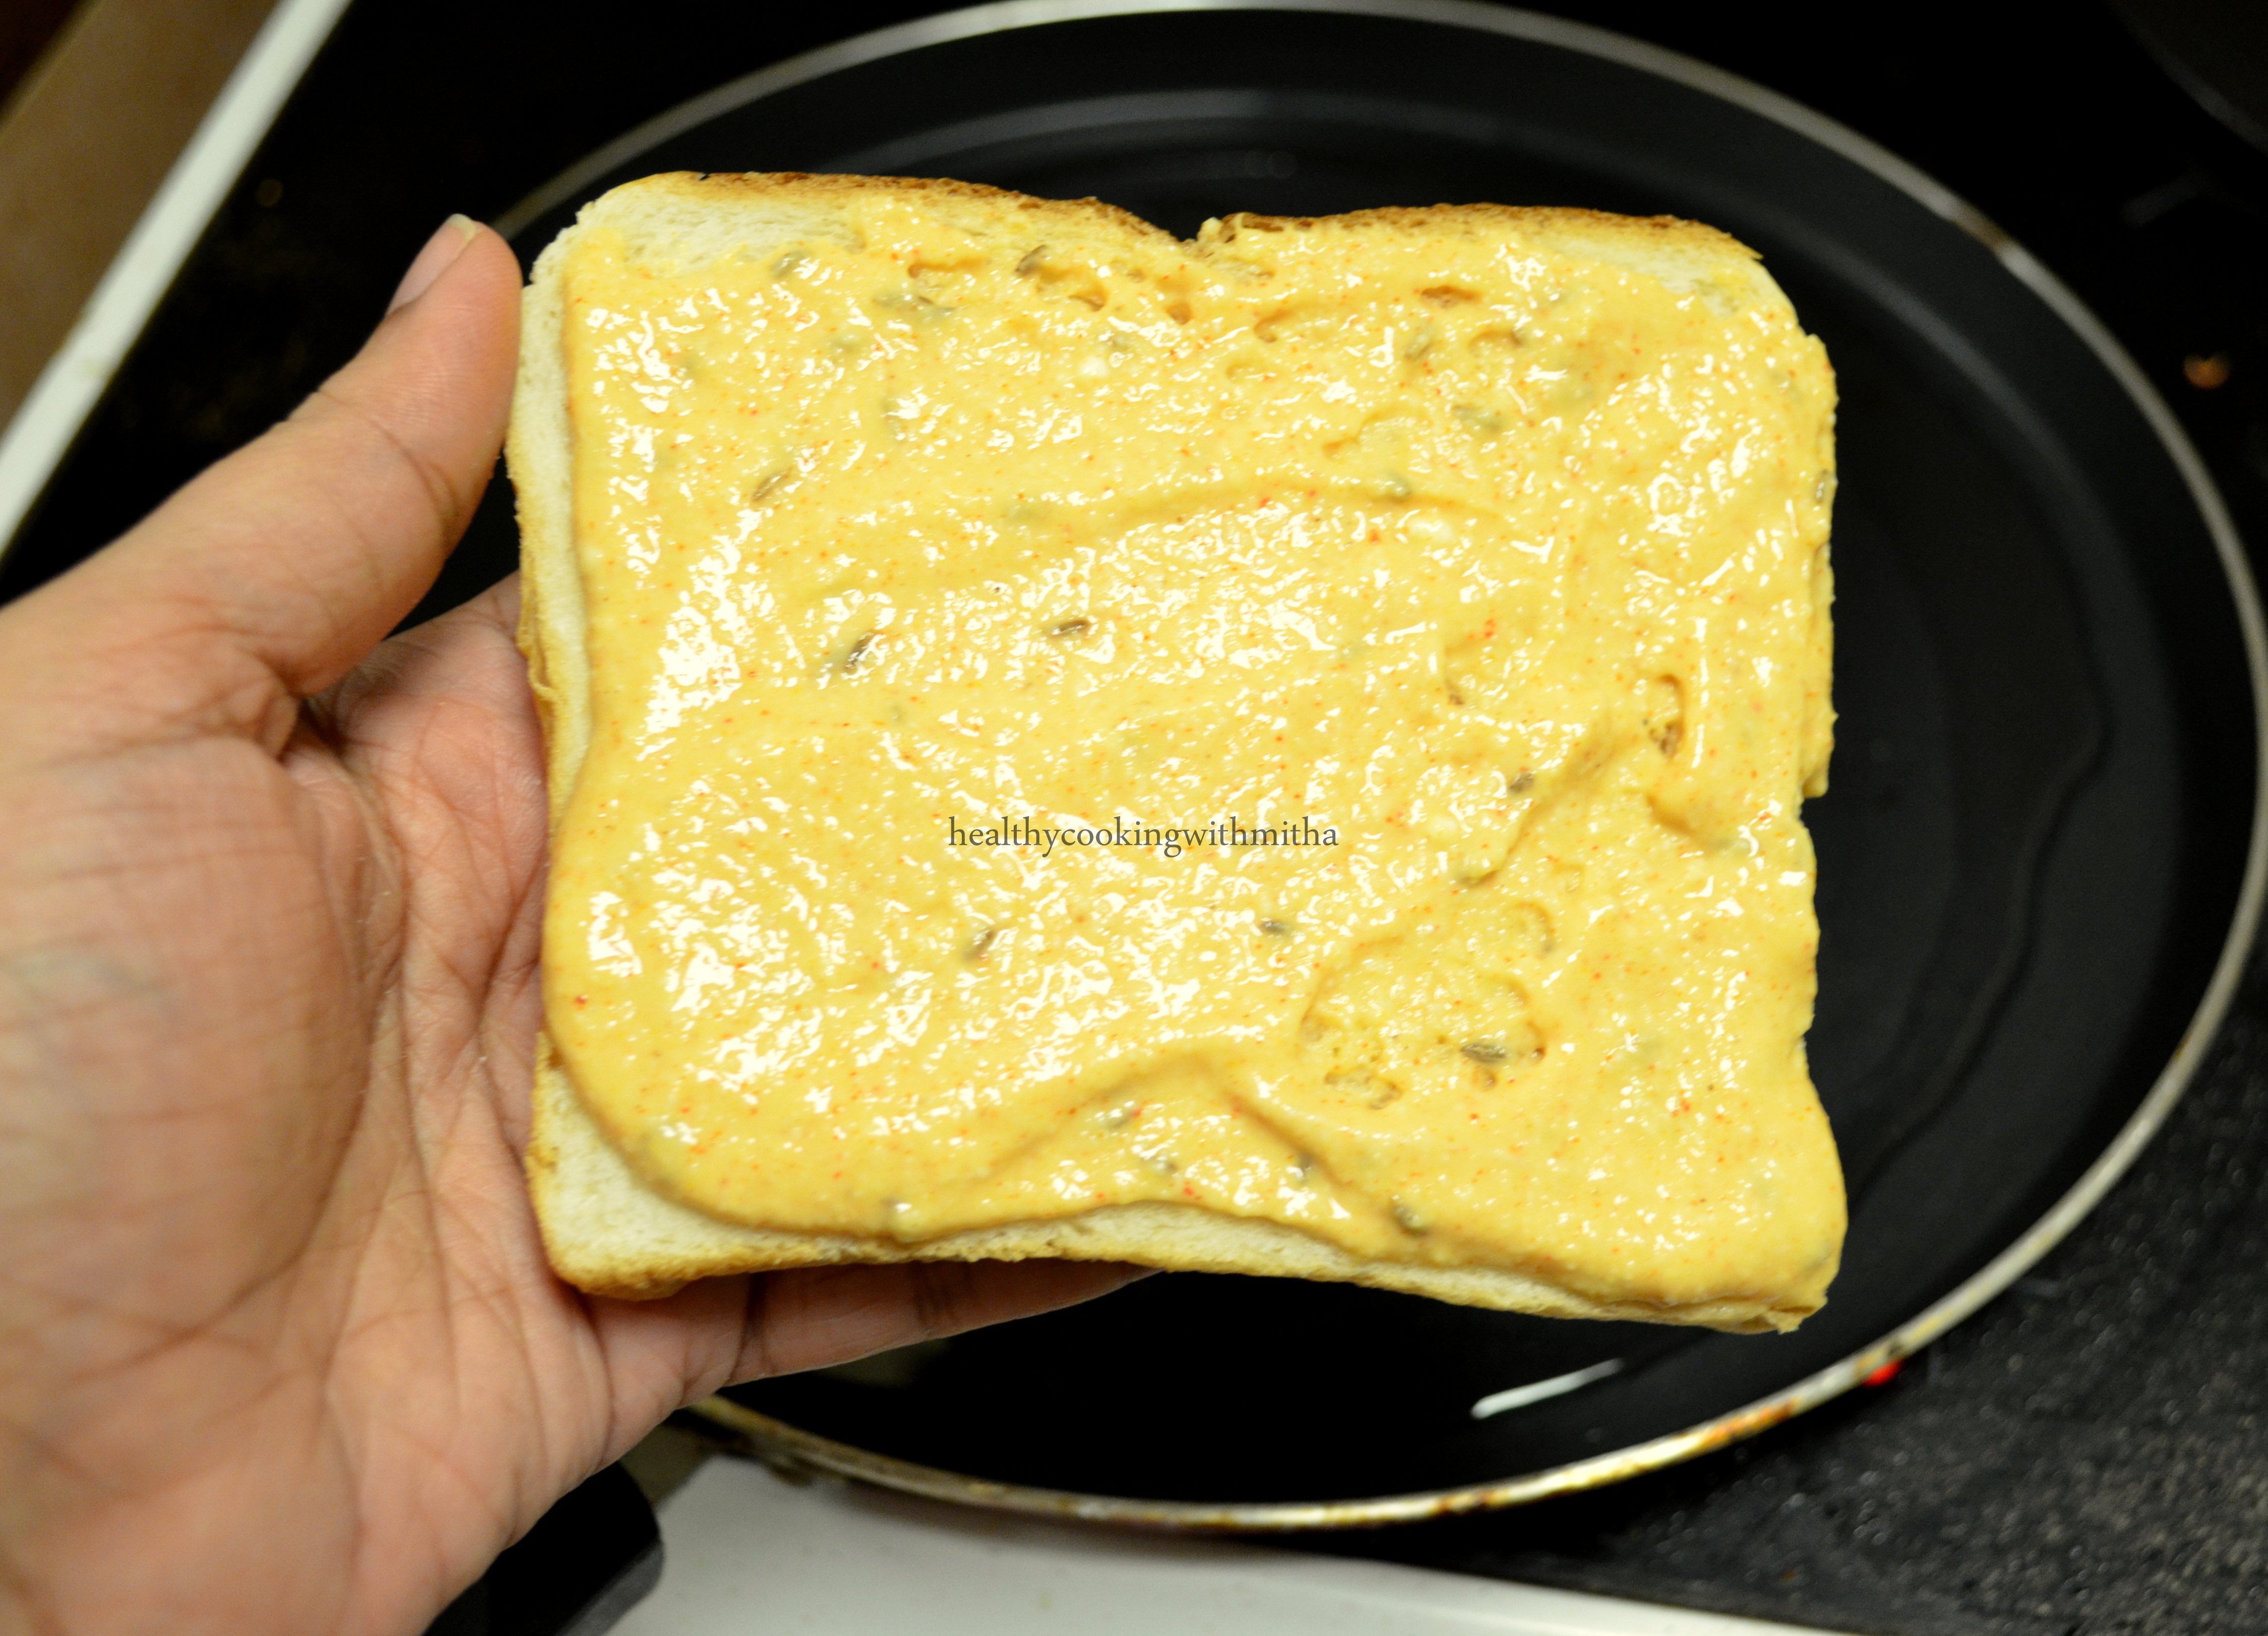
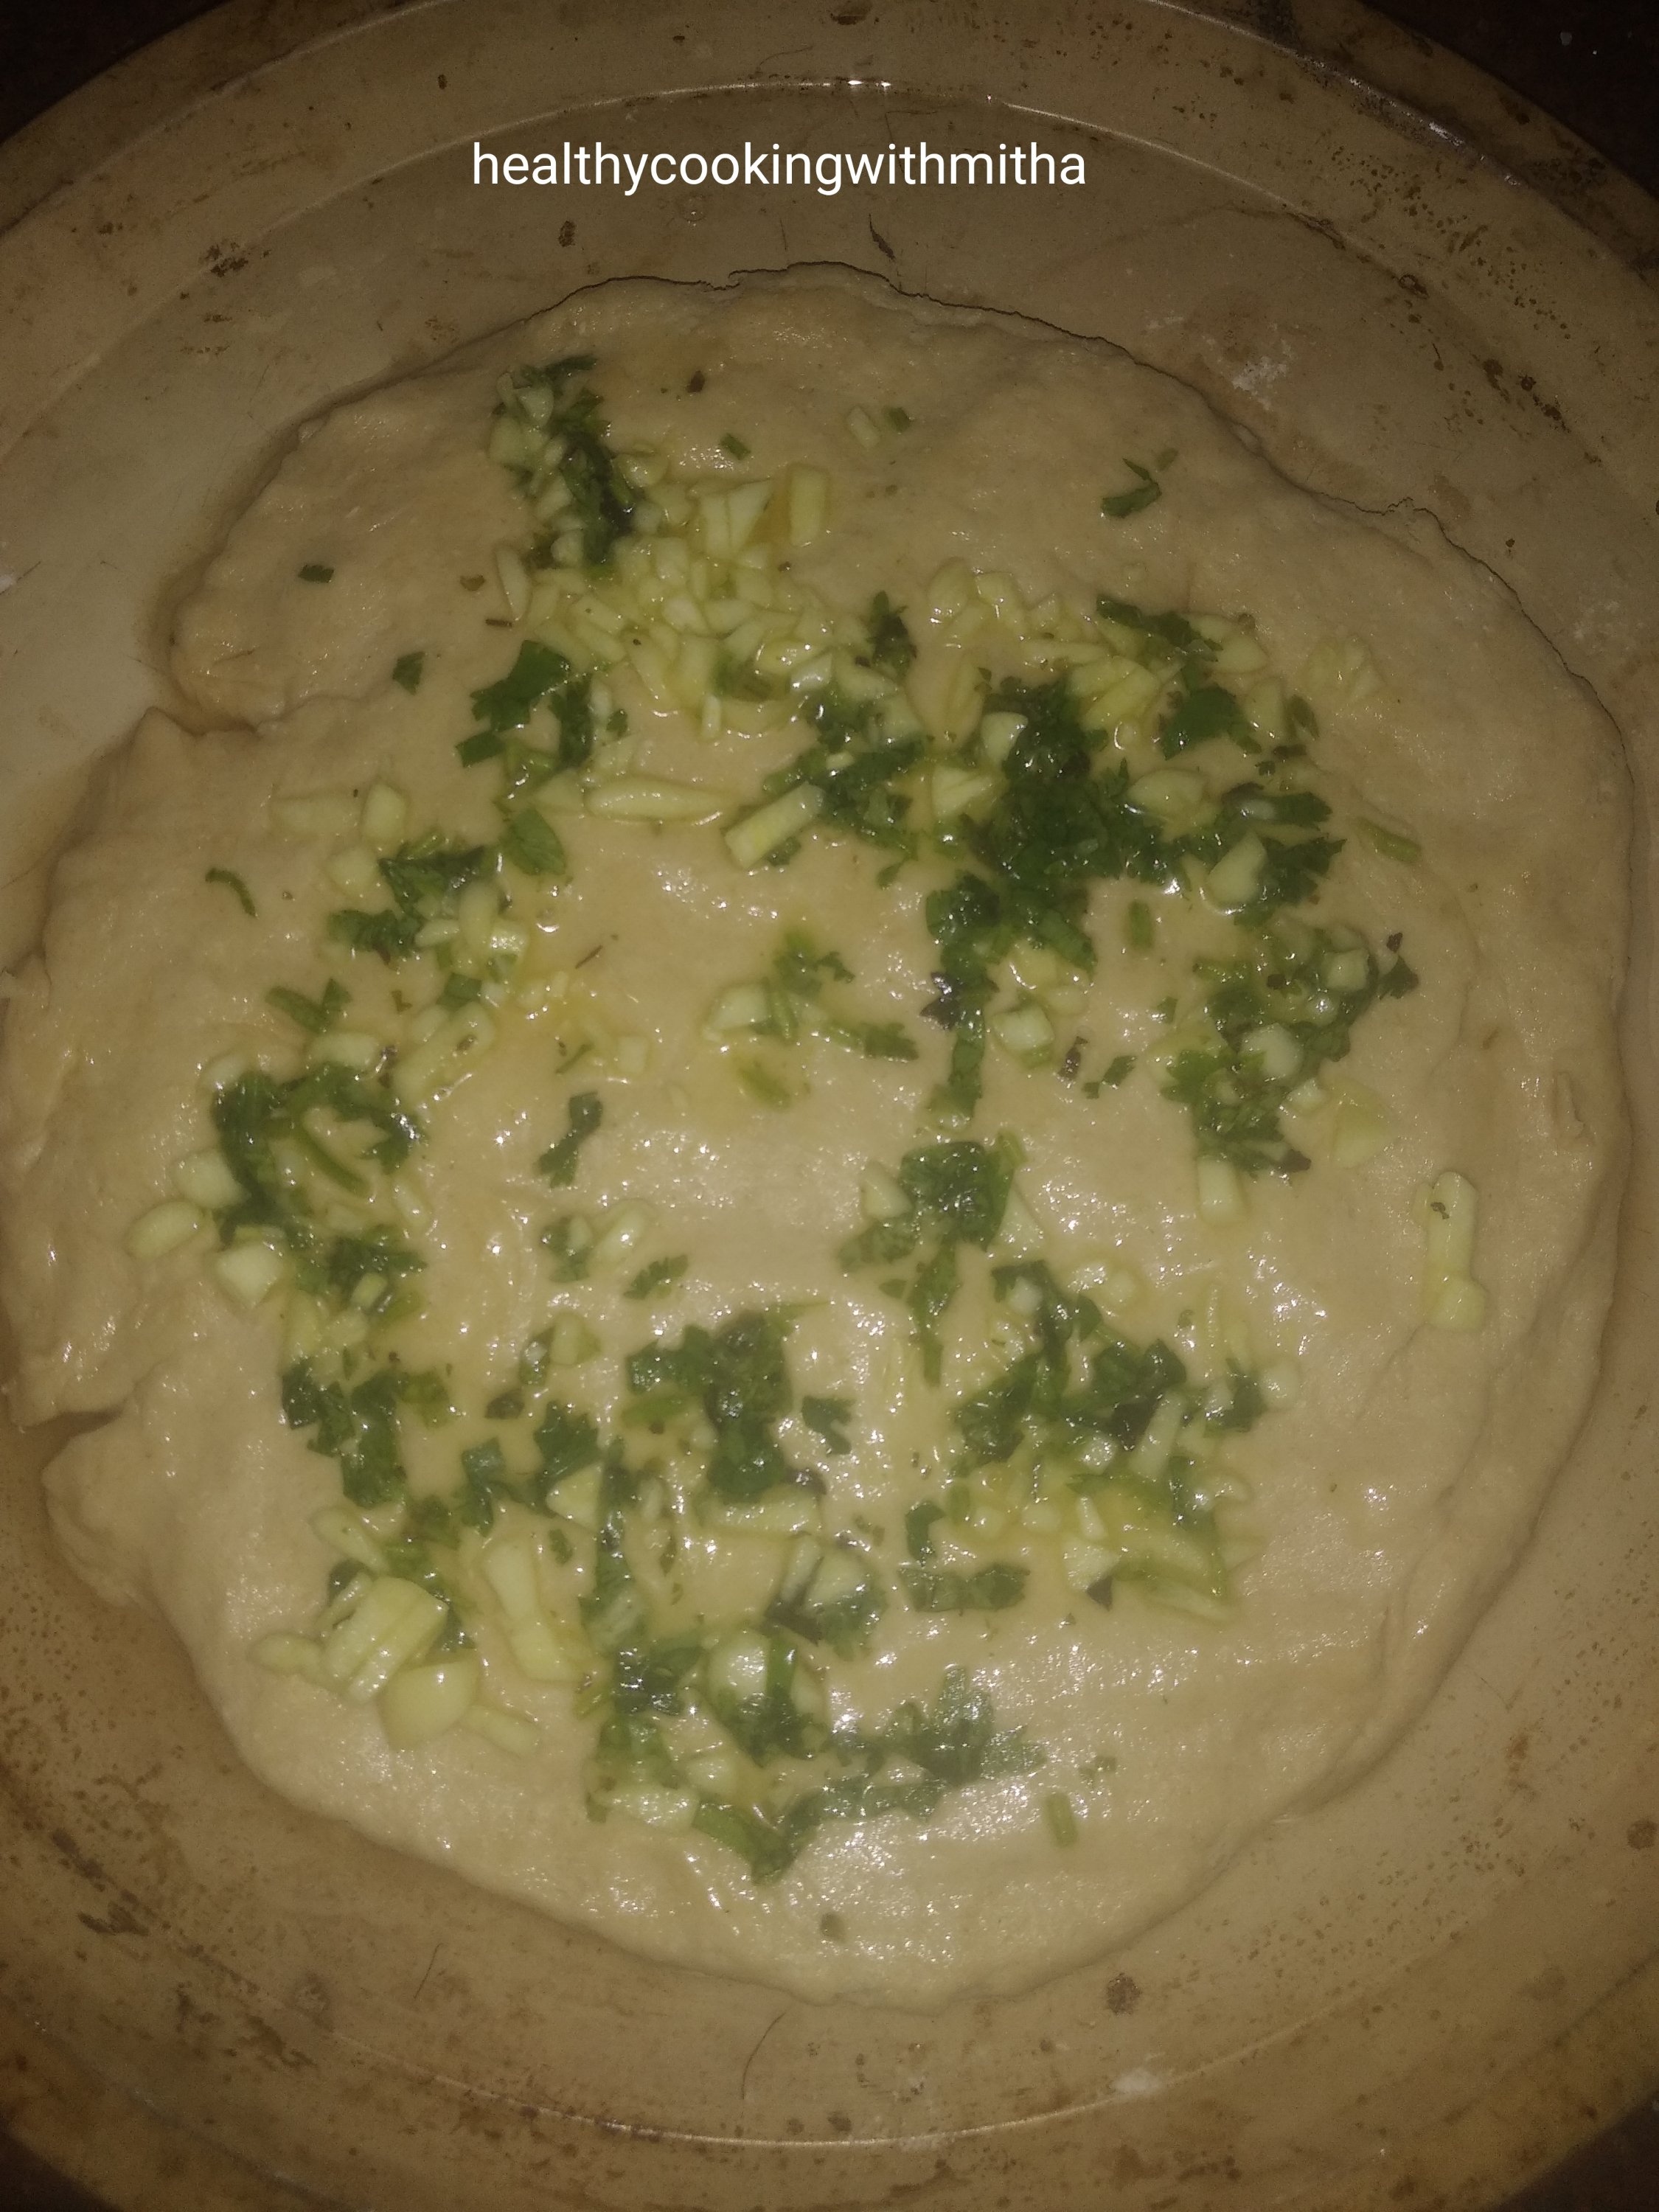
6. Now apply half of the dressing evenly over it.

7. Spread mozzarella cheese evenly over it.

8. Fold and seal the edges as shown.

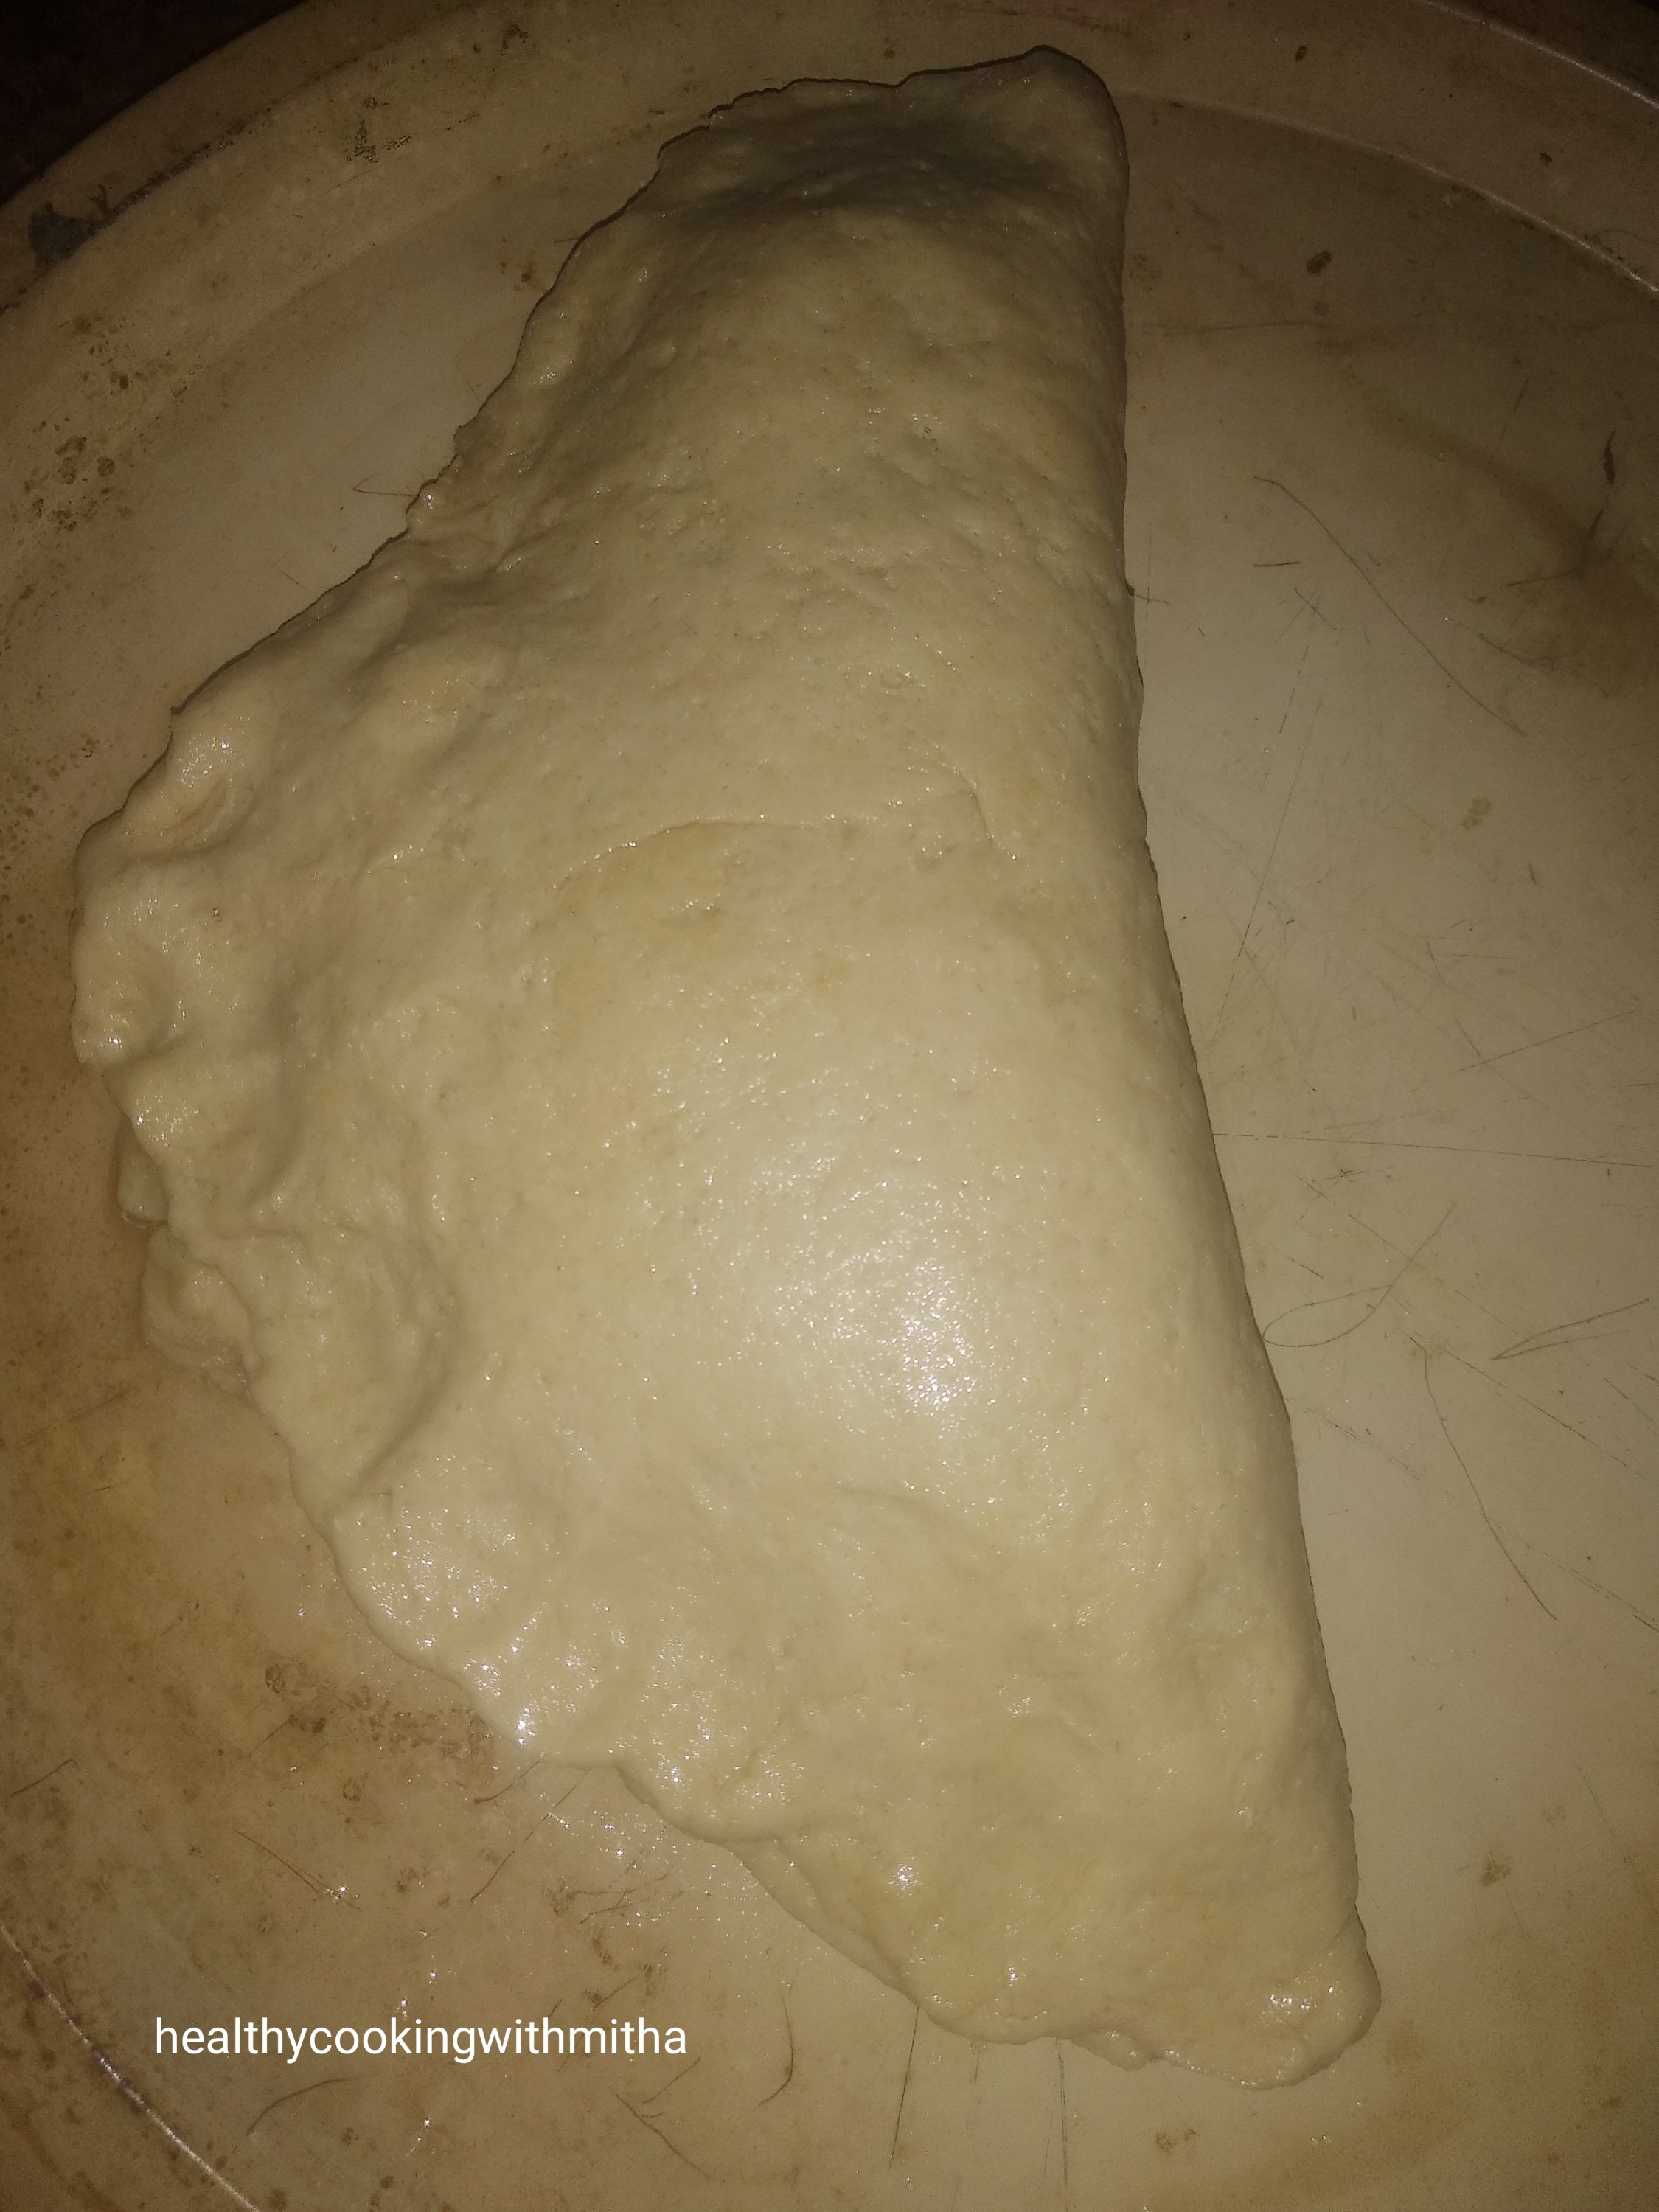
9. Apply the rest of the dressing over it and make evenly spaced cuts over it till three fourth of the semicircle. (reminds me of maths lessons 😁😁)

10. Bake in the preheated oven at 200 C for 15 mins in the center rack or till the surface turns golden brown in colour.

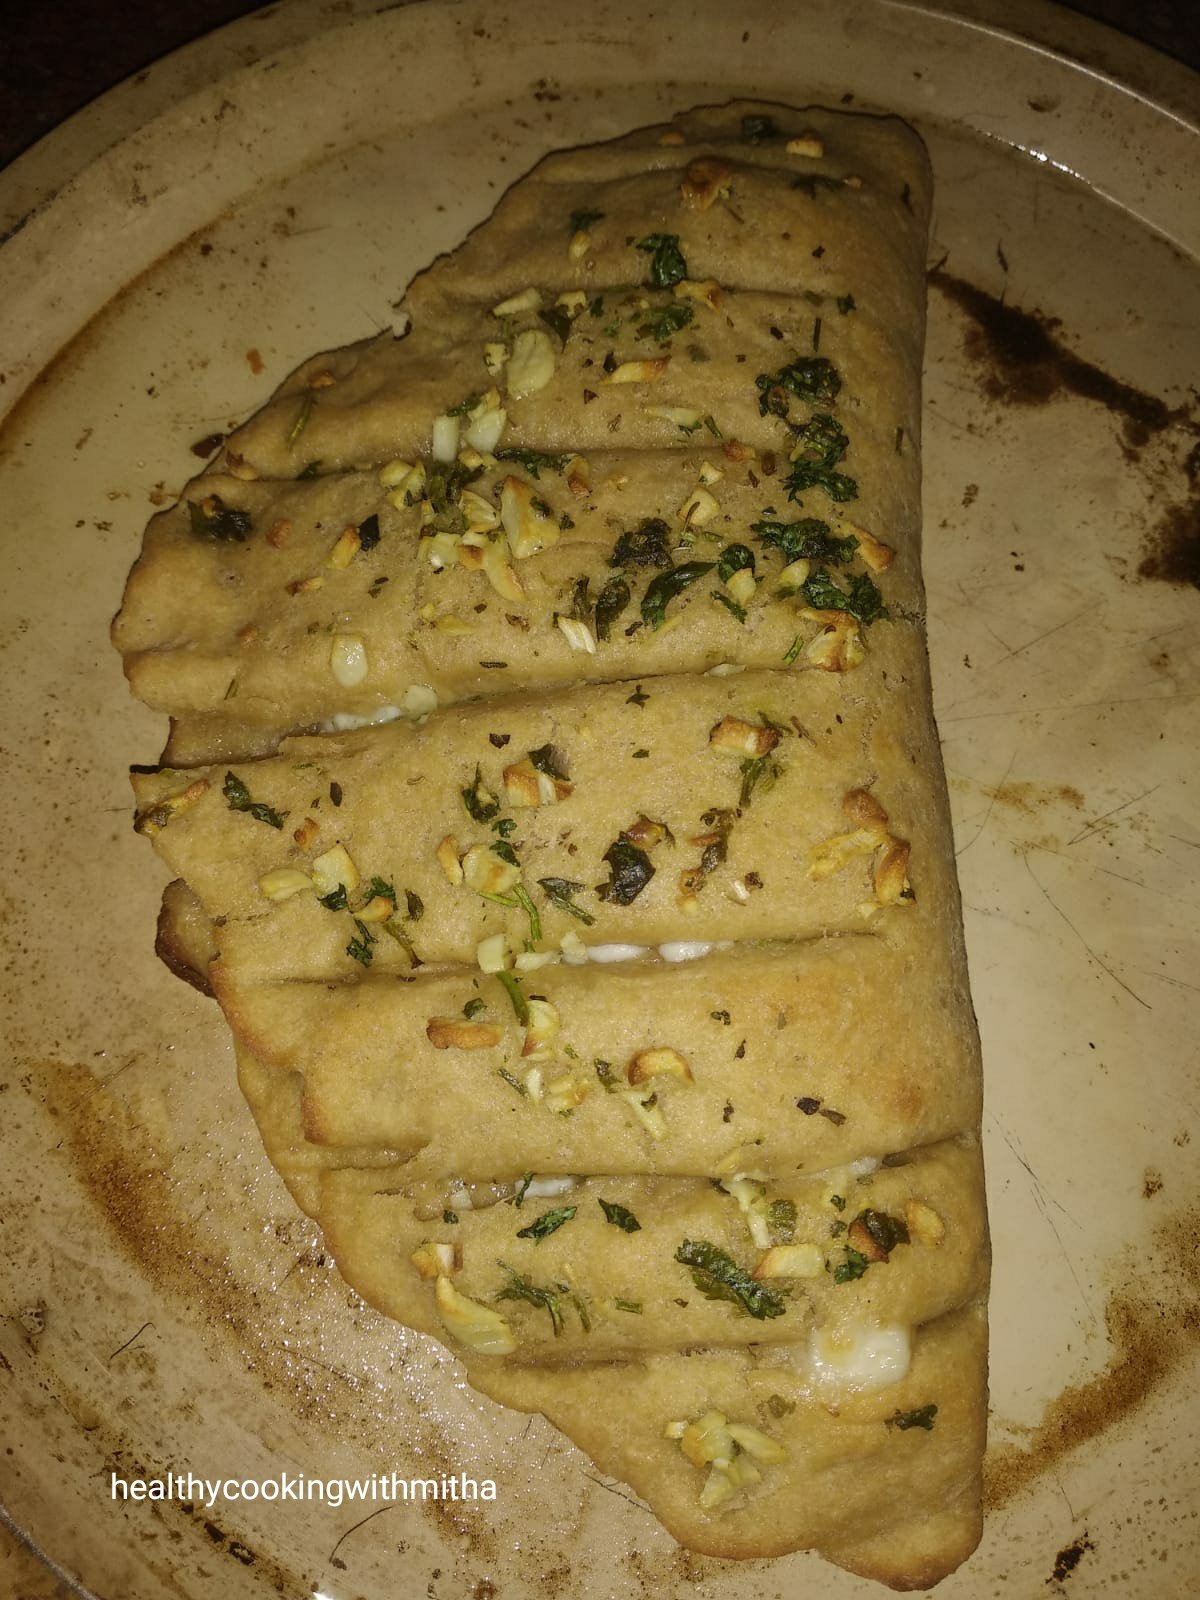
11. Allow it to cool slightly. Enjoy served with ketchup.

Notes:

* I use Pillsbury wheat flour for all my bakes. Love the flour as it makes the baked goodies perfect.

* There is no need to knead the dough. Just bring them together like chapati dough. That’s enough. But make sure the instant yeast is of good quality. If using dry active yeast, make sure to proof it as mentioned above in the step by step recipe.

* You can grate the garlic if you don’t like garlic bites in your garlic bread. Also add chilli flakes if you like it.

* Don’t keep opening the oven door while baking. Open only after 10 to 12 mins into the baking time. Else it can hinder the baking process.

* Preheating the oven is a very important step. Don’t forget it.

* This tastes best when eaten hot and consumed immediately after baking.

* The dough can be made beforehand and refrigerated to be used within two days.

* This is the same dough that I use for my Whole wheat Pizza which is a regular fare at my house and my kids’ favourite.

Wheat Banana pancakes | Snack idea for kids

My daughter gets attracted by fancy names and few months back, she came to me saying “Amma, I want pancakes!”. She had seen it in some video. I told her pancakes are nothing but our dosas, just sweet version of it like our amchi Surnalis. She just would not accept it and wanted me to make the original pancakes for her.

So, I had to look up for pancake recipe (since I had never made nor eaten it before) but found it rather unhealthy with maida (which we never buy) and sugar. So I substituted it with wheat flour and jaggery. It came out very well and she was very happy to see it. ❤️

From that day onwards, when she’s hungry, she asks me to make these pancakes. I have improvised it by adding bananas to it too as it helps me finish off the over ripe bananas (who stare at me to use them up 😁) and also makes the pancakes more nutritious.

My 2 year old son too loves it a lot and it fills my heart with happiness when I see them eating together dipping the little pancakes in honey and eating with their tiny hands. Beautiful memories which will be in me forever. ❤️

Hope you all try and love these pancakes too. Happy and healthy cooking!

RECIPE:

Ingredients: {Makes about 18 to 20 small pancakes}

2 Cups Whole wheat flour/ Atta

1 Cup mashed overipe Bananas

1/4 Cup Milk

1 Tbsp Jaggery powder (optional)

1/4 tsp Baking soda (skip if making for kids aged less than one year) * check notes

Salt to taste

Step by step recipe:

1. Add the mashed bananas and jaggery powder in a bowl. Mix well.

2. Sieve wheat flour, baking soda and salt in the same bowl.

3. Add milk and water to form a smooth, thick, lump free batter of slightly thick consistency.

4. Heat a flat pan and when it gets hot, pour the batter using a spoon onto the pan making small pancakes as shown.

5. Cover and cook on medium flame till the surface cooks. Add ghee over it.

Note: Be careful to cook on medium flame as high flame can cause the pancake to turn black underneath due to bananas.

6. Flip gently and cook for couple of minutes.

7. Remove and serve with bananas, butter and honey.

Notes:

* I make these pancakes without baking soda too and my kids love it that way as well. They don’t turn fluffy but turn out very soft like dosas.

* You can skip bananas if you don’t have. It comes out like regular pancakes.

* You can skip jaggery if the bananas are very sweet. Use overripe bananas for best results.

* I make sweet dosas similar to this. Just mix together wheat flour, jaggery and salt with water and make a slightly thick batter. Good for quick to make evening snacks for kids.

* For kids, cook the pancakes in ghee and serve with butter and honey with bananas on the side. It’s very filling and they are sure to love it too.

* Do cook these pancakes in medium flame and not high flame as it can cause it to turn black underneath.

Bhel puri chaat | The easiest chaat ever!

Apart from desserts, chaats are my favourite. I can never get tired of them and they are always my choice when we eat out. Here, we get amazing chaats in Kailash Parbat and their chaat platter is my favourite. ❤️

I must admit though that Bhel puri is not my favourite among chaats. It is my husband’s and kids’ favourite one. Mine is always Masala puri or Sev puri or Dahi puri (Craving for some now as I write this 😭😭😭😭).

But since bhel puri is hands down the easiest chaat ever, we usually make it for our evening snack. It’s not only easy to make but healthy and light on the tummy apart from being tasty too.

So I had to share this with all of you. A must try chaat if you love Bhel puris from outside. It’s super easy to make at home, trust me. Happy and healthy cooking!

RECIPE:

Ingredients: {Serves 2}

2 Cups Bhel/ Kurmura / Charmburo/ Puffed rice

1/4 Cup finely chopped Onion

1/4 Cup finely chopped Tomatoes

2 Tbsp finely chopped Coriander leaves

1/2 tsp Red chilli powder

Salt to taste {I use kaala namak or rock salt}

1/4 Cup Mint Coriander chutney (5 sprigs of coriander leaves, 3 Green chillies, 8 to 10 mint leaves, salt)

2 Tbsp Dates Tamarind chutney {I use Mother’s recipe brand readymade chutney} * check notes to make at home

1 Cup Alu bhujiya or Sev ( I use Haldirams brand )

1/2 Cup Mixture or Namkeen of your choice ( I use Bikaji brand)

Step by step recipe:

1. Dry roast the bhel till it turns crisp. Keep aside till use.

Note: This step is necessary so that the bhel does not turn soggy instantly when chutneys are mixed.

2. Take mint leaves, coriander leaves, green chillies and salt in the mixer.

I used kaala namak or rock salt or pink salt and hence the colour.

3. Grind with little water to a smooth paste. Keep aside.

4. Now get everything ready. Shown below are:

* Finely chopped onions, tomato, coriander leaves, red chilli powder and salt in a mixing bowl.

* Dry roasted Bhel, alu bhujia, Namkeen in another bowl.

* Mint coriander chutney.

* Dates Tamarind chutney.

5. Mix everything well and serve immediately.

Notes:

* Bhel puri chaat has to be served immediately after mixing or it turns soggy. So get your family to sit down for the chaat time and then mix everything.

* The measurements for the green chutney gives 1/2 Cup of the green chutney. Use only how much is necessary as per your spice levels. Since I have to accommodate my kids’ tastebuds, I add only 1/4 Cup.

* Rest of the chutney can be refrigerated for use later. Lasts well for couple of days if handled well.

* I use Mother’s recipe brand of Dates Tamarind chutney. For making it at home, Soak about 6 to 8 dates for 30 mins in warm water and grind along with tamarind and salt to a smooth paste.

* You can add finely chopped green chillies too but I avoid as my kids find it spicy.

* You can check the Karnataka version of Bhel puri which we call Charmbure Upkari here.

* The masala puri chaat I make is very close to chaat stall ones. You can check the recipe here.

Masala Puri chaat

It is my son’s second birthday today (August 12th) and we are celebrating it since 10th. 10th because it was my husband’s off day from work (we did a small celebration at home), 11th as it was Janmashtami and I love dressing him up as Krishna. He is our little Kishan Kanhaiyya who brought flood along with him during the Kerala floods in August 2018.

I remember those scary days every year and pray that no one has to go through it again. But yes, God has been really kind upon us and we survived the days well.

My parents shifted back to our native Udupi in Karnataka after that as they wanted to be closer to their siblings and the days in Cochin are a beautiful memory to cherish.

One among the food memory from Cochin is piping hot masala puri that we used to enjoy from a small chaat stall behind the Ernakulam Shiva temple. Me and Amma used to sit in our car (as I was very shy to eat in front of other people 😁) and my dad and brother used to bring them to us. The flavours of the masala puri is still in my taste buds. So so delicious. I have never eaten a tastier masala puri than that.

But I am glad after many trials, my version of masala puri does taste almost same to that. I make it during special days and since it was my son’s birthday, I made it for our evening special snack and we all enjoyed it. Hope you all try and enjoy too. Happy and healthy cooking!

RECIPE:

Ingredients: {Makes about 4 plates}

For the curry:

1 Cup dry Green peas (soak overnight)

1 medium sized Potato

1 medium sized Tomato

1 tsp Garam masala powder

1/4 tsp Turmeric powder

Salt to taste

1 Tbsp Oil

To grind:

1 medium sized Onion

3 Green chillies

1/2 inch Ginger piece

1/2 Cup Coriander leaves

1/4 Cup Mint leaves

For garnish: finely chopped Onion, tomatoes and coriander leaves as desired

For assembling the chaat: {In one plate}

3 to 4 Puris, 3 ladles of the curry, 1 Tbsp Date Tamarind chutney, Green chutney if desired, finely chopped onions, tomatoes, coriander leaves and bhujiya or Sev.

Step by step recipe:

1. Pressure cook the soaked green peas (soak for atleast 8 hours) along with potato and turmeric powder till it turns soft.

Note: It takes 4 whistles at high flame in my electric stovetop.

2. Mash lightly and keep aside.

3. Take all ingredients to grind in a mixer jar.

4. Grind with little water to a smooth paste. Keep aside.

5. Heat oil in a pan and fry finely chopped tomatoes till it cooks.

6. Add the ground masala paste and cook till it reduces and leaves the sides of the pan. Add garam masala powder and salt.

7. Add the cooked and mashed peas and potatoes.

8. Now cook till it thickens and turns into a gravy like below. Remove from flame.

9. For making masala puris, take puris in a plate and break into pieces.

10. Now add two to three ladles of the curry, top with date-tamarind chutney, onions, tomatoes, coriander leaves and bhujiya. Serve hot.

Notes:

* You can also make green chutney for a spicier masala Puri. Since I make it for my kids, I skip and make the curry mildly spicy for them to enjoy.

* For the green chutney, just grind green chillies with coriander leaves, mint, salt and little water to a smooth paste.

* I also use Mother’s recipe date tamarind chutney. If you don’t have it, just grind dates with tamarind and salt with little water to a smooth paste. That’s your sweet chutney.

* For the puris, I have bought these ready to be fried puris long back (more than 2 years actually) and still they are good. I just microwave it on high for 1 minute and they are ready. No need to deep fry at all.

* The curry can be used as an accompaniment to rotis and rice meals. If you add paneer to it, it becomes matar paneer. I do the same when I have leftover curry.

* You can grind tomatoes if you don’t like tomatoes as it is in the gravy.

Sweet corn Bhel

Being a mommy has turned me into a non stop thinking person about what healthy and yummy food to make for the kids. Yes, kids first and then us. I guess its common everywhere. We always keep our children’s food choices over ours.

My kids take maximum benefit of it and I have to sometimes whip up very quickly for their sudden hunger pangs. It is during this time that our Indian snacks such as bhel come handy. Quick to make and quicker to polish off, a very healthy option as a light but filling evening snack.

The kids too love it very much and I heave a sigh of relief that I won’t get to hear “potta bhook” (I am hungry in konkani) for the next one hour (?? ) atleast. 😄

Hope you all try and love it too. Happy and healthy cooking!

RECIPE:

Ingredients:

2 Cups Bhel or puffed rice or churmura or kurmura

1/2 Cup Bhujiya or Sev

1 Cup Sweetcorn (steamed for about 10 mins)

1/2 Cup finely chopped Onion

1/2 Cup finely chopped Tomatoes

1/4 Cup thick Curd/ Yogurt (optional)

1 Tbsp finely chopped Coriander leaves

1/2 tsp Tamarind paste

1 Tbsp roasted Peanuts

1 tsp Tomato ketchup

1/2 tsp Red chilli powder

1/2 tsp Chat masala powder

Rock salt or regular salt to taste

Step by step recipe:

1. Take a large mixing bowl and add steam cooked sweetcorn, tomatoes, onions, coriander leaves, tamarind paste. Curd is optional but we love the creamy tangy flavour it gives.

2. Mix well. Add chat masala powder, red chilli powder, salt, ketchup and roasted peanuts.

3. Add bhel and bhujiya. Mix well.

4. Serve immediately else the bhel turns soggy. Enjoy with a dash of lemon juice if you feel it needs more tangy flavour.

Notes:

* The proportions of ingredients are to taste and you can change or adjust as per your taste buds.

* You can also skip any ingredient if you don’t have. This is just an easy to make snack idea which can be made with whatever ingredients you have in your kitchen.

* Do remember to serve immediately. Else the bhel turns soggy.

Chow Chow Bath

If you are wondering about the name Chow Chow Bath, let me tell you it’s nothing but upma, sheera and simple coconut chutney. It is easily available in hotels in Karnataka especially in the southern parts of Mangalore and Udupi where I belong to.

I first tasted it post marriage when I was very intrigued by the name and ordered it. To my surprise, it was just something so basic yet the overall combination tasted too heavenly for words. I fell so much in love with it that my eldest brother in law whom I fondly call Danthanna used to call me “Chow Chow Bath Ammi” (Ammi is the short form given by hubby’s family for the name they have put for me as part of marriage ritual – Amitha). I am so lucky to have such a loving family as in laws who love me like their own daughter.

Coming back to Chow Chow Bath, it became our special occasion breakfast apart from Masala dosas. Easy to make and starting the day with sweet on birthdays so that the whole year turns out as sweet. That is my intention. Maybe childish but still something I cherish a lot.

Hope you all those who have not tried this will try and love it. It turns out super delicious. Happy and healthy cooking!

RECIPE:

Ingredients:

For Upma:

1 Tbsp Coconut Oil

2 tsp Ghee (optional but gives great flavour)

1/2 tsp Mustard seeds

1/2 tsp Urad dal

1 Tbsp broken Cashews

Few curry leaves

3 green chillies

1 Cup wheat Semolina/ Rava/ Sooji

1 Tbsp Sugar

Salt to taste

2 to 2 1/2 Cups Water *(read notes)

2 Tbsp freshly grated coconut

For Sheera: Check the detailed recipe here.

For Chutney: Check Notes at the end

Step by step recipe:

1. Keep water to boil in a pan.

2. Heat oil and ghee together in another pan (I use my iron kadhai) and splutter mustard seeds. Add urad dal, curry leaves, cashews and green chillies. Fry till cashews turn light brown.

3. Now add semolina and roast continually on medium flame till it turns light brown in colour and turns aromatic. Takes about 3 to 5 mins.

4. Add sugar and salt. Mix well.

5. Now add the boiling water to this. Be sure to add very hot or boiling water else the upma won’t have desired texture.

6. Mix well continually with a ladle as you add the water so that there are no lumps in the mixture. Mix continuously on medium flame till the mixture cooks well and leaves the sides of the pan. Takes about 5 mins.

7. Cover and keep for 2 mins on low flame. Garnish with grated coconut and remove from the flame.

Notes:

* Remove the upma into a bowl and make Jaggery sheera in the same kadhai. Here is the detailed recipe.

* For Coconut Chutney, just grind together coconut, green chillies, ginger and salt with little water to a smooth paste. Remove into a bowl.

* When making upma, if you want a really soft texture like a lump, add semolina to water ratio as 1 : 2.5 times. If you want fluffy texture, add semolina to water ratio as 1 : 2 ie twice the water as compared to semolina.

* You can also add ginger, onions and tomatoes in the seasoning along with little turmeric powder and sambar powder in the upma to make khara bath. That tastes good too but as Chow Chow Bath, we prefer this basic version of upma.

* While eating Chow Chow Bath, take one serving of each upma and sheera, dip in chutney and eat. Tastes so delicious!

Dry fruit bites

We are a sweet loving family where the discussion for post dinner dessert is more than the dinner itself. Especially my daughter who asks what treat she will get if she finishes her meal. 😅

Although I make many sugar and jaggery based sweets which you can see in my Desserts page, this one is the healthiest any sweet can get and I can guarantee you that it will get finished off in a jiffy too. When I make these dry fruit bites, it hardly lasts couple of days. Both the kids and the kids’ daddy steal the sweet and gobble it up whenever they see the sweet box. They team up and find it even if I hide it. 😁

These are the healthiest sweet because they don’t contain any form of refined sugar at all. The sweetness from dates, apricots and raisins along with the bites from nuts makes this sweet too delicious for words.

Hope you all try for your family too. Happy and healthy cooking! ❤️

RECIPE:

1 Cup Dates {seeds removed and halved}

10 dried Apricots, {soaked in warm water for 5 mins}

1/4 Cup golden Raisins

1/4 Cup Cashews

1/4 Cup Pistachios, shelled

1/4 Cup Almonds

2 tsp Ghee

Step by step recipe:

1. Add dates, apricots and raisins in a mixer or food processor. Grind till it turns into a coarse mixture. Do not add water at all while grinding .

Note: You can also grind it’s finely.. Check notes.

2. Now finely chop all the nuts using knife or use pulse mode in mixer or food processor. Add ghee in a pan and roast the nuts till it gives out an aroma. Do it on low flame.

3. Now remove this in a plate and fry the dates paste in little ghee for two mins till it binds together.

3. Add the roasted nuts and mix everything well. Keep mixing till they bind well.

4. Now remove to a plate. Allow to cool slightly.

5. Make small balls or rectangular shaped bites. Enjoy!

Notes:

* Store in an airtight container and refrigerate after one day at room temperature {if leftover 😅}.

* You can also finely chop the nuts in mixer or food processor which leads the nuts to get to almost powder form. Also grind the dates mixture to a fine paste. My kids love that more. I also spread it in a plate and cut into squares. Looks like this.

Dry fruit squares

* The ratio of dates, apricots and raisins to nuts is perfect in this recipe. Don’t alter. Or else you won’t get the desired texture.

*Don’t add water at while grinding both the dates mixture and nuts.

* Be careful to roast both times on low flame. Else it can turn black and get a burnt taste.

* In case you don’t have apricots, use 1 1/2 Cup Dates.

* Use 3/4 Cup nuts. It can be any of the combination of cashews, almonds and pistachios. You can skip any one or use only nut variety too.

* I do not use walnuts as my kids don’t like the flavour in this sweet.

** You can also shape them in ladoos like I have done here. I have also used black raisins here.

Eggless Mayonnaise

We are special kind of vegetarians. Don’t know how many of you are like us. We don’t eat eggs as such but eggs in cakes and other store bought foods is okay for us 😅. Many of our friends tease us for it as we are not strict vegetarian nor a perfect “eggetarian”. Somewhere a mix of both and hence fall in a unique category 😂.

So since we fall in this unique category, we don’t mind mayonnaise inside our sandwiches from cafes (as eggs are not visible to the eyes, you see 🙈).

But while making at home, I make this eggless Mayonnaise with my Whole wheat bread and it makes a delicious combination. Though this mayonnaise is not very healthy due to corn flour in it (corn flour is a refined flour and does not have nutrition), I make it as it’s far better than store bought ones which have loads of preservatives in it. Anyhow when making a sandwich with wheat bread and vegetables, the nutrition level raises.

Hope you all try and like it too. Happy and healthy cooking!

RECIPE:

Ingredients:

1 Cup Milk (to be used as 1/2 + 1/2 Cup)

3 Tbsp Corn flour

2 Tbsp Olive oil

1 tsp Sugar

1 tsp Vinegar

1/2 tsp Mustard seeds

1/4 tsp Pepper powder

Salt to taste

Step by step recipe:

1. Take 3 Tbsp corn flour in a bowl. Add 1/2 Cup milk and whisk well to form a lump free mix. Keep aside.

2. Now heat 1/2 Cup milk in a pan. When it turns hot, add the corn flour mix. Whisk continually.

Note: Be sure to stir the mix before adding as corn flour tends to settle at the bottom.

3. Whisk well for about 5 mins. It will get thick. When it turns thick and glossy like as shown in the picture, it is done.

4. Now remove and allow to cool. Grind in a mixer for few seconds. (to ensure that there are no lumps and the mayonnaise is smooth in texture.)

5. Now remove in a bowl and add sugar, salt, pepper powder, vinegar and olive oil.

6. Crush mustard seeds using a mortar and pestle.

7. Add it to the mayonnaise.

8. Mix well. Done!

Notes:

* Mustard seeds powder can be substituted with store bought mustard sauce.

* I add coconut oil instead of olive oil sometimes.

* Be sure to whisk the corn flour well with milk both times to avoid lumps.

* Grinding ensures smooth texture of the mayonnaise. So I would suggest you to not skip it.

* This tastes really similar to store bought mayonnaise which has egg in it or even the veg mayonnaise which has released in market. But sans any preservatives and is much healthier.

Instant Rava Dhokla

Dhokla is my husband’s favourite evening snack and that’s the first answer I get when I ask him what to make for snack time. The kids love dhokla very much too and I hardly get couple of pieces when I make it. Literally every bite is fought for. 😁

Soft and melt in the mouth, this recipe for dhokla has been a keeper for me and over the years, I have made it so many times that I can now make a good dhokla even in my dreams. 😅 That’s the effect of being a foodie’s wife over the years with kids turning out to be foodies too.

The benefit of the three of them loving what I cook is it gets over so fast that I hardly get to eat it which has lead to my weight loss. I eat only what is necessary as compared to earlier when I got a major portion of what I cooked. My Amma will surely kill me for this. Like all mothers, she does not want me to lose weight 🙈.

Anyhow, I can assure you Amma that I am eating as much as I need. Just that the kids make me run behind them so much that there is no chance of getting fat 😂.

Hope you all try and love this dhokla as much as we do. Happy and healthy cooking! ❤️

RECIPE:

Ingredients:

1 Cup Rava/ Semolina/ Sooji

1 Cup Water

3/4 Cup Yogurt/ thick curd

2 Tbsp Oil

1 Tbsp Besan/ chickpea flour

2 tsp Eno fruit salt

1 tsp Sugar

1/2 tsp Turmeric powder/ Haldi

Salt to taste

For the seasoning:

1 tsp Oil

1/2 tsp Mustard seeds

1/2 tsp Cumin seeds/ Jeera

3 Green chillies

1 Tbsp Sugar

Salt to taste

2 to 3 Tbsp lemon juice (depending on how sour you like your dhokla)

1/4 Cup water

Few sprigs of coriander leaves and freshly grated coconut for garnish (optional)

Step by step recipe:

1. Take 1 Cup of semolina in a large bowl. Add 1 Cup water and 3/4 Cup yogurt. Mix well using a whisk.

2. Now add besan, salt, sugar, turmeric powder and oil. Mix again.

3. Add Eno fruit salt and mix well once.

4. Pour into a bowl which has been greased well with oil. Steam for 20 mins or till a knife inserted in the center comes out clear.

5. For the seasoning,

* Heat oil in a pan and splutter mustard seeds, cumin seeds. Add green chillies and fry for few seconds.

* Now take the seasoning off the pan and add 1/4 Cup water, sugar and salt. Mix well so that sugar dissolves.

* Squeeze lemon juice and mix.

6. Pour over the steamed dhokla. Let it rest for atleast 30 mins so that the seasoning is absorbed well by the dhokla sponge.

7. Cut into squares and serve.

Notes:

* I serve this with mint chutney. Just grind mint leaves with little curd, ginger, green chillies and little coconut with salt. Add coriander leaves too if available. Grind till smooth. Tastes amazing with dhokla.

* The seasoning is very important in the dhokla flavour. Adjust sugar and lemon juice as per your taste. Please be sure to rest the dhokla atleast for 30 mins after pouring the seasoning.

* Eno fruit salt gives the dhokla it’s spongy texture. Though I have not tried this recipe without Eno, the usual substitute for Eno is equal amount of baking soda and lemon juice. So 2 tsp Eno equals 1 tsp baking soda plus 1 tsp lemon juice.

* Don’t add more water than mentioned or the dhokla won’t get the right texture. For 1 Cup semolina, 1 Cup water and 3/4 Cup thick curd gives it the right batter consistency.

* Be sure to insert a knife in the center to see if the dhokla has cooked properly after steaming.

* You can also steam this as Idlis. Just remove the Idlis in a large bowl and pour the seasoning and rest the Idlis till the liquid absorbs.

* The batter rises atleast double while steaming. So make sure to steam in a bowl in which the batter reaches only half of its height.

Instant Bread Pakoda toast

Even though I bake Whole wheat bread at home , there are times when we do order bread along with grocery if we feel like I need a break with all the cooking and baking. And when we do get bread from the stores, I make this toast as an evening snack and we all love it.

This is a healthier version of bread pakoda which is deep fried. Also, this batter has sugar in it as we love it with a hint of sweetness too.

Hope you all try and love it. I know how difficult it is to get a good healthy recipe idea for evening time. Hence sharing with all of you. Happy and healthy cooking!

RECIPE:

Ingredients:

4 Slices of bread

1/4 Cup Besan/ chickpea flour

1 Tbsp Rava/ Semolina/ Sooji

1 tsp Red chilli powder

1/4 tsp Turmeric powder

1/2 tsp Cumin seeds/ Jeera

2 tsp Sugar

Salt to taste

Oil to fry the toast

Step by step recipe:

1. Take Besan, rava, turmeric powder, red chilli powder, cumin seeds, sugar and salt in a bowl.

2. Add little water and mix till there is no lumps. DON’T add a lot of water at once as it will lead to lumps. Add little by little to make a smooth and slightly thick batter.

3. Heat little oil in a pan. Apply a spoon of this batter over bread and place it on the pan on the side where the batter is applied.

4. Now apply batter on the plain side as well.

5. Cook both sides on medium flame till they turn golden brown in colour.

6. Serve hot with ketchup.

Notes:

* Don’t make the batter very thick nor thin. It’s should be spreadable but not runny.

* Also don’t spread the batter thick over the bread. Just a single layer would suffice. Else it won’t cook well and inside will have raw batter.

* This toast like all others is best enjoyed when hot.

* If you don’t like the flavour of besan too much, you can make the batter with equal amounts of besan and rava ( 2 Tbsp each).