Category Archives: Curry house

Sprouted Moong Methi sukke | Kerala Konkani style spicy curry

Click on the image to save the recipe on Pinterest

I have lived a major part of my life in Kerala. So inspite of being a Kannadiga, I love many dishes from the Kerala cuisine like Avial (especially in marriage sadyas ๐Ÿ˜), Palada payasam ( Best bakery ones ๐Ÿ˜‹), Puttu Kadala and Porottas (from thattu kadas โค๏ธ), Appam stew (from my bestie’s lunch box ๐Ÿ˜…)… I can go on and on about it..

Also, since we lived among the Konkani GSB community in Elamakkara, we got a chance to taste dishes from their cuisine too. Many of them became just like our family and used to share whatever special they cook with us. And me being a foodie used to get so excited to taste something new.

One among the dish was this sprouted Moong Methi sukke which was made by an aunty whom we call Shyamala akka. She runs a catering service from her home and also sells snacks like chips and ladoos. So when we had a function at home, we ordered meals from her and this sukke was a part of it. We all loved it so much that we had to ask her for the recipe.

She was kind enough to share it in detail with us and after that, it’s a regular at my place. It is super healthy as it includes two variety of sprouts and is so delicious that you can’t stop eating it, that’s a promise.

Sprouting is very nutritious as it manifolds the health quotient of both moong and methi. Hope you all try this curry. I am sure you will love it. Happy and healthy cooking!

RECIPE:

Ingredients:

1/4 Cup dried Fenugreek seeds/ Methi {gives about 1 Cup methi sprouts}

1 Cup whole Moong/ Green gram {gives about 3 Cups moong sprouts}

3 Cups water or as needed

1 Tbsp Tamarind

2 tsp Red chilli powder

2 tsp Coconut oil

1 tsp Mustard seeds

A sprig of curry leaves

Salt to taste

1/4 Cup freshly grated Coconut

In the below steps by step pictures, I have taken 2 Cups Moong to sprout as I needed to use it for other dishes. For this recipe, only 1 Cup moong is required which yields about 3 Cups of sprouts.

Step by step recipe:

1. Wash well and soak Fenugreek seeds and whole moong separately in atleast thrice the amount of water overnight or for atleast 8 hours.

2. Now drain the water completely from it using a strainer. Do not forget to drain the water completely.

3. Now cover and keep aside for 10 to 12 hours.

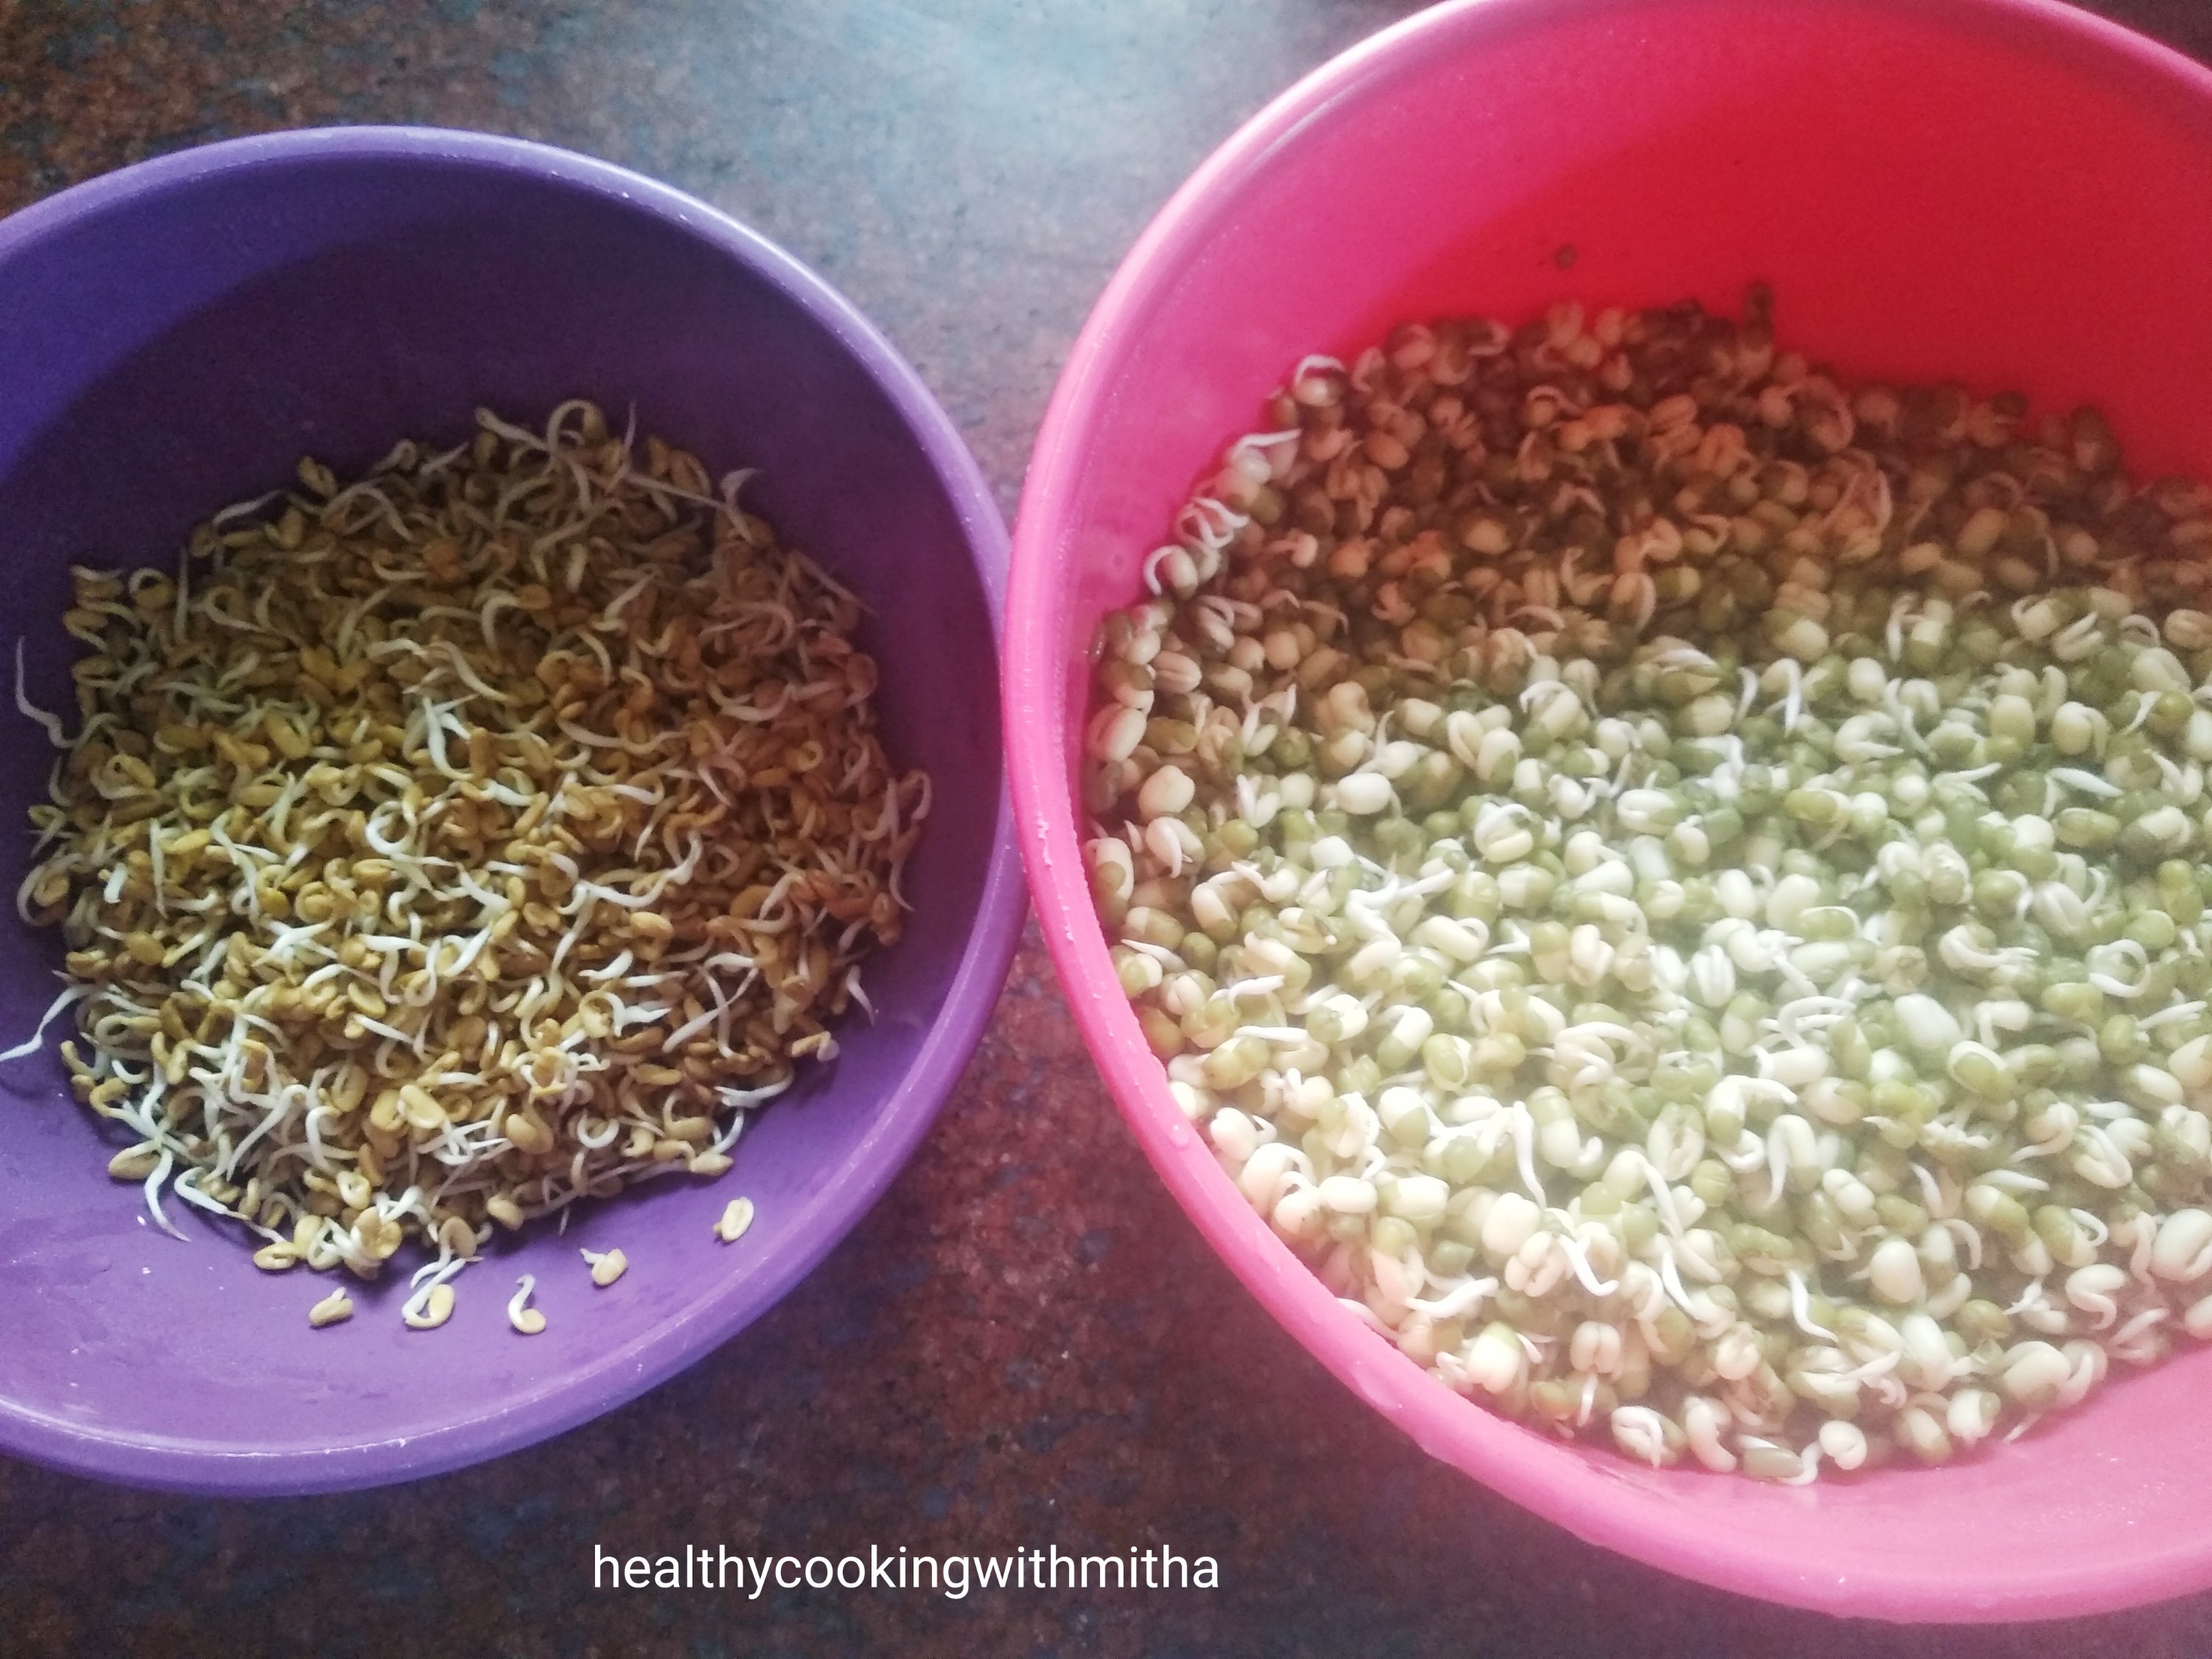
4. Now when you open after 10 to 12 hours, you can see little sprouts have emerged depending upon the weather in your place. In hot weathers, sprouting happens in a faster pace then in cold weathers. Wash the sprouts well and drain again completely.

DAY 1 of SPROUTS

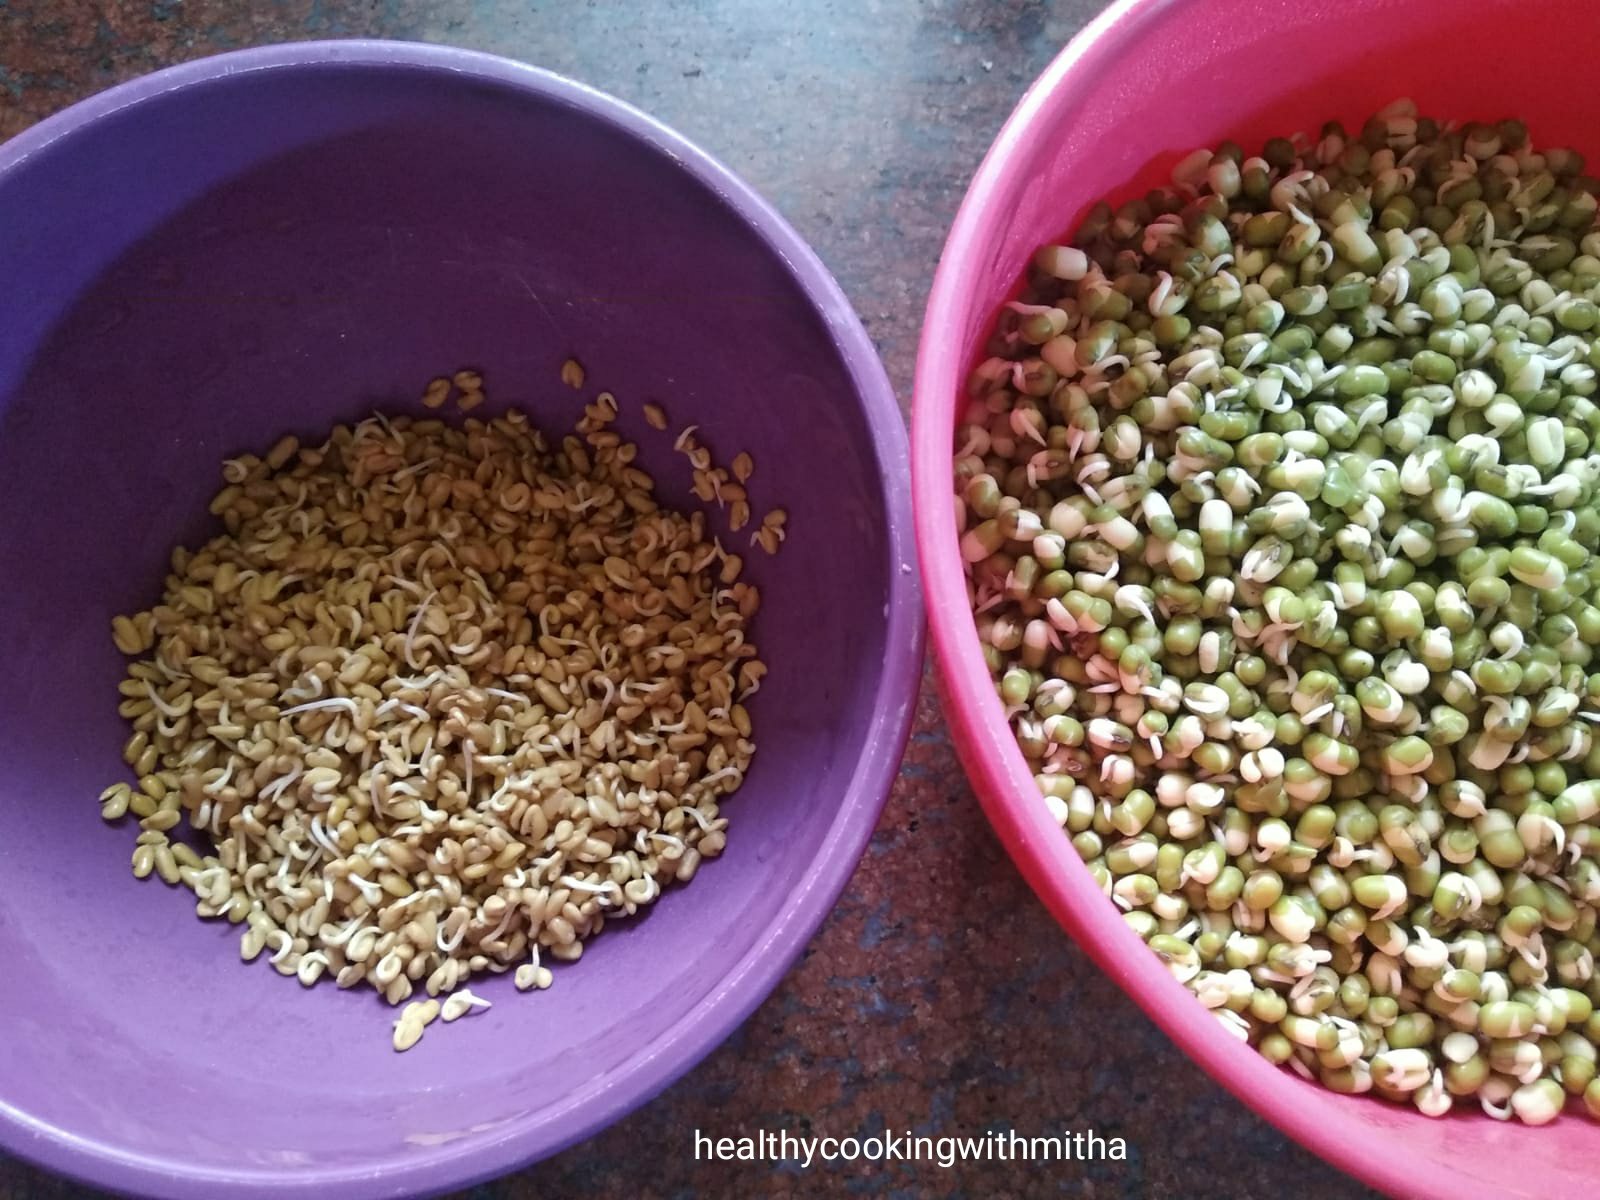
5. Keep again covered for 10 to 12 hours. Then you can see that the sprouts have increased in size. Now they are ready to be used. Wash them again and drain. Keep aside.

DAY 2 of SPROUTS

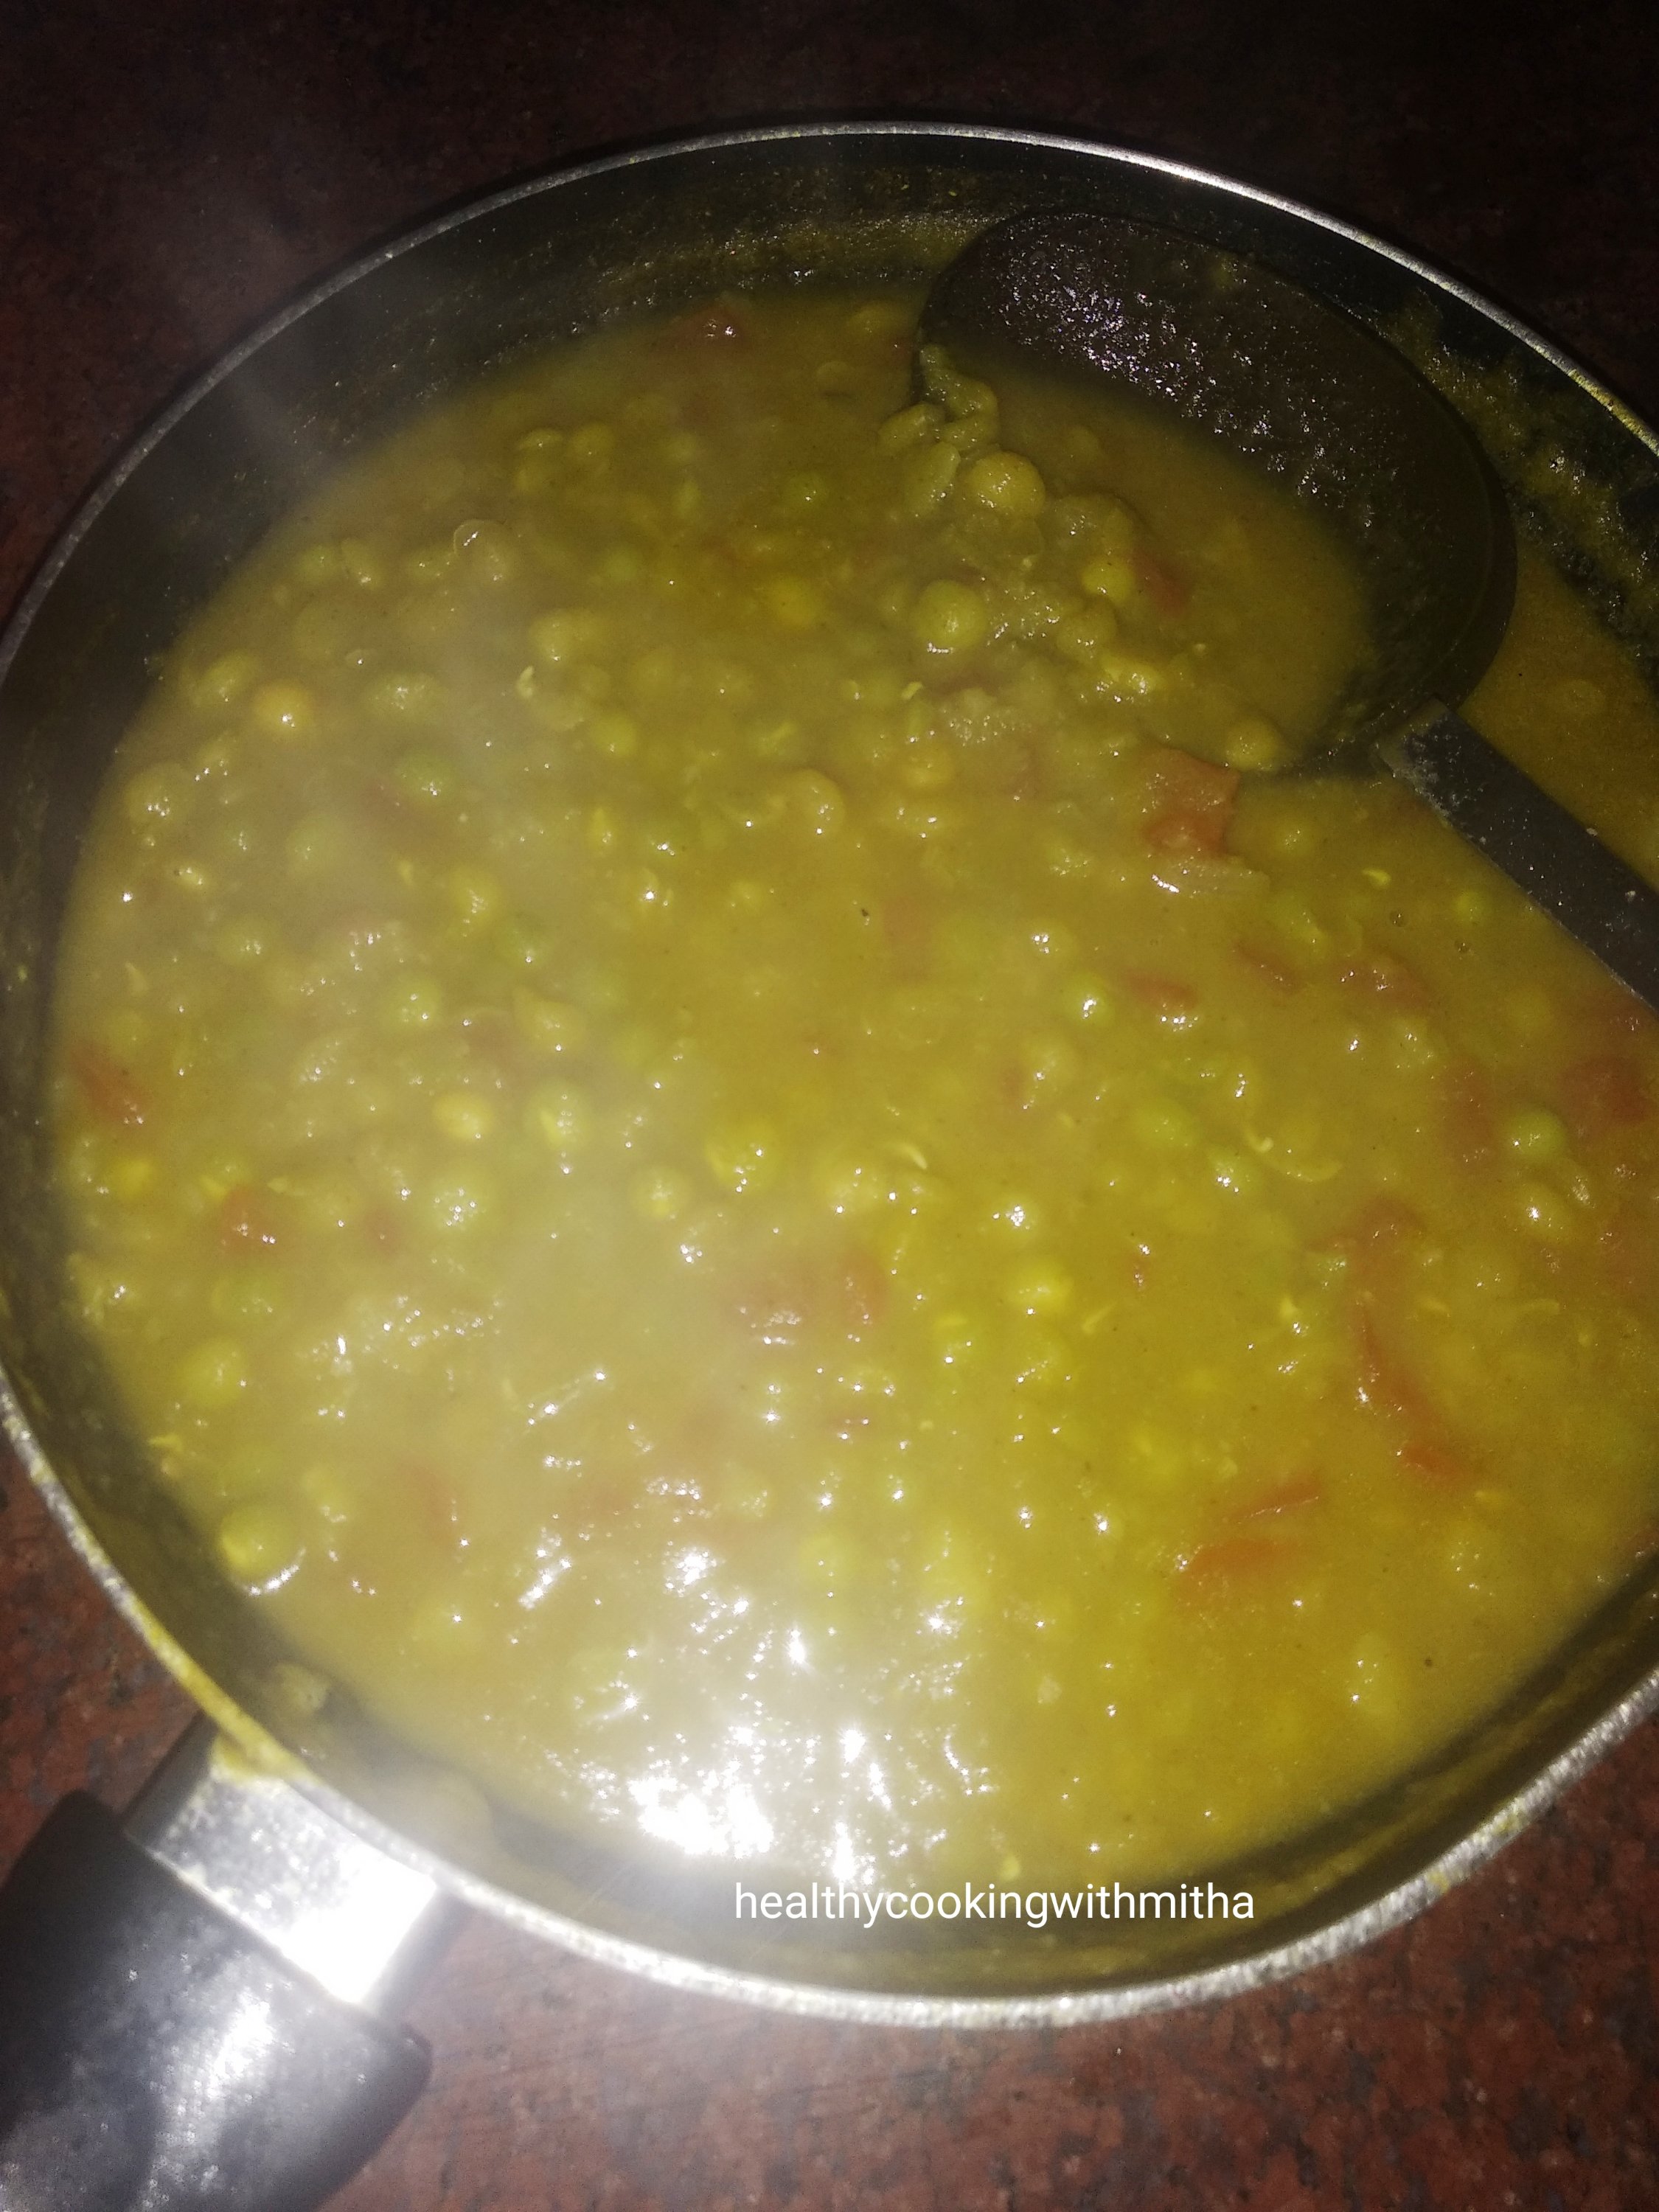
6. Heat oil in a pan. Splutter mustard seeds and add curry leaves. Now add both the sprouts together (1 Cup Methi sprouts + 3 Cups Moong sprouts). Mix well.

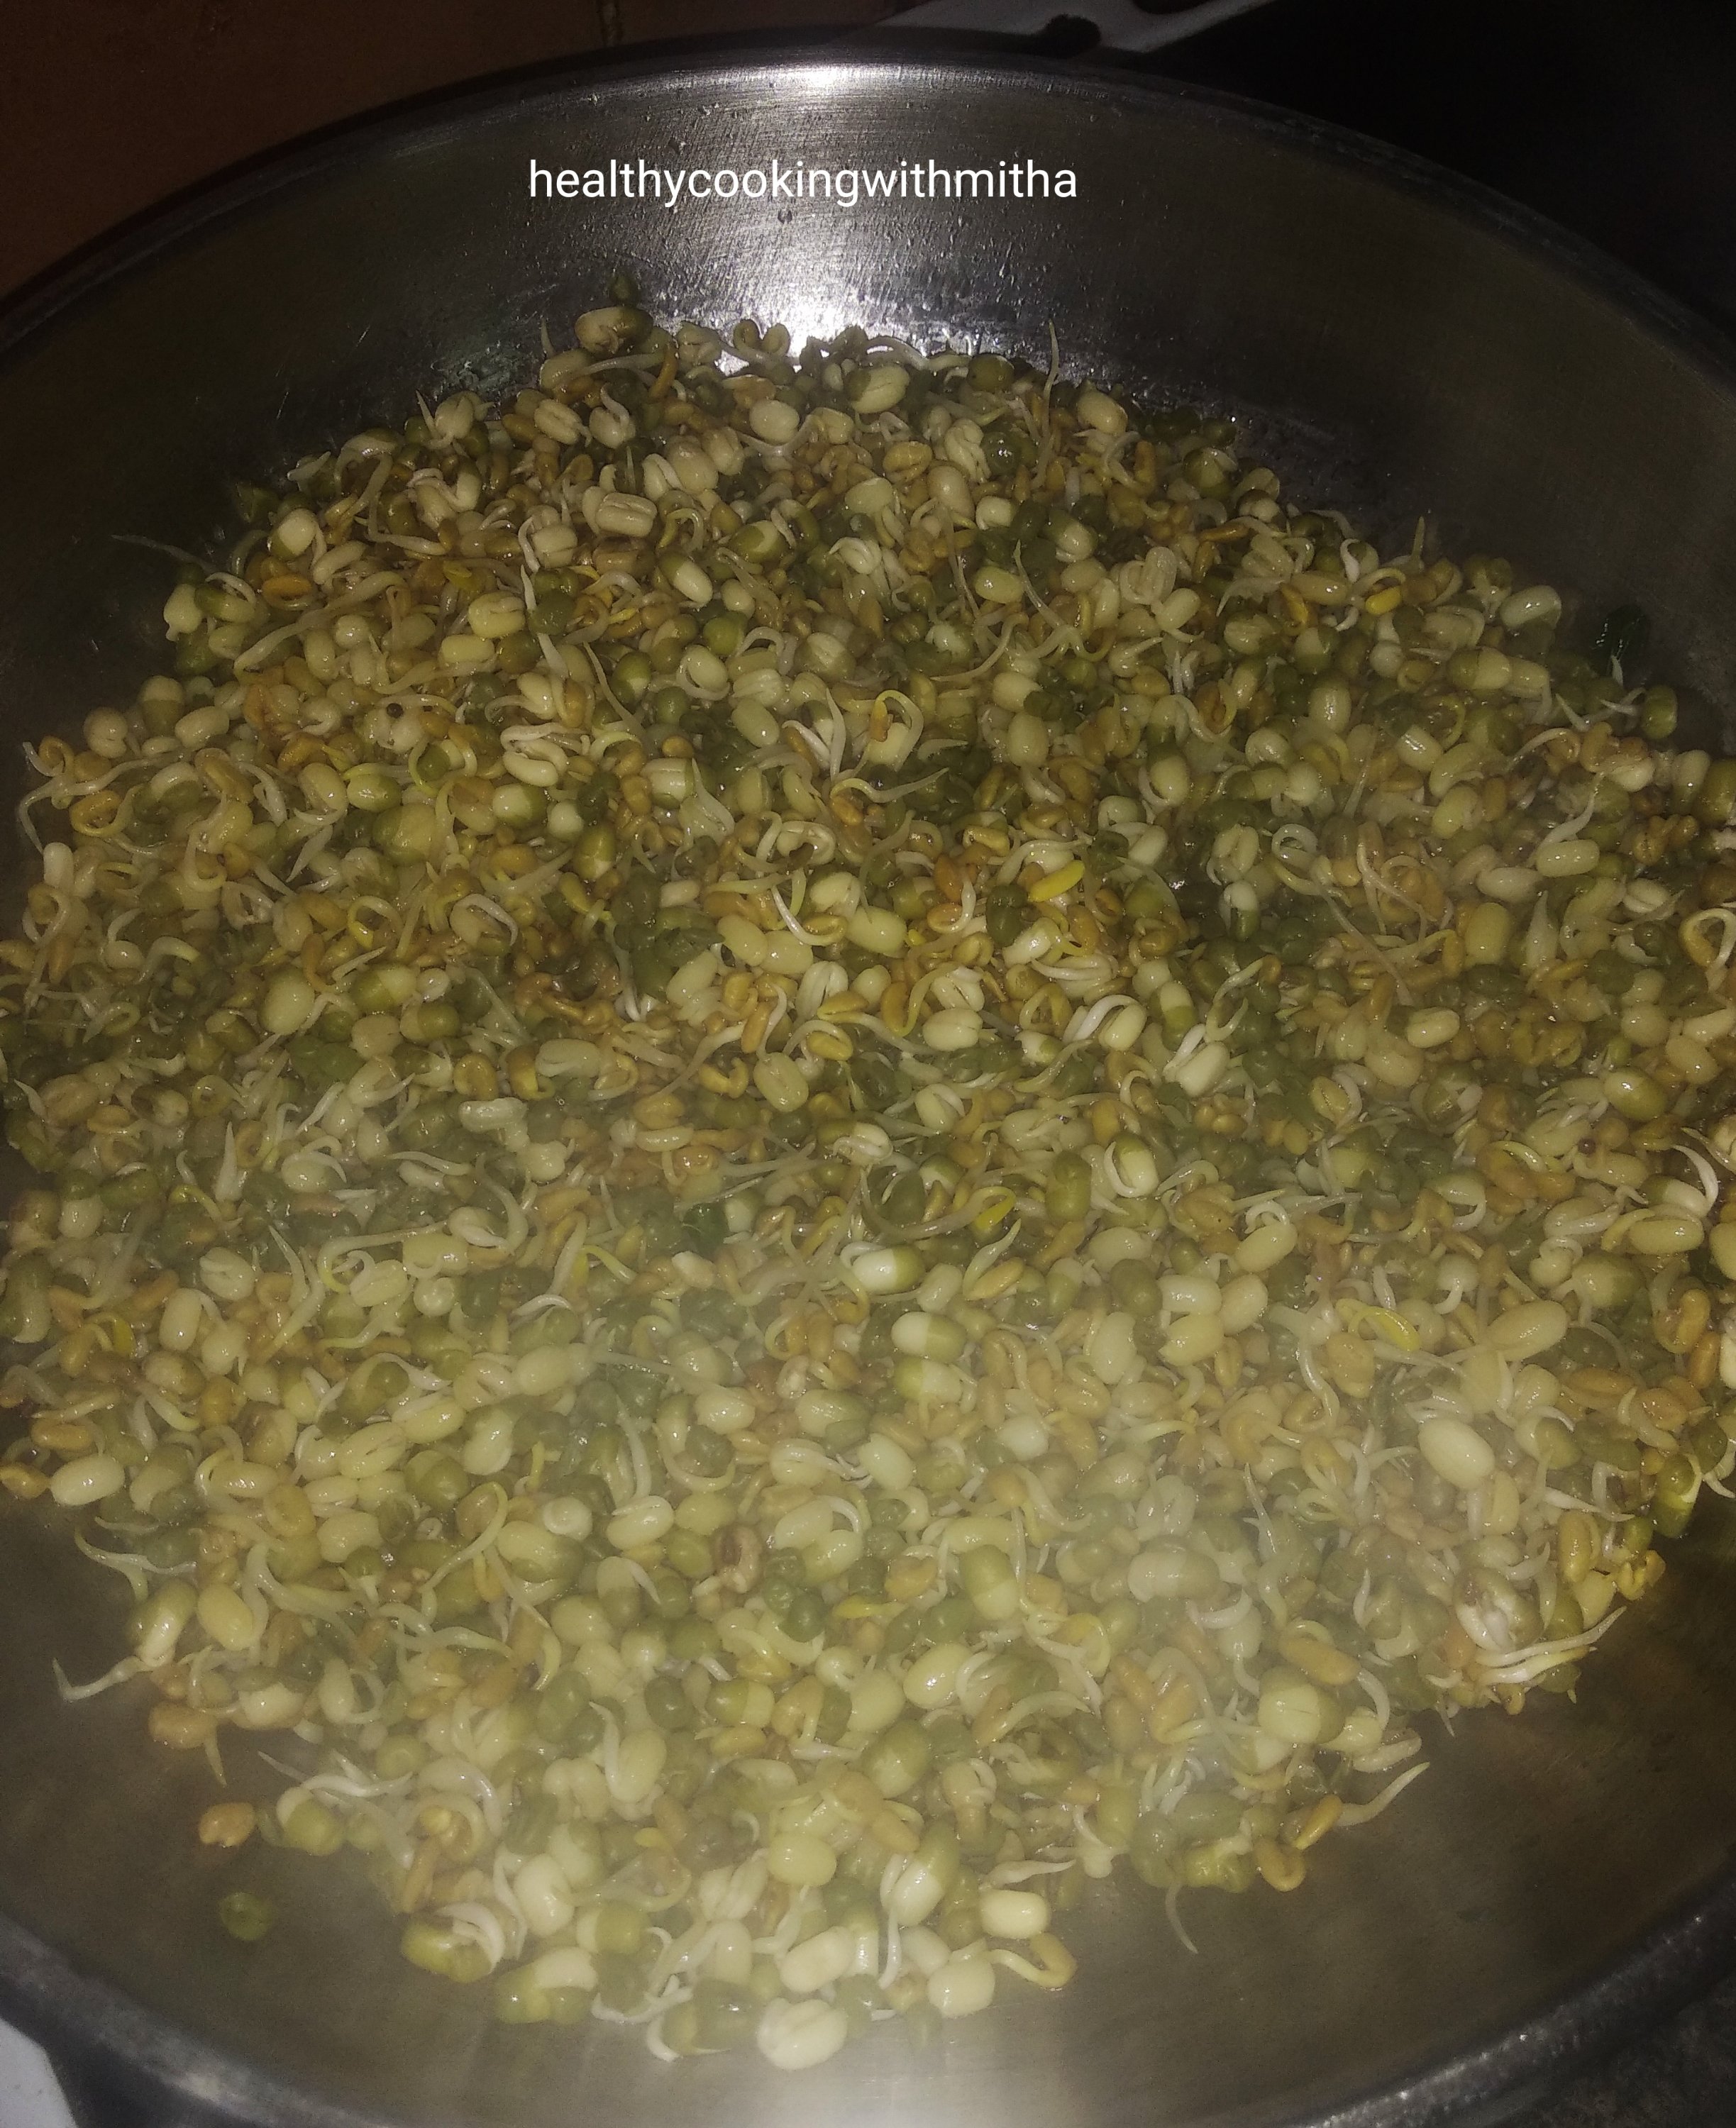
7. Add 3 cups of water and cook covered till the sprouts turn soft but still are firm. Add tamarind paste, salt and red chilli powder.

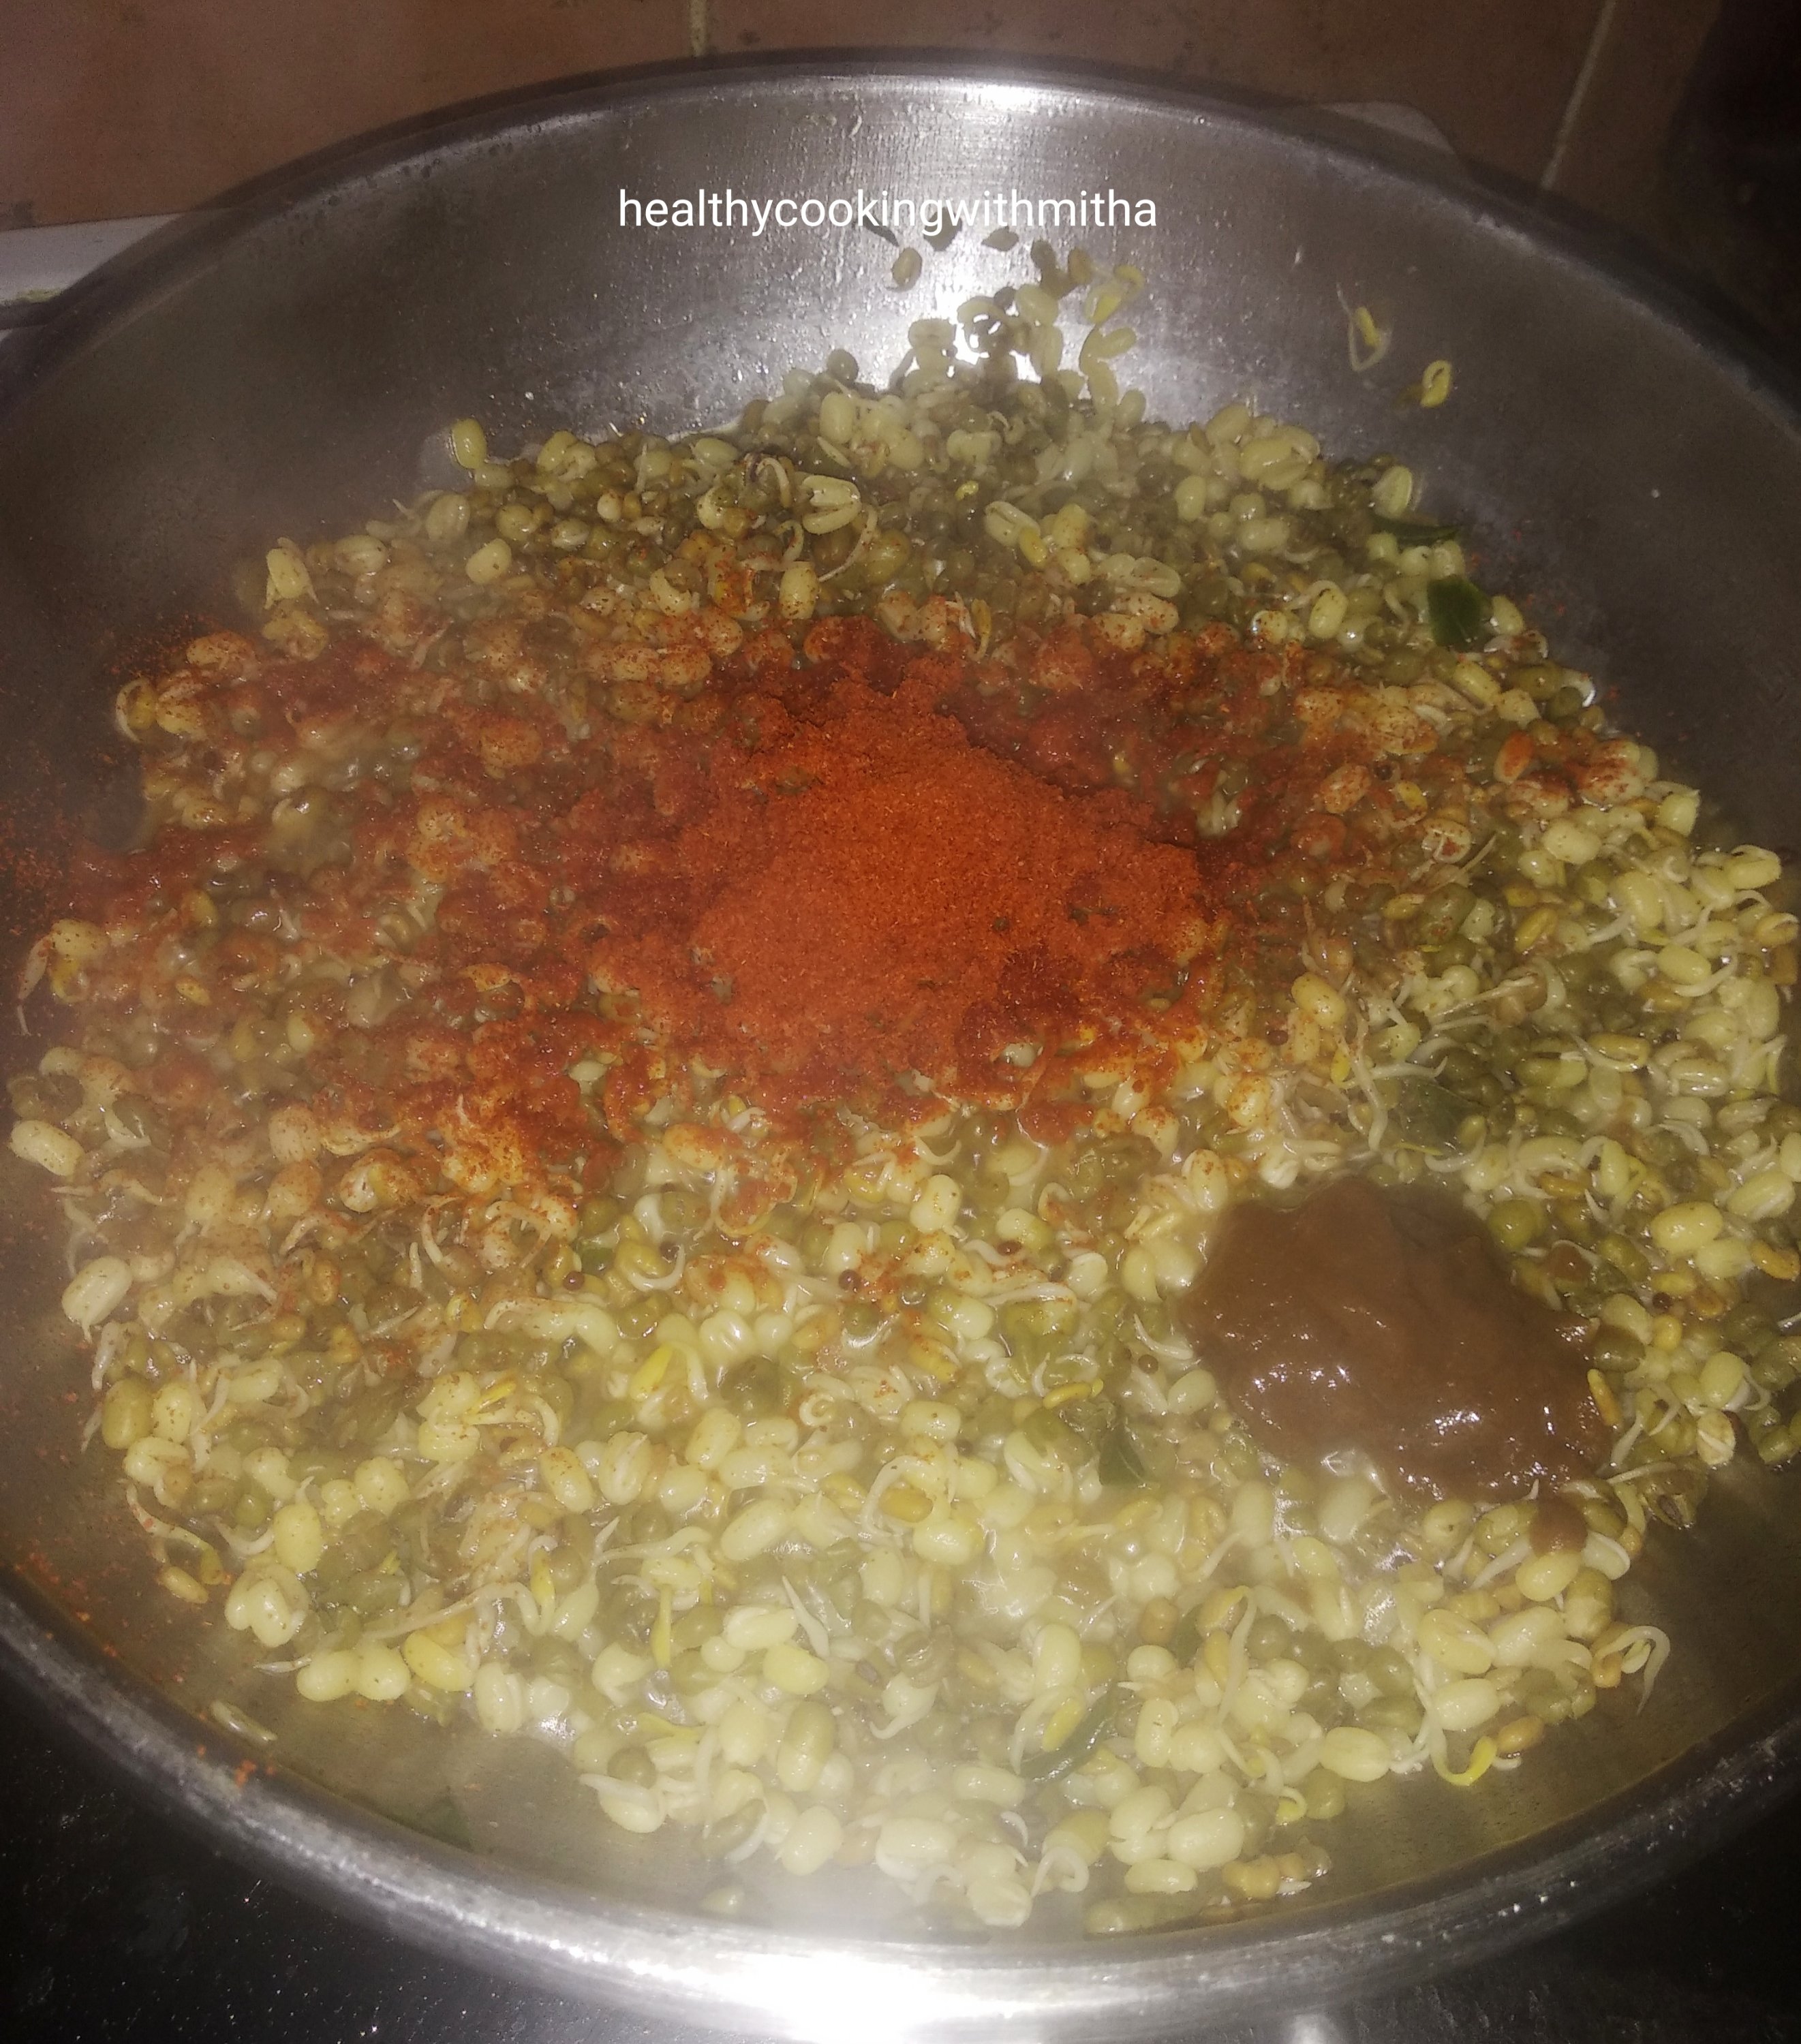
8. Mix well and cook for 5 more mins. Add water if needed and mix well.

9. Remove from flame and garnish with grated coconut.

Click on the image to save the recipe on Pinterest

Notes:

* Methi usually takes two days to sprout while moong sprouts within a day. But I sprout both for two days as it gives good sprouts for moong too.

* Remember to drain water completely before keeping for sprouting or else the sprouts can start smelling.

* Also remember to wash well atleast once daily to avoid the sprouts going bad.

* Red chilli powder is to taste. You can reduce or increase as per your taste.

* Don’t overcook the sprouts. Just cook till they turn soft yet are firm.

* The ratio of 1:3 of methi sprouts : moong sprouts gives perfect taste to this curry.

* The process of sprouting may look difficult but trust me, your work is very less. You just need to soak, drain and wash. That’s all. Rest work is done by the sprouts themselves. ๐Ÿ˜ (I have just added a lot of step by step pictures so that it’s helpful for people who are new to sprouting.)

Raw banana tawa fry Konkani style | Harve kele polo

My mother suffers from muscular dystrophy in her legs since many years and can’t walk. After years of using walker to support her, now she has to use wheel chair for movement. Even then, she does whatever household chores she can, sitting in the wheelchair like washing dishes, cleaning the house and bathrooms. I really admire her mental strength and I am very much proud of her.

She dedicates her time towards devotion to God by singing bhajans, reading slokas, reading The Bhagavad Gita apart from video calling with us. Whatever good things I have learnt in my life is from her. She’s my best friend, my first and true love and my greatest support. โค๏ธ

I am sharing about her today because this raw banana tawa fry is what she used to make for me as a kid. I used to get amazed by the beauty of this flower shaped dosa and used to stand beside her to see how it comes out.

Now whenever I make this dosa, I remember her a lot. Amma, this post of dedicated to you. Though I may not say it often, I love you a lot. ๐Ÿ˜˜๐Ÿ˜˜

Hope you all try and love this too. Happy and healthy cooking!

RECIPE:

Ingredients: {To make 2 flower shaped dosas}

1 medium sized Raw Banana

2 Tbsp Rice flour / rice powder

1/2 tsp Red chilli powder or to taste

1/4 tsp Asafoetida powder/ Hing

Salt to taste

Oil to cook the dosa

Step by step recipe:

1. Wash well and peel the raw bananas. Cut in circles which are not too thick nor too thin, in medium thickness as shown. Immediately put them in water so that they don’t turn black.

Note: I have also finely chopped the rest of the raw bananas to make stir fry or Upkari. Recipe in notes at the end.

2. Now make a thick paste with rice powder, red chilli powder, hing, salt and little water.

Note: Don’t make it thin as it won’t coat the raw bananas. Add only a Tbsp of water at a time.

3. Now heat a dosa pan. Drain all water from raw bananas. Dip the raw bananas one by one in the batter and place on the pan together in a flower shape.

4. Drizzle oil over it. Cover and cook till the surface cooks well. Do this on medium flame. It will take some time but still raw bananas cook quicker than potatoes. Flip and cook till it cooks completely.

5. Serve hot with rice meals or munch on as an evening snack.

Notes:

* Be careful to not cut the raw bananas too thick as it won’t cook well if done so.

* The batter should be thick or else it won’t coat the bananas well.

* Red chilli powder is to taste. I add less to accommodate my kids’ tastebuds.

* For the raw banana Upkari, heat oil in a pan. Splutter mustard seeds. Add hing and broken red chillies. Add finely chopped raw bananas with very little water. Add salt and cook till the bananas turn soft. Garnish with freshly grated coconut. Remove from flame.

Snake gourd seeds spicy dosa | Poddale beeye Sannapolo

After I posted Ridgegourd skin chutney, it reminded me of another “taste from waste” which my grandmother made regularly. It is these small dosas from the seeds of snake gourds. They are not the dosas that we have for breakfast but had with rice meals and called as sannapolo in Konkani.

There are so many varieties of sannapolos made with onion, cabbage, moringa leaves and many others. Those require soaking and grinding rice and toor dal. But this variety of sannapolo can be made instantly as it uses rava instead.

And anything that can be made instantly becomes instantly my favourite too ๐Ÿ˜‰. What better way to use up the healthy part of this vegetable in a delicious way. A meal of these dosas with upkari and ukde pej (Matta rice congee) becomes a soulful meal for us. Something I can never get tired of. โค๏ธ

Hope you all try this and love it like we do. Happy and healthy cooking!

RECIPE:

Ingredients:

3/4 Cup Snake gourds seeds (I took the core of two regular sized snakegourds)

1/2 inch Ginger piece

3 Green chillies

1/2 Cup Coconut (fresh or desiccated)

1 Cup Rava or Semolina

Salt to taste

Coconut oil to cook the dosa

Step by step recipe:

1. * Wash the snake gourd well and scrape the white skin with a knife.

* Then slice lengthwise and remove the core. Keep it aside.

* Chop the snakegourds to small pieces and keep it in another bowl to make Upkari. (Will share the recipe in notes) Soak 1/4 Cup chana dal for the Upkari for about 30 mins.

2. For the spicy dosa or sannapolo, grind the seeds along with coconut, ginger and green chillies to a slightly coarse paste.

Note: Don’t grind too much or it can taste bitter. Just pulse two to three times so that the seeds are crushed.

3. Add this paste to a bowl. Add rava and salt. With little water, make a thick batter.

4. Heat the dosa pan and make small dosas. Drizzle coconut oil and cook the dosas on both sides till they turn brown and crisp.

5. Remove and serve with rice meals. This is not the regular dosa had for breakfast. It tastes best with rice, rasam or dal and snake gourd stir fry (Upkari).

Notes:

* If the snake gourd seeds are very small and easily crushable with hands, then no need to grind it along with the other ingredients in the mixer. Just mix it with the ground paste.

* While grinding the seeds, don’t grind for too long. Just pulsing is enough. Grinding for too long can cause a bitter flavour.

* The rava that I use is normal upma rava. Since this is a thick dosa, don’t add a lot of water. Just enough water to make a thick batter.

* For the snake gourd Upkari, heat coconut oil in a pan. Splutter mustard seeds and add the soaked chana dal, green chillies and curry leaves. Add chopped snake gourd and hing along with salt and little water. Cook till the snake gourd turns soft. Garnish with grated coconut.

Ridge gourd skin Chutney | Ghosale sheere Chutney & Ridge gourd Upkari

We amchis (GSB Konkanis) are famous for not wasting anything when it comes to food. We use every possible part of any vegetable while cooking. I have seen my grandmother and mother do it and follow the same. It is not only economical but is very healthy too.

One of the most used “taste from waste” in my kitchen is watermelon rind (the white part of watermelon) which many people throw away. But you can make these sweet and spongy dosas called Surnalis with it. Also lipsmacking Halwa with jaggery can be made with it.

This chutney is yet another amazing example of using up vegetable peels. The chutney from ridgegourd skin tastes so yummy that I used to literally beg my dad to bring it so that my mother could make this chutney.

I love it so much that I peel the skin a little thicker than normal so that I get more chutney than Upkari ๐Ÿ˜…. Here’s sharing how my grandmother and mother make this chutney. Hope you all try and love it too. Happy and healthy cooking!

RECIPE:

Ingredients:

Skin or peel of one long Ridge Gourd

2 tsp Ghee

1 tsp Cumin seeds/ Jeera

1/2 tsp Hing or Asafoetida

3 Green chillies

1 Cup fresh or desiccated Coconut

1 tsp Tamarind paste

Salt to taste

Step by step recipe:

1. Remove the peel or the ridges of the ridge gourd and cut into pieces.

Note: Cut the ridge gourd into small pieces too for the Upkari or stir fry. Will share the recipe in the notes.

2. Heat ghee in a pan and add cumin seeds and hing. When it changes colour, add green chillies and ridge gourd skin. Fry well till the skin cooks well.

3. Now add coconut and fry till it turns brown in colour. Remove and allow it to cool.

4. Grind with tamarind, salt and little water to a smooth paste. This is a thick chutney.

Notes:

* My grandmother used to add couple of roasted Red chillies too to the chutney while grinding for extra flavour. I skip it so that it does not turn spicy for my kids.

* This is a thick chutney and along with Upkari makes an excellent combination with rice meals. You can enjoy with dosas too.

* I peel the ridge gourd little thick as I love this chutney. You can peel it thin if you are used to doing that way.

* For the Ridge Gourd Upkari, splutter mustard seeds in coconut oil. Add green chillies and the chopped ridge gourd. Add salt and cook without adding water till the pieces turn soft. Garnish with freshly grated coconut and remove from the flame.

Dhaba Style Paneer

We are a paneer loving family and our idea of a special weekend dinner is incomplete without paneer. So when my dearest friend and soul sister Sumangala posted Dhaba style Paneer on her Instagram handle @onlyvegfoodie, I could not resist trying it instantly. It looked so so delicious.

And how amazing it came out too. My kids who usually make faces during dinner time ate whole heartedly and happily that day. My daughter even ate the curry as it is which is a rarity since she always finds everything spicy. So you can imagine how much she liked it.

I also want to write something about Sumangala. We first met through our GSB youth wing Elamakkara (where we lived in Kochi) during our college days. We were (still are ๐Ÿ˜) both talkative and got along very well. She’s very loving and a down to earth person. I still remember my visits to her house and the nearby Shiva temple with her. Now we both are busy mommies with two kids of our own but our common love for cooking keeps us connected on Instagram. So glad to see you happy Suma. Love you. The memories with you are unforgettable. ๐Ÿ˜˜

Hope you all try her recipe of Dhaba style Paneer and love it as much as we did. Happy and healthy cooking!

RECIPE:

Ingredients:

To marinate:

200 grams Paneer cubes

1 tsp Red chilli powder

1 tsp Coriander powder

2 tsp Garam masala powder

1/2 tsp Haldi powder

2 tsp Water

Other ingredients in order:

1 Tbsp Ghee

1 Tbsp Oil

2 Cardamom pods

2 Cloves

1/2 inch Cinnamon stick

1 Bay leaf

1 tsp Cumin seeds or Jeera

1 tsp minced Ginger

1 large Onion, blended in mixer

2 large Tomatoes, pureed in mixer

2 Tbsp Coriander leaves, while frying

1/2 tsp Kasuri methi, crushed between palm

1 tsp Red chilli powder

1 tsp Garam masala powder

2 tsp Besan/ Chickpea flour

Salt to taste

Coriander leaves for garnish

Step by step recipe:

1. Take Paneer cubes in a bowl. Add red chilli powder, garam masala powder, haldi powder and coriander powder along with little water. Mix well and keep aside for 30 mins.

2. Heat oil and ghee in a pan. Add jeera along with Cardamom pods, cloves, cinnamon stick, bay leaf. When jeera changes colour, add blended onion and ginger.

3. Keep frying continually till the raw smell goes away and the paste leaves the sides of the pan. Now add kasuri methi, red chilli powder, garam masala powder and besan.

4. Fry for two mins till the rawness of besan goes away. Now add tomato puree along with coriander leaves and cook covered for 6 to 8 mins till the mixture leaves the sides of the pan.

5. Now add paneer cubes and mix well. Cook again covered for 5 mins.

6. Remove from flame. Garnish with Coriander leaves. Serve with rotis or rice.

Notes:

* Paneer can be substituted with mushroom or cauliflower.

* You can fry the marinated paneer first before adding to the gravy for a firmer paneer. I skipped that step since we like the softness of paneer in gravies.

* Do remember to cook well after adding onion puree, after adding besan and after adding tomato puree. All three steps need some time to cook thoroughly but is very important to get the authentic dhaba style Paneer.

* You can skip the red chilli powder in the gravy and add only to the marinate if you don’t like too much spicy gravy. My kids loved it even though I added red chilli powder in both marinate and gravy.

Masala Puri chaat

It is my son’s second birthday today (August 12th) and we are celebrating it since 10th. 10th because it was my husband’s off day from work (we did a small celebration at home), 11th as it was Janmashtami and I love dressing him up as Krishna. He is our little Kishan Kanhaiyya who brought flood along with him during the Kerala floods in August 2018.

I remember those scary days every year and pray that no one has to go through it again. But yes, God has been really kind upon us and we survived the days well.

My parents shifted back to our native Udupi in Karnataka after that as they wanted to be closer to their siblings and the days in Cochin are a beautiful memory to cherish.

One among the food memory from Cochin is piping hot masala puri that we used to enjoy from a small chaat stall behind the Ernakulam Shiva temple. Me and Amma used to sit in our car (as I was very shy to eat in front of other people ๐Ÿ˜) and my dad and brother used to bring them to us. The flavours of the masala puri is still in my taste buds. So so delicious. I have never eaten a tastier masala puri than that.

But I am glad after many trials, my version of masala puri does taste almost same to that. I make it during special days and since it was my son’s birthday, I made it for our evening special snack and we all enjoyed it. Hope you all try and enjoy too. Happy and healthy cooking!

RECIPE:

Ingredients: {Makes about 4 plates}

For the curry:

1 Cup dry Green peas (soak overnight)

1 medium sized Potato

1 medium sized Tomato

1 tsp Garam masala powder

1/4 tsp Turmeric powder

Salt to taste

1 Tbsp Oil

To grind:

1 medium sized Onion

3 Green chillies

1/2 inch Ginger piece

1/2 Cup Coriander leaves

1/4 Cup Mint leaves

For garnish: finely chopped Onion, tomatoes and coriander leaves as desired

For assembling the chaat: {In one plate}

3 to 4 Puris, 3 ladles of the curry, 1 Tbsp Date Tamarind chutney, Green chutney if desired, finely chopped onions, tomatoes, coriander leaves and bhujiya or Sev.

Step by step recipe:

1. Pressure cook the soaked green peas (soak for atleast 8 hours) along with potato and turmeric powder till it turns soft.

Note: It takes 4 whistles at high flame in my electric stovetop.

2. Mash lightly and keep aside.

3. Take all ingredients to grind in a mixer jar.

4. Grind with little water to a smooth paste. Keep aside.

5. Heat oil in a pan and fry finely chopped tomatoes till it cooks.

6. Add the ground masala paste and cook till it reduces and leaves the sides of the pan. Add garam masala powder and salt.

7. Add the cooked and mashed peas and potatoes.

8. Now cook till it thickens and turns into a gravy like below. Remove from flame.

9. For making masala puris, take puris in a plate and break into pieces.

10. Now add two to three ladles of the curry, top with date-tamarind chutney, onions, tomatoes, coriander leaves and bhujiya. Serve hot.

Notes:

* You can also make green chutney for a spicier masala Puri. Since I make it for my kids, I skip and make the curry mildly spicy for them to enjoy.

* For the green chutney, just grind green chillies with coriander leaves, mint, salt and little water to a smooth paste.

* I also use Mother’s recipe date tamarind chutney. If you don’t have it, just grind dates with tamarind and salt with little water to a smooth paste. That’s your sweet chutney.

* For the puris, I have bought these ready to be fried puris long back (more than 2 years actually) and still they are good. I just microwave it on high for 1 minute and they are ready. No need to deep fry at all.

* The curry can be used as an accompaniment to rotis and rice meals. If you add paneer to it, it becomes matar paneer. I do the same when I have leftover curry.

* You can grind tomatoes if you don’t like tomatoes as it is in the gravy.

Mushroom Aloo masala

Mushrooms are a regular in our grocery list even though I am not a huge fan of it. My husband absolutely loves it and I have learnt to adjust to it even though I have to make a face when I see it come home {Sorry Mr Mushroom ๐Ÿ˜).

So I try to hide it in lipsmacking gravies so that I “manage” to eat it. One of them is Mushroom Chettinad and it does turn out very restaurant like. Another one is this Mushroom Aloo masala as named by me ๐Ÿ˜„.

Mushroom Aloo masala is a perfect combination of mushrooms (which I don’t like, hubby loves) and potato (which I love, hubby hates). So I enjoy the potatoes in the gravy and serve him all the mushroom pieces in it ๐Ÿคฃ. How’s the idea??

I also add peas to the gravy for some colour and great bite. Hope you all try and love it too. Happy and healthy cooking!

RECIPE:

Ingredients:

250 g Button mushrooms, quartered

1 medium sized Potato, peeled and cubed

1/2 Cup frozen Green peas

1 Tbsp Ghee

1 tsp Cumin seeds

1 Bay leaf

1/4 tsp Turmeric powder

1 tsp Red chilli powder

2 tsp Sabzi masala or any garam masala of your choice

Coriander leaves for garnish

Salt to taste

To grind:

1/2 inch Ginger

1 medium sized Onion

1 large sized Tomato

2 Cloves

1/2 inch Cinnamon stick

1 Elaichi or Cardamom

Step by step recipe:

1. Grind the ingredients mentioned in “to grind” to a smooth paste adding water as required. Keep it aside.

2. Heat ghee in a pan and add cumin seeds and bay leaf. Let the seeds change colour. Add the ground paste.

3. Allow it to cook on medium flame for about 10 mins till it changes colour and leaves the sides of the pan. Add salt, turmeric powder, red chilli powder and sabzi masala.

4. Now add potato pieces and green peas. Mix well. Cover and cook till they turn soft.

5. Now add mushroom and mix well.

6. Cover and cook on high flame. Mushroom will leave water and turn soft. Check the consistency of the gravy and add water only if needed.

7. Remove from flame and serve hot with rotis or rice.

Notes:

* Do cook the ground paste very well before adding potato and peas. Else there will be a raw flavour in the gravy.

* You can skip peas too but it gives a good bite in the gravy.

* I use MDH Sabzi masala. You can use any spice powder of your choice.

* Don’t add water at all while adding mushrooms. Mushrooms leave water while cooking. So most times you don’t have to add additional water.

* If needed, add additional water towards the end to adjust the gravy.

Vaingana Bajji | Konkani style mashed brinjal

After my last post of Vastad rotti (pan fried version of Mangalore Buns), I was reminded of another Konkani delicacy which I used to literally beg my grandmother to make. It is this Vaingana bhajji. She used to make with green brinjals (or gulla in Konkani/Kannada) and it tasted so heavenly that I could eat it as it is without rice.

Since we hardly get green brinjals here, I use purple ones for making Bajji. Also traditionally, the brinjal is roasted over gas or wood fire and then mashed after removing skin. If you have the option, then you can do it too. But since we have an electric cooking range, I boil it in water and mash it. My grandmother did this way too and as Amma says, this is much easier (mothers always want less work for their kids and Amma told me to try this way ๐Ÿ˜). Life became easier after that and Bajji became our regular dish when we got fresh brinjals.

We love simple meals and this is an accompaniment which is very flavorful yet very basic. Hope you all try and love it too. Happy and healthy cooking!

RECIPE:

Ingredients:

1 large Purple Brinjal or 2 medium sized Green Brinjal or 3 small purple brinjals (about 2 cups chopped)

1 medium sized Onion, finely chopped

2 to 3 green chillies, finely chopped

1/2 tsp Hing or Asafoetida powder

2 tsp Tamarind paste

1 Tbsp Coconut Oil

Salt to taste

3 Tbsp chopped coriander leaves

Step by step recipe:

1. Take chopped brinjals in a vessel.

2. Add little water and cook till it turns very soft. Water should be absorbed too.

3. Mash the brinjal very well using a masher.

4. Now add chopped onions, green chillies, tamarind pulp, hing, salt and coconut oil.

I have used pink salt or rock salt or kaala namak here. Hence the colour pink.

5. Mix well and garnish with coriander leaves.

Serve immediately as an accomplishment with rice meals.

Notes:

* I have made it with all varieties of brinjals and it tastes great with any variety of them.

* Traditionally bhajji is made by roasted over gas or wood fire but my grandmother made this version too and I make this because I don’t have gas stove here (nor wood fire ๐Ÿ˜…).

* Don’t add a lot of water while cooking the brinjals and make sure the water is absorbed well and brinjal is cooked well too.

* You can skip onions if following satvik diet but onions does add a wonderful bite.

* I usually make this with our Matta rice congee and it tastes heavenly with it.

* With white rice and rasam, bhajji makes an excellent accompaniment.

10 min Restaurant style Veg Kurma

I have tried many Kurma recipes in the past but once I tried this one, I did not have to try any other. It comes out too delicious for words. Although this technique was new to me, I found that cooking with almost zero additional water in the pressure cooker makes the Kurma taste amazing.

Whenever I make this Kurma, the husband comes to know through the aroma and he asks if it’s Kurma that is cooking ๐Ÿ˜‚. You have to try it to know. I have made it for many get togethers and people love it a lot.

Best part of this curry is once the chopping is done, it hardly takes 10 mins. No sauteing or cooking for long time. I make this specially during weekend now when I don’t want to spend the whole day in the kitchen.

Hope you all try and love it too. Happy and healthy cooking!

RECIPE:

Ingredients:

About 3 Cups mixed Vegetables (Potato, peas, carrots, capsicum, cauliflower)

1 Cup Paneer cubes

2 Tbsp Coconut oil

1 Tbsp Ghee

2 green chillies

1/2 inch Cinnamon stick

3 Cloves

2 Cardamon pods

1 large Onion, finely chopped

1 large Tomato, finely chopped

1/2 Cup Milk

2 Tbsp Coriander leaves, finely chopped

For the masala paste:

1/4 Cup Yogurt/ Curd

1/4 Cup freshly grated or desiccated Coconut

5 to 7 Cashews

3 to 4 cloves of Garlic

1 inch Ginger piece

1 tsp Red chilli powder

1 tsp Garam masala powder

1 tsp Coriander powder

1/2 tsp Turmeric powder

Salt to taste

Step by step recipe:

1. First add all the ingredients mentioned in the masala paste and grind to a smooth paste without adding water. Don’t forget to add salt too. Keep aside.

2. Keep the vegetables ready as well.

3. Now take a 2 liter or 3 liter pressure cooker. Don’t keep it on the flame. Add ghee and oil in the cooker. Also add cloves, cardamom and cinnamon stick along with green chillies. Bay leaf too if you have.

Note that I have not yet kept the cooker on the flame or stove top.

4. Now layer finely chopped onions evenly.

5. Layer tomatoes evenly too.

6. Layer the veggies after this.

7. Add paneer cubes layer over this.

8. Now add the masala paste as the top layer.

9. Now pressure cook the above layers on medium flame for 7 mins or till 3 whistles. There is no need to add water while cooking. The juices in the vegetables will release water and that’s what makes this Kurma tasty.

10. Allow it to cool down by itself. Now add milk and cook for about 2 mins.

11. Garnish with coriander leaves and serve hot with rotis or rice.

Notes:

* OPOS is a patented technique owned by Mr.Ramakrishnan. It is a copyrighted term. I have adapted this recipe from this site and since she used this technique for making this Kurma, I followed the same. I have no intention of owning this technique. The full credits to this technique goes to Mr Ramakrishnan Sir only.

* If you don’t know to use a pressure cooker, you can saute tomato and onions in the seasoning and cook the veggies with the masala while following all the steps in a kadhai.

* In the original recipe, it says to keep on high flame for 5 mins but it sometimes burnt my Kurma. So I keep the flame on medium for 7 mins. It works well for me.

* In case your veggies don’t cook when you open the cooker, cook after you add milk for 5 more mins.

* Don’t forget to add salt in the masala paste itself. It makes a huge taste difference if you add later.

* Also don’t add water at all while grinding the masala paste. The yogurt does the job well and you can see it while grinding.

* Paneer is optional. I add because we love it. You can also add any combination of veggies that you have.

Paneer Hara Masala

Paneer is the star at my house and we all love paneer very much. But during both my pregnancies, I could bear to even smell it. And right after I delivered, my paneer love is back again. Weird right? ๐Ÿ˜

The funniest part is both my kids are huge fan of paneer. So I ask them always, what happened when you were inside me? Why didn’t you like it then? ๐Ÿ˜‚๐Ÿ˜‚ I know I sound crazy ๐Ÿ™ˆ

Anyhow this paneer Hara masala was an experiment with using the same masala that I use for Amma’s Carrot pulao since we love the aromatic masala paste. And it turned out super delicious. So was born paneer “Hara” masala, Hara meaning green in hindi.

Sharing this easy recipe with all you. Happy and healthy cooking!

RECIPE:

Ingredients:

200 grams Paneer cubes

1/2 Cup thinly sliced Capsicum

1/2 Cup roughly chopped Tomato

1/2 Cup finely chopped Onion

1 tsp Red chilli powder

1/2 tsp Garam masala powder

1 tsp Jeera/ cumin seeds

Salt to taste

1 Tbsp Oil/ Ghee

For the masala paste:

1/2 Cup Coriander leaves

1/4 Cup mint leaves

3 green chillies

3 cloves of Garlic

1/2 inch Ginger

Step by step paste:

1. Add the ingredients mentioned in the masala paste and grind to a smooth paste. Keep it aside.

2. Heat oil in a pan and add Jeera. Add chopped onions and fry till it turns translucent.

3. Add the ground masala paste and cook for few minutes till it turns dry.

3. Now add capsicum and tomatoes and mix well.

4. Now add red chilli powder and garam masala powder. Also add salt.

5. Add paneer cubes. Mix well. Cover and cook for 10 mins on medium flame.

6. Serve hot with rotis or rice.

Notes:

* You can skip mint leaves if you don’t have.

* If you like a slight crunch of capsicum, don’t cook it completely. If you don’t like it, you can cook till it turns soft or even skip it.

* Paneer can be substituted with mushrooms or cauliflower.