Tag Archives: Easy

Dry fruit Coconut Ladoos | Sugar free ladoos | Easy to make, Ready in 15 mins

Click on the image to save the recipe on Pinterest.

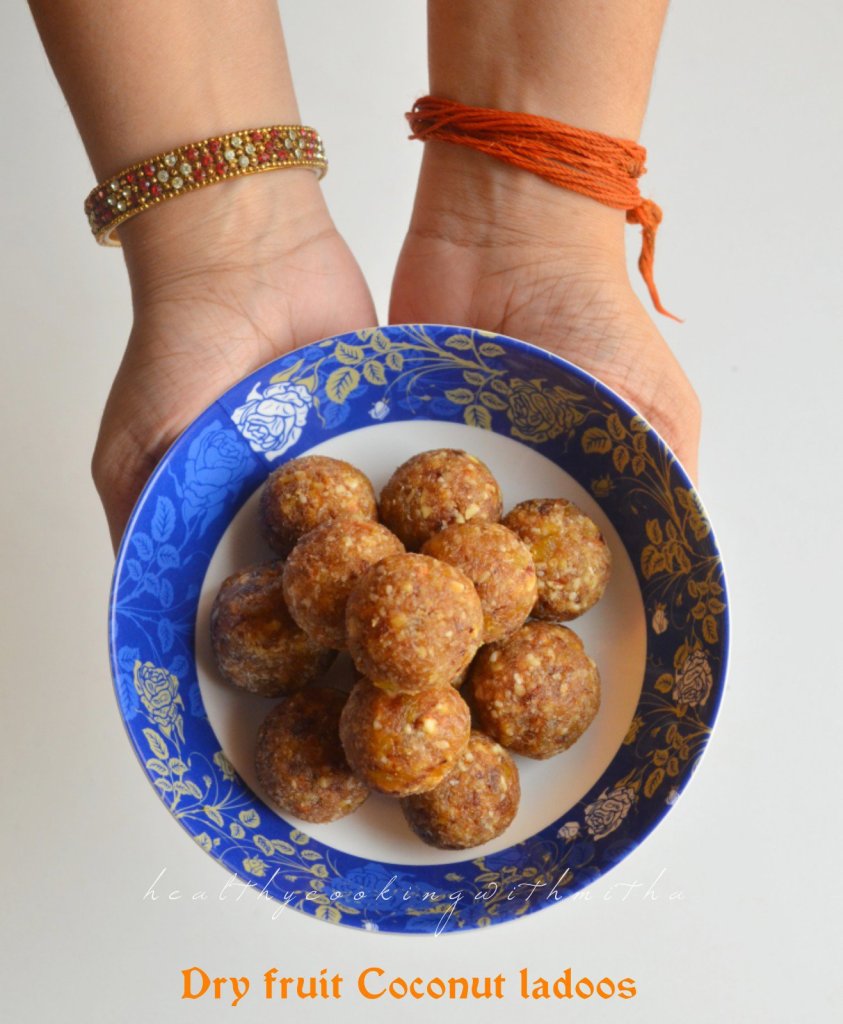
So happy to be posting this super healthy, easy to make, heavenly tasting ladoo recipe on Hanuman Jayanthi today. The thread you can see above in my hand is from Shri Hanumantha temple in Moodbidri near Udupi. It’s been around 2 years that I got it as a prasad from the temple but I am happy that the thread has not deformed nor lost its beautiful colour. Grateful to God for that. This thread is a constant reminder to me that I have Hanumanji’s blessings always and it has removed fear completely from my mind. 🙏

My devotion to Hanumanji started when we shifted to Elamakkara, Kochi when I was in 9th std. Elamakkara is a place with so many temples located very close to each other. My dad used to go to each of these temples on weekends and I would accompany him too. In the Dattatreya Swamy temple, there is a Hanumanji gudi ( a smaller temple) where I started going quite often and I always felt so peaceful standing in front of that gudi while sharing both my happiness and sorrows with Hanumanji. 🙏

During college days, I also started wearing his pendant which had Shree Ram on one side and Hanumanji on the other. Found this picture from exactly 10 years back and sharing with all of you along with the pendant’s picture as it not clear from my photo.

This picture brought back so many memories of our house in Elamakkara. ❤️ Our mandir which you can see behind, the showcase with photos and soveigners, our old computer in which I used to do my college work, the wooden sofa with velvet seating and a glimpse of our kitchen where my grandmother and mother used to make so many dishes very lovingly for me. One photo, hundreds of memories. 😍😍

Talking about photos, my devotion to Hanumanji also was through collecting his pictures, his books, his keychains, in fact anything with Hanumanji in it. I have saved all of it even now and had brought them along with me to Qatar. Looking at them makes me so so happy. Sharing a glimpse with all of you.

My treasure. ❤️🙏

There is a story behind Hanuman chalisa book in my life. During my final college trip to Hyderabad, my Amma was very scared to let me go. But for my happiness, finally she agreed reluctantly. Alongside, she prayed to Hanumanji that if I come back safely, we would give Hanuman chalisa books to my Hindu classmates (I know it might sound childish but a mother’s love is something which only a mother can understand ❤️). And you know the most divine part?

On the way to Hyderabad in the bus, while my friends were dancing, me being a very bad dancer (😅), just sat looking outside the window and what do I see! Small Hanumanji temples in every few kms!! It made me feel so happy that I wanted to call Amma then and there to share my happiness. I saw so many idols of Hanumanji together that evening that I have not seen in my entire life. Such a blissful and unforgettable experience it was! 🙏 And yes, I did reach back safely and we distributed the Hanuman chalisa books to my classmates, much to their surprise. ❤️ My best friend Sunanda still has that book which made her a Hanumanji devotee too. 🙏

Sorry for so many nostalgic stories today but Hanumanji is so close to my life that I just went on writing. Thank you so much for reading. Here’s wishing all of you a very blessed Hanuman Jayanthi. 🙏

Hope you all try these delicious ladoos for your family. Happy and healthy cooking! ❤️

Click on the image to save the recipe on Pinterest.

RECIPE:

Ingredients: { Makes 20 small ladoos }

1 Cup deseeded Dates (I used Khudri variety)

10 dried Apricots

3/4 Cup Mixed Nuts { I took 1/4 Cup each of Cashews, Almonds and Walnuts }

1/4 Cup Raisins

1/2 Cup Desiccated Coconut

Step by step recipe:

1. Soak dried apricots in hot water for about 10 mins. Also soak dates if using hard variety of dates.

2. Meanwhile, dry roast the Desiccated Coconut in a pan on medium flame till it starts changing colour and turns light brown. Immediately transfer to a bowl. (Don’t allow it to turn dark brown. Just a light colour change as shown below is sufficient.) Keep aside till use.

2. Add the nuts to a mixer or food processor. Also keep the apricots, dates and raisins ready.

3. Powder it coarsely, not grinding continually but pulsing in regular intervals. Took me about 5 pulses for 15 seconds each for it to get powdered coarsely. { If ground continually, it will turn into paste as nuts release oil when ground too much. }

4. Now add the drained apricots, dates and raisins.

5. Again pulse in the food processor till the mixture gets blended together to almost like a coarse paste. { Do not add water while grinding.}

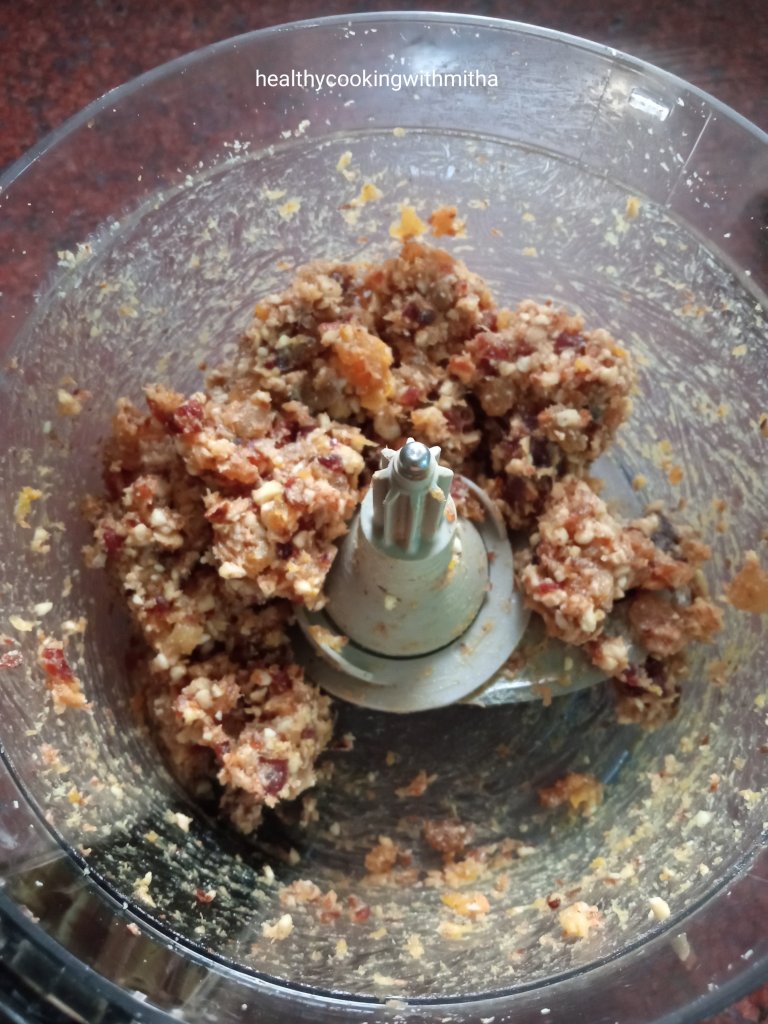
6. Now add to a frying pan and heat it for two mins just till it becomes dry. Remove and keep aside.

7. Now add the mixture to the dry roasted coconut and mix well using a spatula.

8. Once mixture has cooled slightly, make ladoos by taking little portions and shaping between your palms. These ladoos can be easily shaped by anyone as the mixture is not dry.

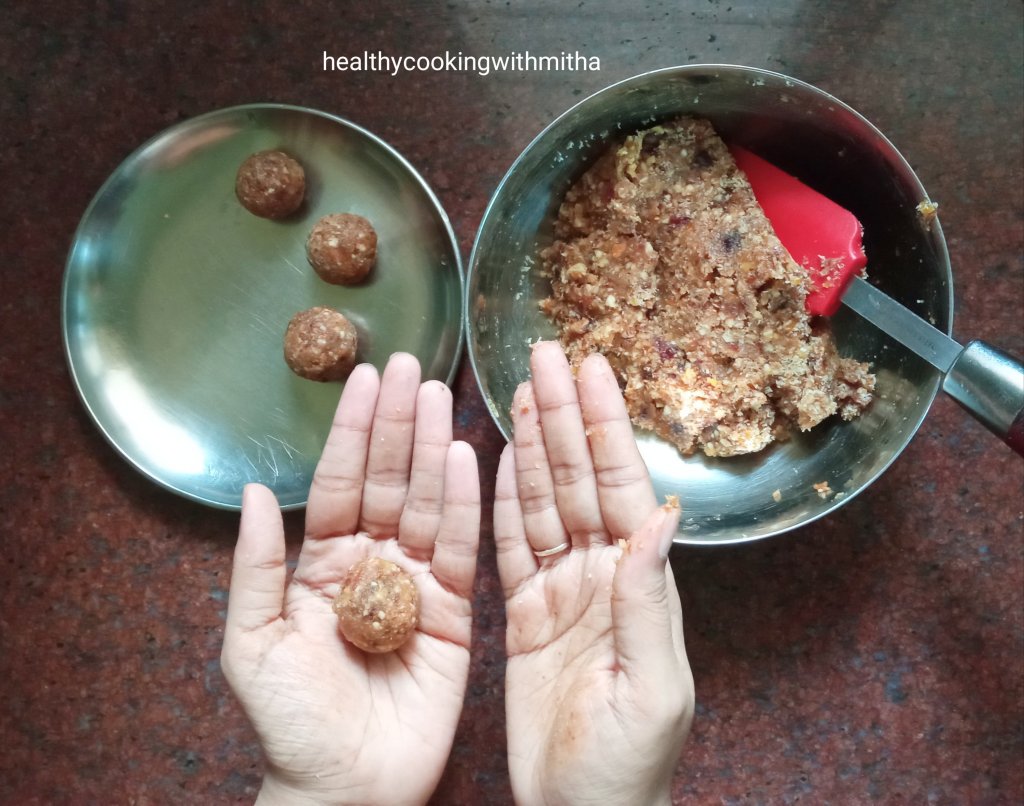
9. Repeat the same with the mixture. Enjoy these guilt free healthy ladoos!

Click on the image to save the recipe on Pinterest.

Notes:

* Store them in an air tight container free from moisture and it will last well atleast for couple of days in room temperature. Refrigerate after that.

* Desiccated Coconut can be substituted with freshly grated coconut. Just that it will take a little while longer to get brown colour.

* If using hard variety of dates, soak it in hot water for about 10 mins or till it turns soft.

* If you don’t have dried apricots, substitute with 1/2 Cup more of Dates. So total 1 1/2 Cup Dates in the recipe.

* In the 3/4 Cup nuts, you can use any variety of nuts. I used a mix of Cashews, Almonds and Walnuts.

* You can use either golden or black raisins.

* If you don’t want to use coconut, just skip it like I do for my Dry fruit bites.

* If you don’t want to make them as ladoos, spread onto a plate and cut once it gets hard. I do that for my Dry fruit bites.

* You can check my Ready in 15 min healthy sweet recipes compilationfor easy, healthy sweet recipes.

Click on the image to save the recipe on Pinterest.

Chane Usli – Godu Phovu | Seasoned black chickpeas – sweetened rice flakes | Konkani Breakfast/snack combo

Click on the image to save the recipe on Pinterest

Since childhood, my Amma has always taught me the importance of days dedicated to each God. Not sure how many of you believe in it but sharing the little I have learnt.

* Mondays To worship Lord Shiva and in our case, our Kuladevata too, Shree Damodar. 🙏

* Tuesdays For Ganpati Bappa, Devis/ Goddesses and Hanumanji. 🙏

* Wednesdays Dedicated to Lord Krishna. ❤️🙏

* Thursdays A day dedicated to Lord Vishnu and our Gurus. Dattatreya Swamy or Guru Raghavendra Swamy or Sai Baba or as believed by each individual in their life. 🙏

* Fridays To worship Devis/ Goddesses. 🙏

* Saturdays Dedicated to worship Lord Venkatarama. Also, Shanidev and since worshipping Hanumanji is said to remove the Shani dosha or wrath in one’s life, Hanumanji too is worshipped on this day. 🙏

* Sundays Dedicated to Sun God. Also, Mahalasa Narayani (Amma’s Kuladevi in her mother’s side); Sunday is dedicated to this devi. 🙏

You might be wondering why all this explanation (free ka gyan 😅) is for. Actually, along with all the days dedicated to each God, there have been foods dedicated to these days too. In almost all Konkani households, black chickpeas is cooked on Fridays as it is believed to be a favorite of Goddess Lakshmi. Hence, considered auspicious to make a ghashi (curry) or this usli with black chickpeas on Fridays. Same is the case with Horsegram which is said to be good to be had on Saturdays saying it gives us strength like Hanumanji.

Some of you may laugh at this, but I believe all of these traditions were made by our ancestors for a reason. When I think about it, this tradition made sure we had the healthy legumes atleast once a week. Else, I would forget to make it as Chickpeas and Horsegram have a long shelf life, easily can be bought and forgotten (if you are like me 😅).

And whenever I make Chane Usli on Fridays, it has to be combined with this delicious Godu Phovu. This is a classic Konkani breakfast/ snack combination, also made as Navaratri prasad.

Click on the image to save the recipe on Pinterest

Inspite of being from Udupi, I have grown up among our Konkani community in Elamakkara, Kochi where we have a GSB Vikas Parishad group which conducts meetings every month in one of the members’ house to discuss issues faced by our community and also to help those in need. During Navaratri, members would volunteer for bhajans to be conducted in their house and the rest of us would go, sing bhajans together and consume the prasad made by them. The prasad would always be Chane Usli – Godu Phovu in every member’s house and it used to taste so divine and delicious that I still remember the flavours. Every family had their own unique way of making it and that made it even more special. ❤️

Now, whenever I get black chickpeas, I always make it on Fridays, to respect our traditions and not allowing it to diminish away at any cost. Also, since these traditions have health benefits associated with it, it is an added advantage too, right! 😄

Hope you all try this combination too. Very filling and comes out delicious. Also, can be made as a breakfast or evening snack too. Happy and healthy cooking! ❤️

RECIPE:

Ingredients: { Serves 3 }

For Chane Usli –

1 Cup dried Black Chickpeas/ Kala Chana

1 Tbsp Coconut oil

1 tsp Mustard seeds

A sprig of Curry leaves

A pinch of Hing/ Asafoetida

3 to 4 Green chillies

Salt to taste

3 Tbsp freshly grated Coconut for garnish

For Godu Phovu –

1/2 Cup Jaggery

1/4 Cup water

1/2 Cup freshly grated Coconut

1 1/2 Cups Poha/ Flattened rice/ Beaten rice/ rice flakes (thin variety)

1 Tbsp Ghee

1/4 tsp Cardamom powder

Step by step recipe:

For Chane Usli:

1. Soak the black chickpeas in more than double the water for atleast 6 to 8 hours. Drain the water. Add to a pressure cooker. Add fresh water enough to soak the chickpeas. Pressure cook till soft. {Takes a whistle on high and 10 mins on medium flame on my electric stovetop.}

2. Heat oil in a pan. Splutter mustard seeds. Add curry leaves, hing and green chillies.

3. Fry till green chillies change colour. Now add the cooked chickpeas. {I add along with the cooked water. If you plan to make saar (check notes), add only the chickpeas and keep the cooked water aside}.

4. Mash lightly with a ladle. Add salt and cook till the mixture turns dry. Mix in coconut and keep aside.

For Godu Phovu:

1. Melt jaggery in water. I use 1/2 Cup jaggery and 1/4 Cup water. It melts and bubbles start forming. Then I remove it from the flame. Sieve and mix in 1/2 Cup coconut.

2. Now add thin Poha, first 1 Cup, mix well. Then if needed add 1/4 Cup at a time till the texture and sweetness is perfect. Do taste tests.

3. When the mixture is even and done, add ghee and cardamom powder. Mix well.

Serve with Chane Usli. I have garnished the Godu Phovu with Tulsi leaves as they do in temples.

Click on the image to save the recipe on Pinterest

Notes:

* Mixing few Tulsi leaves in the Godu Phovu not only makes it more aromatic, but gives us the benefit of eating Tulsi leaves which are very healthy and also giving us the divine feel of temple prasad.

* Thin Poha does not need soaking. Just mix as it is with melted jaggery. Add little at a time to ensure you don’t over add the poha as it leads to less sweet poha.

* Both these recipes require atleast the amount of freshly grated Coconut I have mentioned. Lesser than that, it does not give the authentic taste. You can add more too if you love coconut.

* Make sure to cook the chickpeas till soft.

* Black chickpeas can be substituted with white chickpeas too.

* The cooked water is usually drained and kept for Chane Saaru (A kind of rasam). Just add salt to the water and bring to a boil. Season coconut oil with mustard seeds, curry leaves and broken red chillies. Pour over the boiled water. Mix well. Serve with rice meals. You can also give fried garlic seasoning instead.

* You can also check this Quick to make Kerala style Kadala curry recipe.

Click on the image to save the recipe on Pinterest

Roasted gram dal and coriander leaves chutney

Click on the image to Pin the recipe on Pinterest.

As much as I love my dosas and idlis, there is no denying that they are incomplete without a good chutney. I usually discuss which chutney to make with my family in the morning while making dosas/ steaming idlis and the demand is either for Hing chutney ** (by Mr Husband) and Tomato Chutney (by Miss Daughter). My son is just like me who loves any kind of chutney. 😍

But ever since I made this roasted gram dal coriander leaves chutney, the common demand by everyone including my son has been for this “green chutney”. My 2.5 year old son who is talking a lot now (inspired by you know who 😂) calls it “geen chechi” and it sounds so cute that I can’t make any other chutney ever. 😄

So here is the recipe for the green chutney which tastes too delicious for words. A must try chutney for sure!

Thank you so much Vinaya Prabhu Akka for this keeper of a recipe. ❤️ We have become such huge fans of this chutney that we no longer like any other chutney now. 😍

Happy and healthy cooking everyone!

{** recipe for Hing chutney mentioned above is in the notes section of this Urad Rava idli recipe }

RECIPE:

Adapted from: Vinaya’s Culinary delights

Ingredients: Serves 2 to 3 people

1/4 Cup Gram dal

1/2 Cup freshly grated or desiccated Coconut

3 to 4 Green chillies

5 to 6 sprigs of Coriander leaves

6 to 8 Curry leaves

1 tsp Tamarind paste

Salt to taste

Step by step recipe:

1. Dry roast the gram dal on medium flame till it turns brown in colour. Don’t allow it to turn black. Cool down and powder in a mixer.

You can see the gram dal packet in the background for those who are new to it.

2. Now add coconut, green chillies, coriander leaves, curry leaves, tamarind paste and salt.

3. First grind once without adding water. Then add water as needed (about 1/4 to 1/2 Cup) to make a smooth paste. Dilute with more water to your desired consistency of thickness.

Click on the image to Pin the recipe on Pinterest.

Notes:

* This chutney does not need seasoning with mustard seeds/ curry leaves.

* Be careful while roasting the gram dal as few extra seconds of roasting can make the dal turn black and burning it which can spoil the flavour of the chutney. Roast only till the dal starts turning brown.

* If you don’t have gram dal, then just increase the quantity of coconut to 1 Cup and skip the gram dal. That’s how I make my regular coriander chutney.

* I made this chutney with Barnyard Millet Idlis and it made a super delicious combo.

Click on the image for the recipe.

Check all my Chutney recipes here.

Poha Sheera | Aval Kesari with Jaggery | Easy 15 min sweet recipe

Click on the image to save the recipe on Pinterest.

A new recipe after nearly two months! Both Feb and March were filled with so much uncertainties and many sad days due to losing my loved ones that I did not even feel like trying something new or blogging recipes. If there was something that kept me going without breaking down, it is my love for music. I kept listening to my daily shlokas, bhajans and my favorite songs on youtube all day, which gave me peace of mind. Youtube has become my favorite app now! ❤️

Music really has healing powers and when you don’t feel like talking with anyone, immerse yourself in the world of music and it will definitely bring you peace! ❤️

In devotional music, Guru Raghavendra Swamy’s bhajans and shlokas are my favorite. Whenever I feel nobody can understand me, and also when there are instances in my life which I can’t share with anyone else (not even with my Amma as I don’t want to worry her ❤️), that’s when Guru Raghavendra Swamy comes to my aid. Through his bhajans, I talk to him and he shows me the way. Not all would believe, but I get the answer to my talks within a day. That’s the power of my relation with him and those who believe in him will know how he’s always with us, taking care of us, knowing all the battles that we face in life.

Sharing my favorite picture of Guru Raghavendra Swamy with all of you. The way he is hugging Krishna depicts so much love that I feel very happy just looking at this picture. ❤️

So, I am dedicating this sweet that I learnt recently from Usha Thukaram mai, which we loved a lot, to my Guru Raghavendra Swamy. 🙏 Today is Thursday (Guruvaar) and my Guru’s day. An apt day to post this Sheera as prasad to him. Om Shree Guru Raghavendraya Namaha 🙏

This sweet is very easy to make and a unique twist of adding roasted poha powder instead of semolina, gives it a wonderful flavour. Do try for a change and I am sure you will love it. Happy and healthy cooking!

Thank you Usha Thukaram mai for your recipe. You had once said that you see me as your daughter. Just want to say that I will never forget that and always admire you for your amazing dishes that you post. Love, respects and seeking blessings from you! ❤️🙏

RECIPE: { Serves 2 }

Ingredients:

1 Cup thick or thin Poha / Aval / Flattened rice / Beaten rice

3/4 Cup Jaggery (I used powder)

2 Tbsp Ghee

6 to 8 chopped Cashews

6 to 8 Raisins

2 Cups Water

1 tsp Cardamom powder

Step by step recipe:

1. Heat 1 Tbsp ghee in a pan and roast the poha on medium flame till it turns light brown in colour. Allow it to cool.

2. Add to a mixer and powder it finely.

3. Now heat the rest 1 Tbsp ghee in the pan and fry cashews and raisins in it till cashews turn brown in colour. Add 2 Cups water and bring to a boil.

4. Add the powdered poha along with jaggery powder. (If adding jaggery as blocks, melt jaggery first in the water and then add the poha powder.) Mix continually removing lumps if any.

5. Now cook mixing continually on medium flame till the mixture leaves the sides of the pan. Takes about 8 mins.

6. Add cardamom powder. Mix well and remove from the flame. Serve hot or cold. Both tastes yummy.

Click on the image to save the recipe on Pinterest

Notes:

* You can use both thick or thin Poha for this recipe.

* Make sure to not burn the poha while roasting. Remove from flame as soon as it starts turning brown in colour.

* For 1 Cup Poha, 2 Cups water and 3/4 Cup jaggery works well for me. It turns out sweet enough for our taste buds. If you have a extra sweet tooth, you could increase the quantity of jaggery to upto 1 Cup.

* When poha powder is added to the hot water, there is chance of it forming lumps. So mix continually with a spatula removing lumps if any.

* If using jaggery blocks instead of powder, melt it in the water and then add the poha powder.

* Also, if the jaggery you use has impurities in it, make jaggery water separately (3/4 Cup jaggery in 2 Cups water). Sieve and then add the water to the roasted cashews and raisins.

* Don’t skip the cardamom powder as it enhances the flavour so much.

* I found that as the Sheera is kept in room temperature, it increases the taste than when had hot. So I would suggest to make this sweet a bit ahead of time for the poha to absorb the flavours well. The tagline behind this Sheera is ” As time went by, the Sheera kept tasting better and better! 😄”

* Here is yet another Sheera that I make always with Rava/ Semolina: Jaggery Sheera

* This is the compilation of all my Easy 15 mins sweet recipes.

Amma’s Moong curry (with freshly ground masala)

All of us have a special kind of liking towards our mother’s cooking and I am sure you all will agree that no matter which Masterchef cooks for us, our Amma’s food is the best. Why not, as she makes everything with a secret ingredient in it – Love. ❤️

My Amma too used to cook so well and the flavours of all her dishes are still in my taste buds. This moong curry was one among them and I used to take it with puris in my lunch box during my school/ college days. My friends used to love it too and I used to take extra boxes of it for them as well. The precious memory of those days is forever etched in my heart and I remember it each time I make this curry. ❤️

Now Amma can’t cook like before as she suffers from muscular dystrophy in her legs. Although she’s strong most of the days and remains happily engaged all day, there are times when she falls into self doubting sadness and I have to convince her my best that she is still very much loved and an important part of our lives. Right now, she’s going through a difficult phase and this post of mine is to cheer her up in my little way, by adding her recipe on my blog.

Amma, this is for you. ❤️ I am coming in few months to make this curry for you and you have to tell me if it tastes as good as yours or not. 😍 Loads of love to you Amma. 😘 Please be happy always as that is what makes me happy too. ❤️ Sharing some words for you which I found as best to describe our love for each other. Hope it cheers you up. 😍

Now to Amma’s recipe. Hope you all try her way of moong curry too. Tastes amazing with puris, chapatis or even with rice. Happy and healthy cooking!

RECIPE:

Ingredients:

1 Cup dried whole green gram/ whole moong

1 Tbsp Oil

2 tsp Red chilli powder or to taste

Salt to taste

For the ground paste:

1/4 Cup Coconut (freshly grated or desiccated)

6 to 8 sprigs of Coriander leaves

1/2 a large Tomato

1 small sized Onion

2 Cloves

1 Cardamom

1 small piece of star anise

1/2 tsp Cumin seeds or Jeera

1/4 tsp Turmeric powder

Step by step recipe:

1. Soak whole moong in atleast thrice the amount of water overnight or for 6 to 8 hours. When soaked, drain the water. Add fresh water enough to soak it in a pressure cooker and cook until soft. Takes 3 to 4 whistles on high in my electric stove top. Might vary depending on your cooking range.

2. Add ingredients to grind in a mixer.

3. Grind adding about 1/4 Cup water or as needed to a smooth paste. Now heat oil in a pan and add the paste. Also add red chilli powder and cook till the raw smell goes away. (About 5 mins and this paste splatters. So be careful and mix continually.)

4. Now add the cooked moong and salt. Bring it to boil and cook for 5 to 8 mins. Adjust consistency of the gravy.

5. Serve hot with Puris, Chapatis or rice meals.

Notes:

* The gravy thickens when kept at room temperature as moong absorbs a lot of water. So if serving later, add water that time to adjust gravy consistency.

* Star anise and coriander leaves make this masala very aromatic. So don’t skip it.

* The masala splatters while cooking. So be careful while sauteing.

* I also sprout moong and make this same curry.

* You can also check my mother’s other three recipes –

# Amma’s Carrot Pulao

# Amma’s Tomato Chutney

# Amma’s Alu Paratha

Radish Chutney

In my last post of Ragi Jaggery ladoos, I had mentioned about our relocating back to India but I had never expected my readers to comment and message me with their best wishes. It really made me so happy that people actually take time to read the full writeup and also write such heartfelt words for me. ❤️ I always consider my readers to be a part of my extended family and the love showered on me in the past couple of days proves that my readers feel the same, which means the world to me. Thank you dear readers. Love and blessings is what I need the most now. ❤️🙏

I had actually decided to stop blogging for a while as I am not in the right frame of mind to write. Most of the families we know will be separated, even us, as only me and kids will shift back as of now. But we knew this since a year, were mentally prepared for it and specially as I have a great support system in my parents, we are not much worried. But there are many families who don’t have that and hearing their situations make me feel very sad too. Praying that God blesses all of them and they can survive this change well. 🙏

Sorry that this is turning out to be such a emotional write-up which is why I did not want to blog but I guess you all will understand, like always. ❤️

Coming to this chutney, it is my way to sneak radish in my kids’ diet as they love dosas with chutneys. So making them eat vegetable in this form too. I learned this chutney long back from a cookbook but have changed it to suit our tastebuds. Comes out very tasty and you can never say it has radish in the chutney.

Hope you all try and love this chutney. Happy and healthy cooking! ❤️

RECIPE:

Ingredients:

1 Cup peeled and grated Radish

1/4 Cup Coconut

1 Tbsp Coconut Oil (+ 1 tsp)

4 Red chillies

1 tsp Urad dal

1 tsp Cumin seeds

1/4 tsp Hing or Asafoetida powder

Salt to taste

Step by step recipe:

1. Heat 1 Tbsp Oil in a pan. Add grated Radish and saute on medium flame till the raw smell of radish goes away and the radish turns dry. Takes about 5 mins. Now remove from flame and allow it to cool.

2. Now add the radish to a mixer along with coconut. In that pan, heat 1 tsp Oil and add Hing, 1 tsp Urad dal and 1 tsp Cumin seeds. Also add red chillies. Fry till Urad turns brown. Allow it to cool.

3. Now add the fried chilies, Urad dal, cumin seeds to the radish- coconut. Also add salt and about 1/4 Cup Water or as needed. Grind to a smooth paste. This is a thick chutney. Remove to a serving bowl.

Notes:

* Do fry the radish till the rawness goes away. Else the chutney will have the raw taste.

* This chutney is not seasoned with mustard seeds but you can season if needed.

* Can be had with rice meals or dosa/idli.

* Here is my Chutney/dips recipe collection that I make always.

Ragi Jaggery Ladoos | Easy to make healthy ladoos

Click on the image to save the recipe on Pinterest

I can’t believe till some time back, I thought making ladoos were the most difficult among sweets. Now, if you give me 15 mins, I can make ladoos for you. 😄 That’s the change which practice has brought in me. Now I can understand the real meaning of “Practice makes a man perfect”. Though not perfect by looks (I am reaching there 😬), these ladoos come out looking like ladoos 😂 and tastes so delicious that my kids love it a lot. So I thought it was worth sharing with all of you.

Hope you all try these healthy and delicious ladoos. Happy and healthy cooking! ❤️

RECIPE:

Ingredients: {Makes about 12 ladoos}

1 Cup Ragi or finger millet powder

3/4 Cup Jaggery powder

1/4 Cup + 2 Tbsp Ghee

2 Tbsp Raisins

Step by step recipe:

1. Heat 2 Tbsp Ghee in a pan and add 2 Tbsp Raisins. Fry till the raisins puff up. Remove to a bowl.

2. Now melt 1/4 Cup Ghee in the pan and add 1 Cup ragi flour. On medium flame, saute the flour in the ghee. Saute till the ghee and ragi flour combines well.

3. Now, keep sauteing on medium flame till the mixture comes together as shown below. It will take about 6 to 8 mins. The mixture turns aromatic and raw smell of the flour goes away.

4. Remove it in the bowl where we had put the raisins. Also add 3/4 Cup jaggery powder.


5. Mix well and allow it to cool slightly. When it still warm, bind to make ladoos. I am attaching some pictures that I took when making these ladoos. Hope it helps all of you.

Keep it in your palm and open close your fingers. Keep doing it till it forms round shape.

6. Repeat the same with the rest of the mixture. Enjoy the ladoos!

Notes:

* Store in a moisture free container at room temperature. Stays well for atleast 2 to 3 days. Mine gets finished off before that.

* Don’t reduce the amount of ghee or you won’t be able to bind the ladoos well.

* Add little ghee to the mixture and on your palms if you find it difficult to form ladoos.

* Do remember to saute the ragi flour well in the ghee so that there is no raw taste in the ladoos.

* You can add cardamom powder too if you like.

* Substitute ragi flour with wheat flour to make Churmundos or wheat flour ladoos. They come out delicious too.

* These ladoos are very soft when freshly made but turns hard as they cool down and tastes much better when kept for little while.

You can check all recipes with Ragi that I make regularly like Ragi idlis, Ragi dosas, Ragi cake, Ragi cookies, Ragi Malpua in this Ragi recipes collection.

Ragi Set Dosas

Instant Ragi Rava Dosas

Instant Ragi Idlis

Ragi Urad Idlis

Ragi Ela Ada

Ragi Butter cookies

Eggless Ragi Chocolate Cake

Ragi Malpua

All Millet Recipes

Click on the image to save the recipe on Pinterest

You can also check my 15 mins healthy sweets recipes collection.

Aloo Corn Bharta with Milk Chapatis

Click on the image to save the recipe on Pinterest

I have had people tell me that social media friendship is fake and what matters is the friends we make in real life. Might be true for many but I feel finally it ends to the vibe you feel with each individual. Some people talk with so much sweetness that it might seem unreal in the beginning but when you get to know the person, you understand that they are really good natured. (my experience and I have been lucky that way to get to know many nice people. ❤️)

In real life, I talk with everyone (being the chatterbox that I am 😁) and have many friends but if I have to choose my close buddies, they are only two (my college besties ❤️❤️). Apart from that, through social media, I have many friends and some people offer so much love, encouragement and support that I have to call them my angels rather than friends. I sometimes wonder if I really deserve this love and it overwhelms me (not used to hearing praises and having had some self worth issues as a child). But these people keep me going, by motivating me with their kind words. So social media friendship can be anything but fake and gives you a chance to know genuine people too. ❤️

One among them is Ashwini Kulkarni whom I got to know through a food group. She had first tried my Masoor dal dosa and messaged me saying how much her daughter loved it. After that, she messages me whenever she makes the dosa and also sends many healthy recipes for me to try (that has been very helpful for me 🙏).

This Aloo Bhartha is also her recipe which she learnt from Binita Mangaraj but added corn to it making it Aloo Corn Bhartha. I loved the recipe so much that I tried it instantly with soft Milk chapatis (that I recently learnt from Mukherjee Mala). It came out to be such a great combination that we all loved it a lot.

This is one recipe combination that I will be making regularly from on. Huge thanks to Ashwini, Binita and Mukherjee Mala for their recipes. Hope you all try and love it too. Happy and healthy cooking! ❤️

RECIPE:

Ingredients:

4 medium sized Potatoes

1/4 Cup Sweetcorn

1 medium sized Onion

1 medium sized Tomato

2 to 3 Green chillies

1 tsp Red chilli powder

1/2 tsp Coriander powder

1/2 tsp Garam masala powder

1/4 tsp Turmeric powder

Salt to taste

1 Tbsp Oil

1 tsp Cumin seeds

3 Tbsp Coriander leaves, finely chopped

Step by step recipe:

1. Pressure cook the potatoes till soft. Allow to cool. Then peel and grate using grater. You can alternatively mash it.

2. In a pan, heat oil and add cumin seeds. When it changes colour, add green chillies and onions. Fry till onions turn translucent.

3. Now add tomatoes and fry till it cooks and turns very soft. Now add Turmeric powder, coriander powder, red chilli powder and Garam masala powder. Fry for few seconds.

4. Now add the grated potatoes, sweetcorn and salt. Mix well. Add little water and cook for 5 mins on medium flame till sweet corn turns soft. Also add coriander leaves and mix well.

5. Serve hot with rice meals or chapatis/rotis.

Notes:

* I served this with Milk Chapatis. For milk chapatis, just add wheat flour and salt in a bowl. Also add milk and water. Knead to a soft dough and make chapatis as usual. I add about 1/2 Cup milk to 2 Cups flour and add rest water while kneading. Gives really soft chapatis.

* You can mash the potatoes instead of grating but grating gives a good texture to the curry.

* You can make the curry as thick or thin as you like.

* Sweetcorn can be skipped but it gives a good bite to the bharta.

* I used frozen sweet corn which cooks quickly. If your sweet corn variety takes time to cook, boil it separately and add.

Click on the image to save the recipe on Pinterest

Til Jaggery Burfi | Easy 15 min, 3 ingredient sweet recipe

Click on the image to save the recipe on Pinterest

I was supposed to write this blog last night after putting my kids to sleep but their tired mommy fell asleep before them 😅 and so here I am, writing it atleast before they wake up (and the double storms start 😁😁). Had a great sleep after long though, with so many dream sessions. I have been a person who gets loads of dreams, about people whom I think of during daytime, about places that I wish to go, some hidden desires which only I know about, all of it gets fulfilled (atleast 😄) in my dreams ❤️. And I remember it even after I wake up. Am I weird or is it the same with all of you too? 😀

Anyhow, after some heart to heart talk, let me get back to these burfis which I am sharing as it is Makara Sankranthi in two days. Til and Jaggery are important ingredients that people consume on the festival in different forms like ladoos, chikkis, burfis and many other ways. Makara Sankranthi is celebrated all over the country marking the end of winter with the sun starting it’s northward journey or the Uttarayan journey and signifies new beginnings.

I love how each of our festival gives such positive vibes and also the dishes consumed are so healthy. Til and jaggery are both warm foods to the body, also loaded with health benefits, so this festival makes sure we consume it atleast on this day.

Hope you all try this easy to make Burfi which requires only 3 ingredients. I always prefer to make such quick sweets as I don’t like to spend my whole day in the kitchen for sweets. Also, this is very healthy and perfect for the festive occasion as well. Wishing you all a very happy Makara Sankranthi. 🙏🙏

RECIPE:

Ingredients: { Makes about 12 small pieces of burfis}

I usually double this recipe when I make for my family

1 Cup white sesame seeds/ Til

1/2 Cup Jaggery (I use powder)

2 Tbsp Ghee

Sliced almonds for garnish (optional)

Step by step recipe:

1. Roast 1 Cup sesame seeds in a pan on medium flame till it starts browning on the edges. Don’t allow to burn as it can taste bitter. As soon it starts turning brown, remove onto a plate. Allow it to cool. Now powder coarsely in a mixer.

2. Now add 2 Tbsp ghee, 1/2 Cup jaggery and 2 Tbsp water in a pan. Allow jaggery to melt in the water and form bubbles on top like shown.

3. Immediately reduce flame to medium and add the powdered sesame seeds. Mix well continually for about 3 to 5 mins till everything comes together and the mixture leaves the sides of the pan.

4. Keep a plate greased with ghee ready. Pour this mixture and spread evenly using spatula. Allow it to cool.

5. Garnish with almond slices to enhance the beauty of the Burfi. Slice and serve.

Notes:

* Don’t burn the sesame seeds while dry roasting it. Sesame seeds get roasted quite quickly and we have to be very careful while roasting it so that it does not turn black. As soon as it starts turning browning, immediately transfer it to a plate to cool.

* Powder coarsely in the mixer. Gets done very quickly. Don’t grind too much as sesame seeds can leave oil.

* You can skip ghee for a vegan version but ghee adds a wonderful aroma.

* 1/2 Cup Jaggery + 2 Tbsp Water makes a correct ratio. Adding more water can make the burfi turn into halwa. 😀

* Add the sesame seeds powder as soon as you see bubbles forming in the jaggery water. Mix well for few minutes and then remove immediately. Keeping in the hot pan itself can make it form a crisp layer on the bottom.

* This Burfi hardens as you keep it. So don’t worry if it’s soft first. Just slice with knife and keep it to cool. Remove after it hardens.

* You can also add cardamom powder if your want and garnish with any other dry fruits too or just leave it plain.

Click on the image to save the recipe on Pinterest

You can also check my other 15 mins sweets recipe collection.

Peanut Jaggery ladoos | 2 ingredient easy Ladoos

Click on the image to save the recipe on Pinterest

I am someone who gets emotional and get tears very quickly (no matter how much I show that I am strong from outside 😀) and right now I am having tears of joy in my eyes. The reason is that the blockade which was imposed on Qatar (where I live) by some neighboring countries has been lifted after more than 3 years. It is definitely a happy news for people living here as well as people in those countries as finally things have got normal like before (most importantly many families reuniting ❤️).

It takes me back to the time when this sudden blockade was imposed. We were really worried as we did not have much grocery, veggies or milk as people were stocking up everything. The supermarkets were empty. Milk and milk products which used to come from Saudi and UAE stopped coming. There was utter chaos.

But our King handled everything very well and within few months, we became self sufficient with milk industry doing great production and even fresh veggies being available locally. Really proud of him, the way the situation was managed. 🙌

Now when things have got back to normal, it makes me happy that whatever misunderstanding there was between the countries have been solved and they are back together like before. I don’t belong here and mostly will shift back to India within an year or so, but that does not stop me from being proud of this country and celebrating this happy news. ❤️

So here’s sharing a very easy 2 ingredient Peanut Ladoo that I learnt from my friend Trupti Rao who is a great cook and someone who encourages me a lot. Thank you so much dear for your amazing recipe. We all loved it a lot. ❤️

Dedicating these ladoos to Qatar 🇶🇦. May this country always be as amazing as it is and more power to our King. 🙌

RECIPE:

Ingredients: {Makes about 10 ladoos}

1 Cup Peanuts

1/2 Cup Jaggery powder

Step by step recipe:

1. Dry roast the peanuts on medium flame till the peanuts get brown spots on it showing it has got roasted. Don’t burn it. Remove as soon as it starts getting brown spots. Allow it to cool.

2. If using peanuts with skin, you need to remove the skin after the peanuts cool down. Since I have used skinned peanuts, I have skipped this step.

3. Add to a mixer along with jaggery powder or grated jaggery.

4. Now grind the mixture,not in one go but pulsing, removing after few seconds and scraping the sides, grinding again and repeating till peanut leaves oil and the mixture turns little wet from powder form. It took me about 5 times of grinding, scraping the sides and grinding again till I got the perfect mixture.

5. Now add to a bowl. Take little quantity of mixture in your hands and form small ladoos by pressing well using your palm and fingers.

6. Do the same with the rest of the mixture.

Notes:

* Store in a moisture free container. Lasts well for couple of days. Mine gets finished off by then.

* If using peanuts with skin, roast, cool, remove skin and then add to the mixer.

* Roast on medium flame only and remove as soon it starts turning brown. Else burnt peanuts will have a bitter after taste in the ladoos.

* Use grated jaggery instead of powdered ones.

* Main part here is grinding it till it turns from powder to slightly wet but not such that peanuts leave oil completely. So just pulse (grind only for few seconds), scrape the sides of the mixer and continue doing so. I usually check if I can form small ladoos. If I can, it means the mixture is ready.

* Learning to bind ladoos takes few attempts to get perfect but once you get the knack of it, it’s very easy. Just take a handful of mixture in your palm and continue pressing while opening and closing your fist giving it the shape.

* You can check my Wheat jaggery ladoos/ Churmundos recipe too. Very easy to make and tastes heavenly.

* I also make Peanut Jaggery Ubbattis or Holiges or Puranpoli which comes out very delicious.

Click on the image to save the recipe on Pinterest