Click on the image to save the recipe on Pinterest.
A new recipe after nearly two months! Both Feb and March were filled with so much uncertainties and many sad days due to losing my loved ones that I did not even feel like trying something new or blogging recipes. If there was something that kept me going without breaking down, it is my love for music. I kept listening to my daily shlokas, bhajans and my favorite songs on youtube all day, which gave me peace of mind. Youtube has become my favorite app now! ❤️
Music really has healing powers and when you don’t feel like talking with anyone, immerse yourself in the world of music and it will definitely bring you peace! ❤️
In devotional music, Guru Raghavendra Swamy’s bhajans and shlokas are my favorite. Whenever I feel nobody can understand me, and also when there are instances in my life which I can’t share with anyone else (not even with my Amma as I don’t want to worry her ❤️), that’s when Guru Raghavendra Swamy comes to my aid. Through his bhajans, I talk to him and he shows me the way. Not all would believe, but I get the answer to my talks within a day. That’s the power of my relation with him and those who believe in him will know how he’s always with us, taking care of us, knowing all the battles that we face in life.
Sharing my favorite picture of Guru Raghavendra Swamy with all of you. The way he is hugging Krishna depicts so much love that I feel very happy just looking at this picture. ❤️
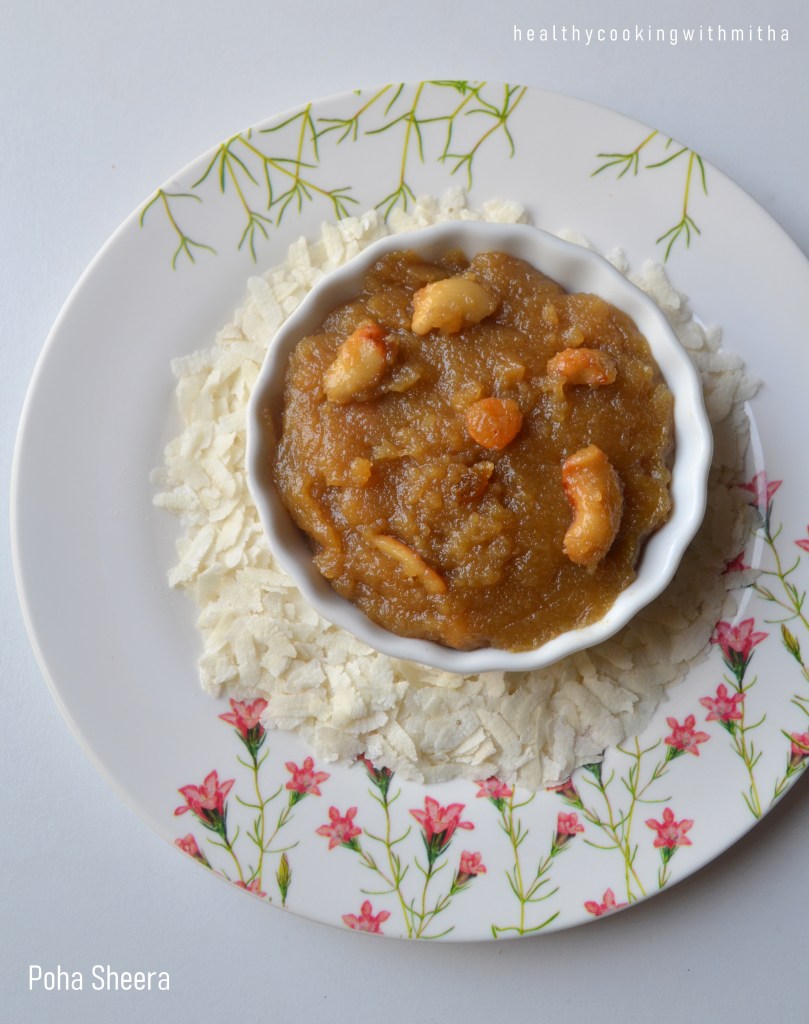
So, I am dedicating this sweet that I learnt recently from Usha Thukaram mai, which we loved a lot, to my Guru Raghavendra Swamy. 🙏 Today is Thursday (Guruvaar) and my Guru’s day. An apt day to post this Sheera as prasad to him. Om Shree Guru Raghavendraya Namaha 🙏
This sweet is very easy to make and a unique twist of adding roasted poha powder instead of semolina, gives it a wonderful flavour. Do try for a change and I am sure you will love it. Happy and healthy cooking!
Thank you Usha Thukaram mai for your recipe. You had once said that you see me as your daughter. Just want to say that I will never forget that and always admire you for your amazing dishes that you post. Love, respects and seeking blessings from you! ❤️🙏
RECIPE: { Serves 2 }
Ingredients:
1 Cup thick or thin Poha / Aval / Flattened rice / Beaten rice
3/4 Cup Jaggery (I used powder)
2 Tbsp Ghee
6 to 8 chopped Cashews
6 to 8 Raisins
2 Cups Water
1 tsp Cardamom powder
Step by step recipe:
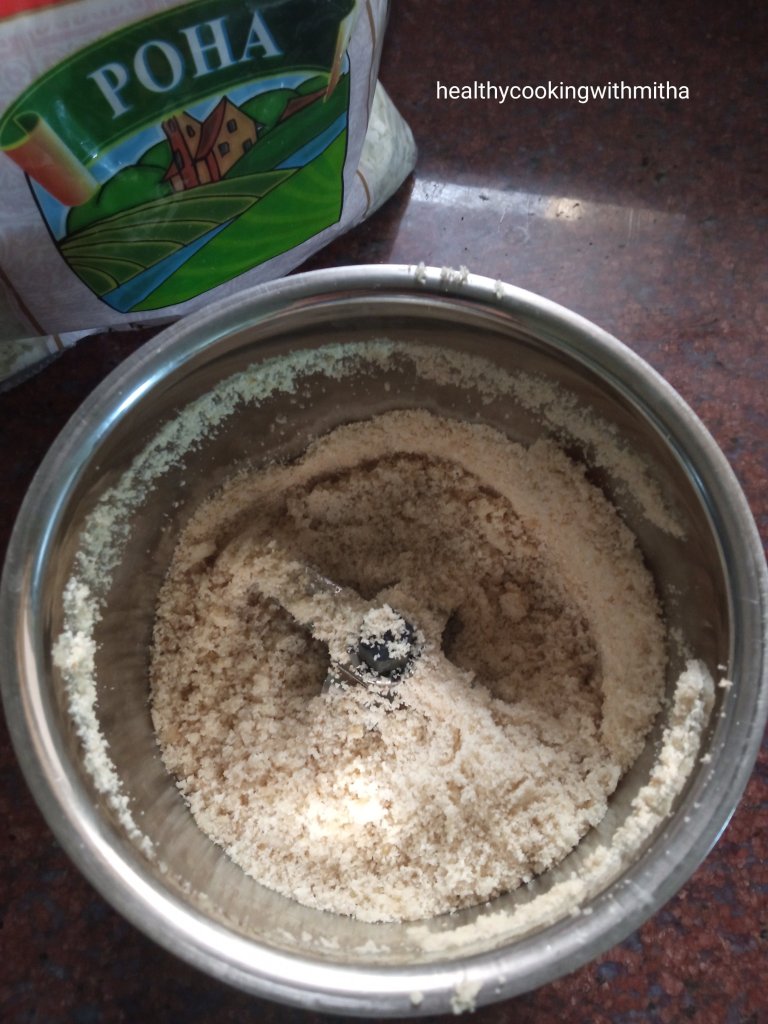
1. Heat 1 Tbsp ghee in a pan and roast the poha on medium flame till it turns light brown in colour. Allow it to cool.
2. Add to a mixer and powder it finely.
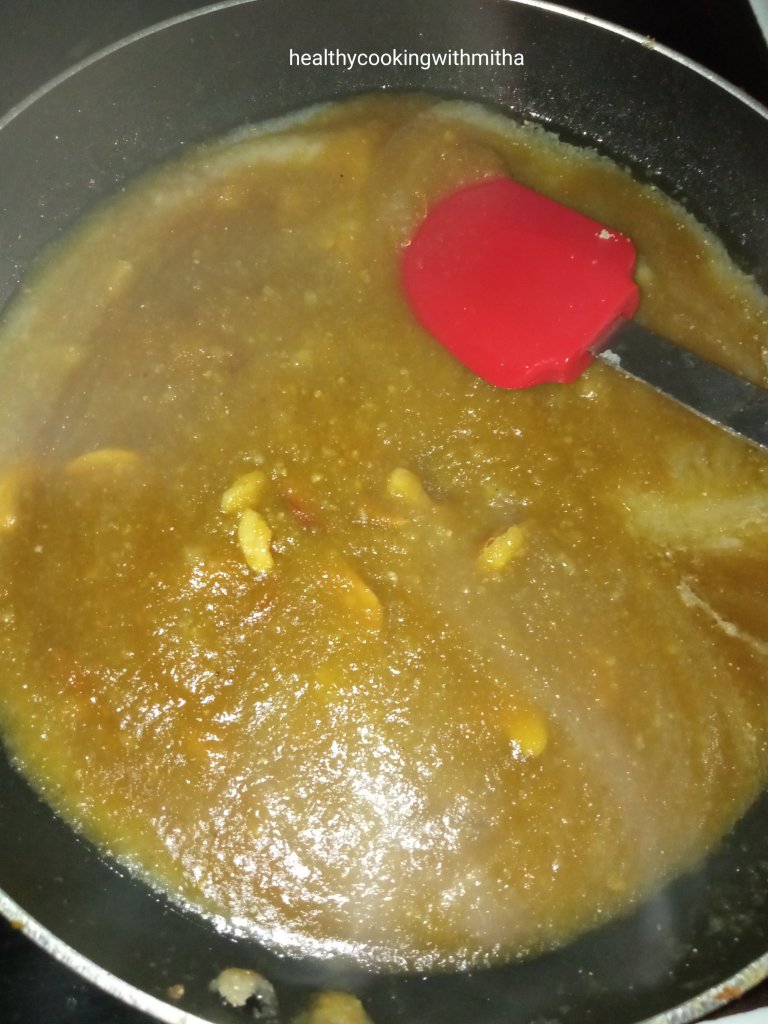
3. Now heat the rest 1 Tbsp ghee in the pan and fry cashews and raisins in it till cashews turn brown in colour. Add 2 Cups water and bring to a boil.
4. Add the powdered poha along with jaggery powder. (If adding jaggery as blocks, melt jaggery first in the water and then add the poha powder.) Mix continually removing lumps if any.
5. Now cook mixing continually on medium flame till the mixture leaves the sides of the pan. Takes about 8 mins.
6. Add cardamom powder. Mix well and remove from the flame. Serve hot or cold. Both tastes yummy.
Click on the image to save the recipe on Pinterest
Notes:
* You can use both thick or thin Poha for this recipe.
* Make sure to not burn the poha while roasting. Remove from flame as soon as it starts turning brown in colour.
* For 1 Cup Poha, 2 Cups water and 3/4 Cup jaggery works well for me. It turns out sweet enough for our taste buds. If you have a extra sweet tooth, you could increase the quantity of jaggery to upto 1 Cup.
* When poha powder is added to the hot water, there is chance of it forming lumps. So mix continually with a spatula removing lumps if any.
* If using jaggery blocks instead of powder, melt it in the water and then add the poha powder.
* Also, if the jaggery you use has impurities in it, make jaggery water separately (3/4 Cup jaggery in 2 Cups water). Sieve and then add the water to the roasted cashews and raisins.
* Don’t skip the cardamom powder as it enhances the flavour so much.
* I found that as the Sheera is kept in room temperature, it increases the taste than when had hot. So I would suggest to make this sweet a bit ahead of time for the poha to absorb the flavours well. The tagline behind this Sheera is ” As time went by, the Sheera kept tasting better and better! 😄”
* Here is yet another Sheera that I make always with Rava/ Semolina: Jaggery Sheera
It has been long I have not blogged a recipe and the last one was this Chocolate sponge cake that I had posted on Feb 6th. It was a special cake close to my heart (many reasons that this page won’t be enough if I start writing about it 😄) and I had posted it with so much love. ❤️ How glad I am now that many of my readers have tried and loved it too. Thank you dear readers. Your feedbacks make all the efforts of blogging worthwhile. 🙏
Along with the feedback messages that I keep receiving, if there is something I get regularly, it is doubts regarding baking. Since I have been baking for about a decade now, I can understand what went wrong when readers message me. So I try my maximum to help them as much as I can. Helping people gives me a kind of peace and happiness which nothing else can give (simple but precious joys of life). ❤️
So, no matter what doubt you have, even if you feel it’s a very silly one, Ask away.( I get that quite often that people think their doubt is very silly). I would not mind at all and will surely reply when I find time. No doubt is small and clearing it will ensure you get the recipes well and your ingredients/ time is not wasted.
Today, I got a baking doubt from my reader and after I replied, she asked me if I have written a blog regarding oven basics. That’s when I realized I had not blogged an article dedicated to it and how helpful it would be for all of you if I write a detailed one explaining what all I have learnt in these 10 years of baking. Have a long way to go and so much to learn but still will try to jot down whatever I know.
So, here goes the article. I will write as Q and A so that it’s easier for you all to read. Also, will keep updating whenever I get new doubts and I feel it will help you all.
My Oven –
Q : Which oven do you use?
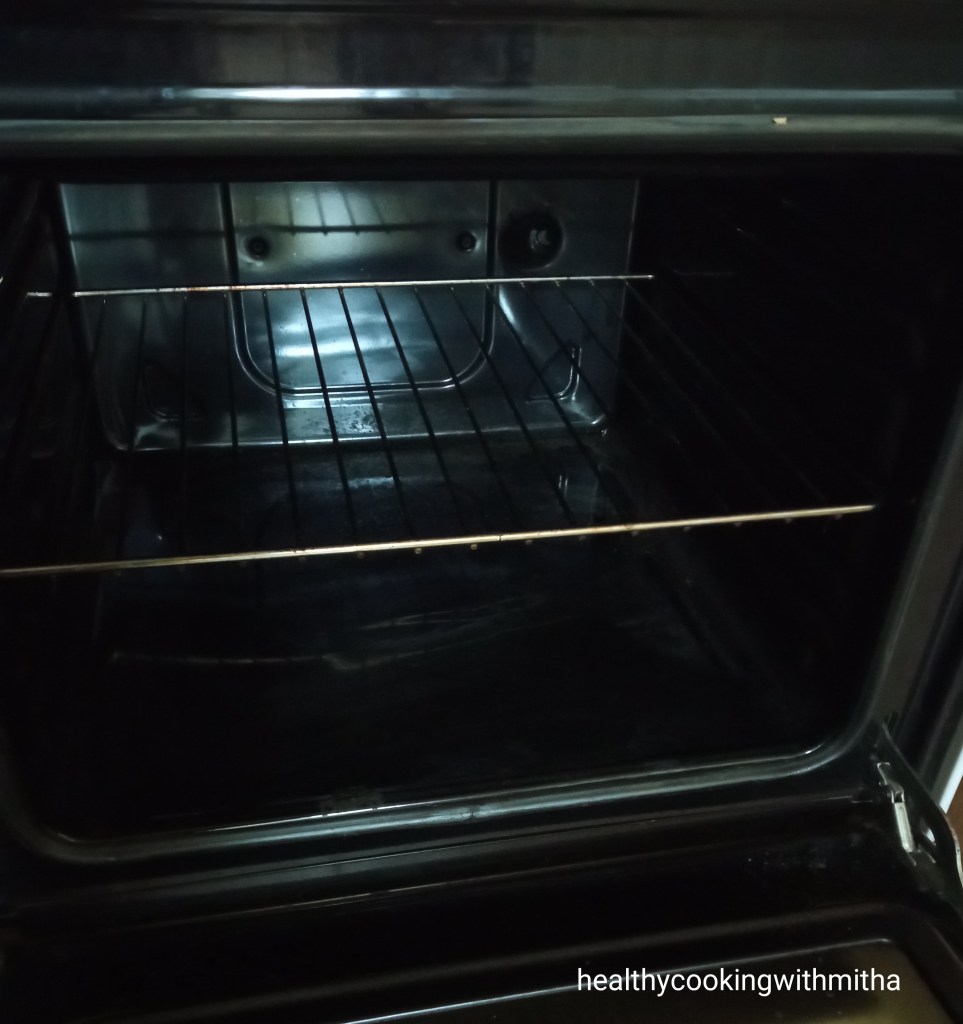
A : This is the picture of the oven that I use. It is an OTG and I have not bought it. Since we live in a company provided accomodation, we were provided with all electronic appliances too and this came along with it. It is a INDESIT oven plus glass top cooking range. I have been using the same since 10 years now and very happy with it. I can say it is my best friend and my favorite appliance in the kitchen since I both cook and bake in it. 😍😍
Q : Which oven is better to buy? OTG or conventional oven?
A : As I mentioned above, I did not buy the oven. But I have always baked in this OTG only and love how evenly it bakes. My parents have a microwave with conventional mode oven and I love how user friendly it is. Yes, the space inside is less when compared to OTG which brings to the point that if you want to bake in large batches, OTG is for you while if you want to bake just for your family, microwave with conventional mode oven is very easy to use. Here is the inside picture of my OTG. Love how spacious it is.
Q – Which rack to use in my oven for baking? It has three racks.
A – I have always used only the center rack as shown above in the picture for all my bakes. This ensures even baking and I get good results with it. But it sometimes depends on your oven. Some readers say they only have two racks. In that case, place in the bottom rack and bake longer (it’s better than keeping in the top rack which can cause the cake to burn). Once you start baking, with experience you will know which rack of your oven works best for you. (For people owning microwave conventional oven, this is not for you as you have just one rack to place your bakes. In your case, just bake in conventional mode or with two rods on as per your type of oven.)
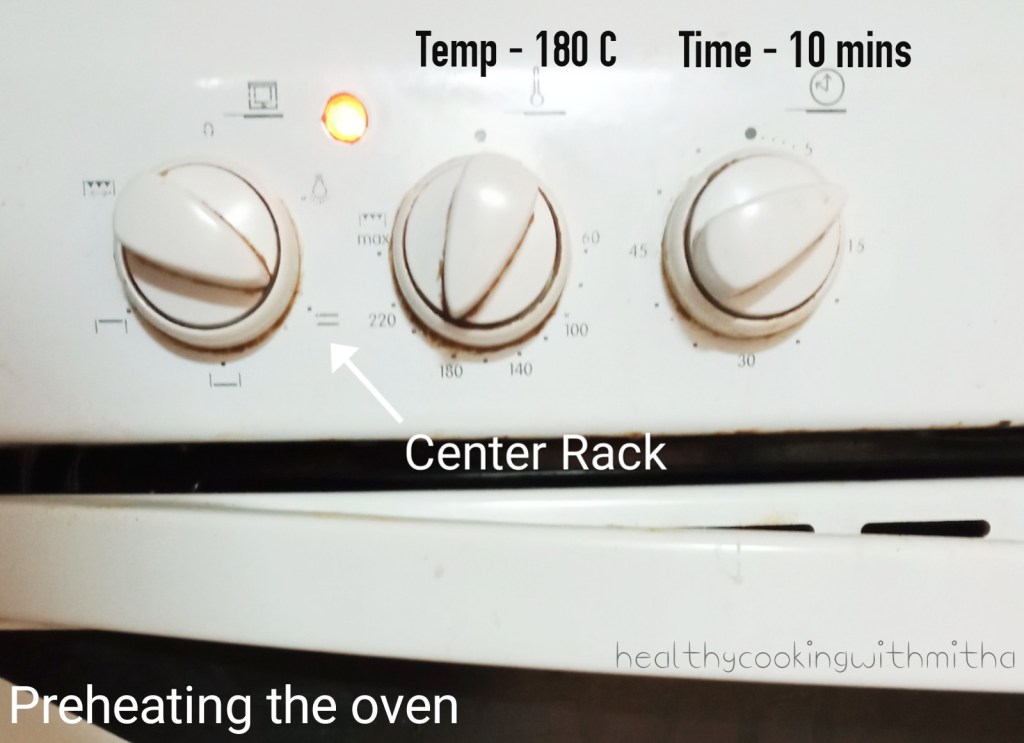
Q – How to preheat the oven?
A – Preheating the oven to the mentioned temperature is very important to get perfect bakes. Almost all of my recipes require pre heating to 180 C for 10 mins atleast. This ensures you are placing the cake batter or cookie/ bread dough in a hot oven which is the first important step in baking. So before you start making the batter or while making, don’t forget to preheat the oven. Most cake recipes need only sifting the dry ingredients, mixing the wet ingredients and then the batter is done which hardly takes 10 to 15 mins. So preheat the oven during that time. Here is the picture of the knobs from my oven.
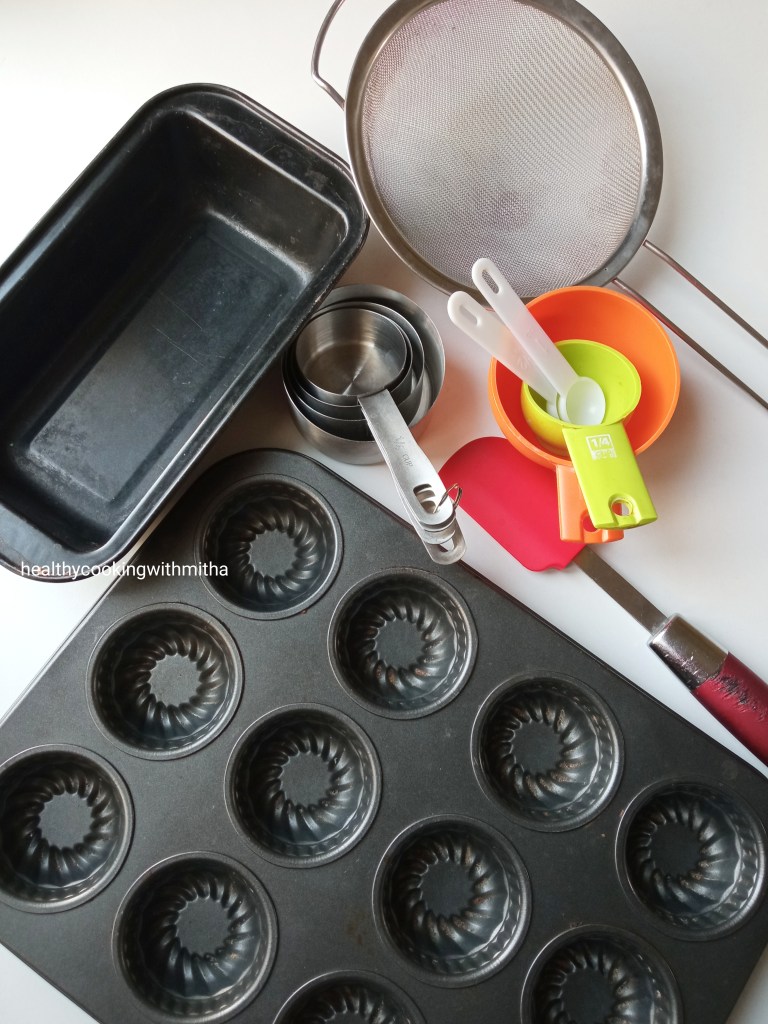
My Baking accessories –
I am someone who believes in not hoarding stuffs unnecessarily and all my baking equipments are from the time I started baking. I am happy that these bake wares have lasted all these years inspite of me using them so often. Here is a picture of some of my most used ones.
The nonstick loaf pan and the colourful measuring cups were my first buys when I started baking.
Measuring cups are the most important when you bake as no matter what anyone says, baking is definitely a science. You can’t just add ingredients in any ratio blindly and expect perfect results unless you are that experienced a baker. As for me, I can’t imagine baking without measuring cups. I have also been getting requests from readers for measurements in grams and I am planning to buy a kitchen weighing scale soon for this purpose. Weighing scales gives even better results as measuring cups comes in various sizes. Mine is a 250 ml one but it also comes in 200 ml cups.
Nonstick loaf pan that I use measures 20 cm in length and 4 cm in width. I have baked all my cakes, bread and pav in it. I also don’t use parchment paper. I just grease it with oil or ghee and the bakes come out clean. One of the best baking buys ever!
Muffin pan is useful if you like baking cupcakes. I use it while making cupcakes for my kids.
Sieve is essential in baking for me as I bake without eggs and using whole wheat flour. So to make the batter airy and light, I sieve the dry ingredients using the sieve shown above.
Spatula – While mixing the dry and wet ingredients, a spatula is required as you can mix without the batter sticking on it and also ensures that you don’t over mix the batter.
If you are my regular reader, you must have noticed this baking plate on which I bake my cookies, pizzas and also my falafel bread. It has been 10 years I am using it and so it’s not as beautiful (😬😅) but still I love how my bakes do not stick on it with very little greasing with ghee and bakes evenly. Can’t count the number of times I have baked on this plate. My best friend in baking for sure. 😍 It is a oven proof plate/ tray available in any bake ware stores.
Healthier Ingredients that I use –
Q – Which brand of wheat flour do you use?
A – This is the question I had been getting a lot of times. So I started mentioning the brand that I use which is Pillsbury Atta in my recent posts. I have used many brands of wheat flour but the flavours and texture that Pillsbury gives is the best. I get queries specially with whole wheat bread and whole wheat Pav that they did not get the desired taste nor softness even though they followed the recipe properly. When I ask them, I find they have used some other brand of Atta. So if you can find, use Pillsbury only as that is what gives the best results from my recipes.
Q – Which brand and kind of jaggery do you use? Also, can I use liquid jaggery?
A – I used to buy jaggery blocks, melt in water and then use in my initial baking recipes. After that, we started getting Jaggery powder from Goodness foods company ( here in Qatar) and my life changed. It is so easy to add to cakes and cookies. Apart from being healthier than refined sugar, it is also a lot more flavourful which gives amazing bakes.
About liquid jaggery, I have never used them in my bakes but you can add with wet ingredients a little lesser in quantity as liquid jaggery is more concentrated in taste.
Baking soda and Baking powder –
Do make sure of two points with these:
1. Make sure to check the expiry date as the bakes won’t come out as soft and spongy if the baking soda or powder is expired.
2. They usually form tiny lumps even if stored in a dry place. So do sieve before using in cakes and cookies. Else you will get those tiny lumps in the baked goodies which spoils the taste.
Same is the case with Cocoa powder too. I freeze my cocoa powder as it lasts well for many months that way. Sieve to remove any lumps that form.
Ghee or Butter instead of Oil –
I use Ghee or Butter in my bakes instead of Oil as I mostly bake for my kids and they need the fats since we are Vegetarians. Another reason why I don’t use oil is the flavour and aroma of the oil in the cakes which my kids don’t like. You can substitute with a neutral flavoured oil like Sunflower or Canola oil if you want to make the bakes free from Ghee or Butter. Using Olive oil or Coconut oil means the bakes will taste and smell of the oils as they have their own strong aroma and flavour.
I use Amul Ghee and Lurpak salted butter which are readily available here in Qatar.
Tips while Baking – Cakes
* Always preheat the oven at 180 C for atleast 10 mins (unless it is mentioned to preheat at a higher temperature).
* Sieve the dry ingredients to remove lumps and to ensure the flour mixture is airy and light.
* Always use all wet ingredients like milk and curd at room temperature unless otherwise mentioned like hot milk or hot water.
* Mix both the dry and wet ingredients using a spatula till the mixture is free from flour specks. But do NOT overmix as it leads to dense cakes. Just mix with light hands till the ingredients combine and you are done.
* You can use parchment paper to line your cake tin and cookie tray but I grease them with ghee or butter. It ensures that the cake comes out clean and cookies do not stick to the plate after baking.
* Do NOT open the oven door atleast till three fourth of the bake time. If you keep opening the door, the temperature varies drastically and it will lead to imperfect bakes. So if the bake time is 30 mins, open the door only after about 20 mins.
* Check for doneness using a toothpick or skewer inserted in the center of the cake. If it comes out clear or with little crumbs, the cake is done. If it comes out sticky and with batter in it, bake for 5 mins more and then check again.
* When you check and see that the top portion of the cake is done and turning dark brown but inside has to bake, cover the tin with aluminum foil during the last 5 to 10 mins of bake. This is ensure that the cake does not burn or turn black on surface and the inside with bake well too.
* Allow the cake to cool completely before running the knife along the sides and trying to unmold it. Best is to leave the cake covered at room temperature overnight. I have noted that cakes always taste best the next day.
* You can keep the cake at room temperature for 24 hours and then leftovers can be refrigerated in a airtight container. Microwave before use and get the same softness when you eat each time.
Tips while Baking – Cookies
* Remember to refrigerate the cookie dough for atleast 10 mins so that the cookies can be shaped perfectly.
* Also, remember to grease the tray well with ghee or butter so that the cookies don’t stick on it.
* Don’t make the cookies very thick and pat them into thin discs. Else the insides of the cookies can remain underbaked.
* Space the cookies with some distance in between them as they increase in width after baking.
* Cookies get baked very quickly than cakes. Takes only about 15 mins. So keep an eye after 10 mins so that the cookies don’t burn.
* When the cookies get slightly brown streaks, it means they are done. If they turn too much brown on the surface, they turn very crispy. So if you want soft cookies, remove as soon as it starts turning dark brown. Else it turns crispy.
* Store in an airtight container at room temperature and the cookies last well for atleast 5 days.
Tips while Baking – Pizza and Falafel bread
* The main point to note while baking both the pizzas and Falafel bread is to grease the plate well and spread the dough as thinly as possible so that the dough cooks inside and bakes evenly.
* Here are all 4 recipes. I have mentioned the tips in detail with step by step pictures in all the four recipes.
I have made a step by step pictorial with tips in notes in these posts below. You can check to make soft wheat Pav and assorted wheat breads at home easily.
Okay, so finally ending this post as I think I have finished noting all the points (had put up a huge thinking cap on 😂). Though this turned out to be a very long one, I know it will very useful for beginners. Do let me know here in comments or on my Facebook page or Instagram if you still have any doubts. Happy and healthy baking! ❤️
On request from my readers, here is the post on Pinterest. Find the Pin here.
I never thought I would be penning this as an article on my blog but today, I can’t seem to sleep without writing down my thoughts.
I lost two important people in my life last week.
First was my grandmother who was seriously unwell since a month and finally her illness took her away from us on March 9th. Looking at her through the mobile screen, lying lifeless is something I won’t forget ever in my life. Though I know she is at peace now as she has been relieved from her suffering, it is difficult to believe that I will no longer see Annama (as I call her) when I go back to India.
And look at destiny’s play here. I was supposed to travel back to India this month but due to some major situation change, our plans were cancelled. The day it was cancelled, it had left me shattered as I was really hoping to see her and my Amma too. We had even finished most part of the packing. But life is really unpredictable and these past few months have shown that to me. So here I am, still in Qatar, with just memories remaining of my Annama to share with all of you.
Annama has been the inspiration behind all my Konkani recipes as that is what she made for us when we grew up. I still remember the way she used to say in her typical style, “Khavnu pale!!” meaning atleast taste and see, when I used to make a face at some not-so-favorite dishes of mine. Thinking of it does bring a smile on my face now. 😍
She was an expert at making sweets and her Churmundo (wheat flour ladoos) and soyye khadi (coconut burfis) are my favorites. She always made it and kept for me when I went on vacation. She would keep those along with a packet of tingalavro (white beans), some cotton towels, a small purse and a bottle of Ponds talcum powder, all ready for me to take back to Qatar. That love filled bag will definitely be missed next time. ❤️
Another memory of my Annama which I am remembering continually is her expression when I used to show her my newly bought artificial earrings during my school and college days. She used to tell me why are you wearing all these “santheche” (market ones) as she always believed in wearing gold and not other materials which she considered cheap. I wish I could show her that I now wear only gold earrings which my Amma gifted me during marriage. This woman now is no longer the girl who used to love those fancy earrings. I have become the woman you wanted me to become, Annama. ❤️
Also, she always believed in eating healthy homemade food and hardly ate bakery or restaurant foods. That is the sole reason that she was free from any disease even after being more than 85 years of age. I wish I had started following her way of life much earlier but as they say, better late than never. Her lifestyle is definitely an inspiration for me.
Annama, you will be missed a lot but I know you will look at me from above and will be happy to see me cooking just like you. Hope I can share more of your dishes and take your recipes forward to the next generation. Loads of love. ❤️
The second person that I lost is my college mate Rajath’s father, Sasidharan Uncle on March 10th. Even though Rajath was from the same college as mine, I had hardly talked to him once or twice as I only knew him as my best friend Taniya’s friend. So it was just a formal kind of relation.
But after I came to Qatar, Taniya gave me his number saying Rajath and his family are here too. From then started our friendship which is not only a mere friendly relation but definitely a family bonding. It would not be wrong if I call Rajath my elder brother as he has always fulfilled his duties of being one.
When blockade was imposed on Qatar and we hardly had any veggies available here, it was Rajath who drived all the way amidst his work schedule to bring us about 10 varieties of vegetables which lasted more than a month for us.
After that, when I was supposed to travel back to Qatar post delivery alone with my newborn son and daughter, he booked his and his wife’s tickets such that we were on the same flight and he could take care of us. He and his wife Malavika (who’s a beautiful girl inside out ❤️) made me feel so comfortable that I forgot all the tensions of travelling with a one month old baby.
All these good nature of Rajath is credits to his parents. Both Sasidharan Uncle and Geetha Aunty are gems of human beings. Even as I write this, I still can’t believe uncle is no more. His talks, jokes and the way he shared his stories about his experiences in life is what I enjoyed always.
Uncle always considered me as his daughter and used to call me lovingly as “Mole..” which means daughter in malayalam. So I always felt he was like a father figure and someone whom I looked up to all these years, living away from my own family.
Ever since Covid started, we hardly met but last month, on Feb 9th, I got Rajath’s message asking if they could come to our house that evening. He knew I was excited to meet his little boy and we were planning since long. So that day, since my husband too was home, I said okay. I confirmed if uncle and aunty were coming too and he said yes.
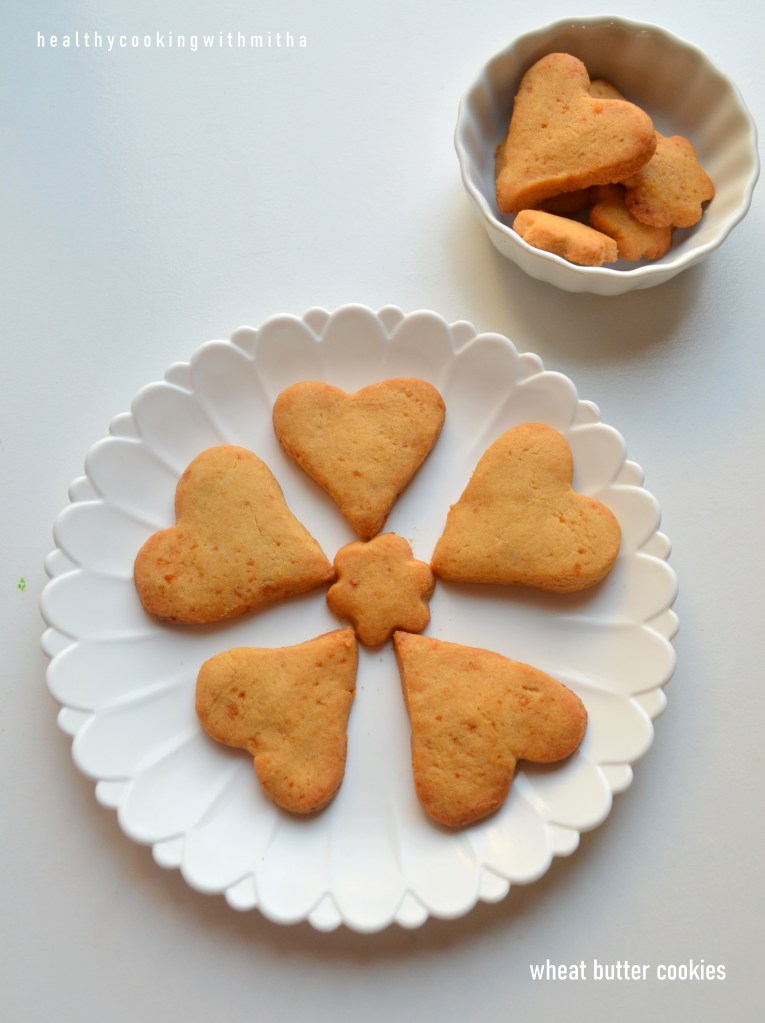
It made me so happy and I made Almond cookies and Churmundos for them. Had shared it on my Facebook page that day. Here is the picture.
They all loved it so much that none of these were left. It had me so happy and it was one of the unforgettable days of my life.
Who knew that it would be the last day that I would see and talk with my dearest Uncle.. His last words as he sat in the car are still in my ears. He had said, “Mole, Mannarkkad endayalum varanam.. Kaanan pattiya sthalam aanu.. endayalum varanam ketto..” (Dear daughter, you should come to Mannarkkad (his hometown), it’s a must visit place.. do come..)
As these words echo in my ears, I have promised myself that I will definitely visit Mannarkkad sometime in my life. That will be my true tribute and my way to offer respects to his soul. 🙏
So these are my memoirs with both these beautiful people whom I lost physically but they are always in my heart as precious memories which no one can take away. These past few days made me realize how unpredictable life is and all that remains is the love we have shown on everyone. So, love truly and unconditionally with all your heart. That love remains a lifetime to be cherished forever. ❤️
I dedicate this blog to my best friends Taniya and Sunanda who have been motivating me to pen down my weight loss journey since a long time. But yesterday while chatting on our mini whatsapp group (of only the three of us 😅), I was so inspired by their talks that I decided to write as soon as possible (the moody me who gets this sudden burst of energy 😆). So thanks my dearest Tanu and Chu for encouraging me so much. If I know true friendship, it is because of both of you. Thank you for being there for your Ladoo (😍) all this time (more than 12 years) and I know we three will be there for each other forever. ❤️❤️❤️
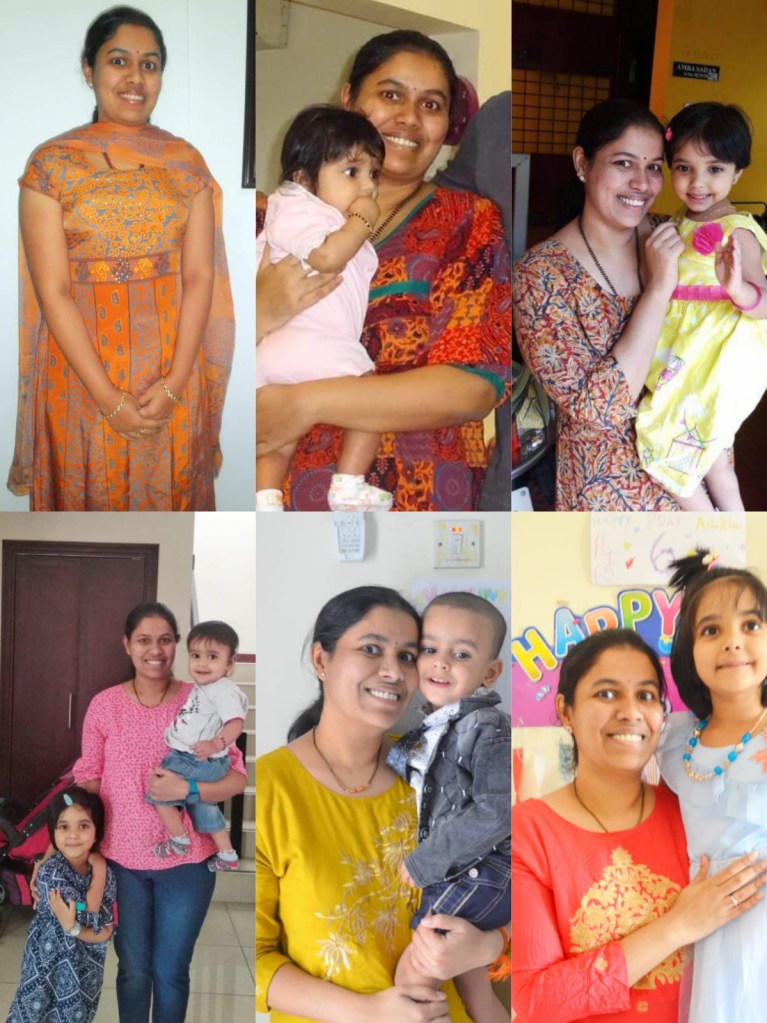
Now to my journey. It started when I was trying to conceive for a baby from 2011 to 2014 (Though I was only 21 to 24 years then, I love babies and was eager to have mine too). I did not have any major health issue nor was over weight. Still it took me three years to conceive my daughter. (Sometimes there are no reasons medically, yet you can’t conceive. It’s the hardest kind of infertility.) I had many sleepless nights and used to cry a lot as I had lost all hopes of becoming a mother. (One of the most difficult phases of my life.) As I was about to fall into depression, a friend of mine suggested a famous Indian infertility doctor here in Qatar – Dr Khudsiya Begum. Couple of months of consulting with her and with God’s blessings, I conceived. It was the happiest moment of my entire life. 😍
So from a girl, I became a mother in Feb 2015. Motherhood made me so excited that I gave it my all, neglecting my health, mindless eating and with lack of exercise, I gained a lot of weight. Still I did not realize I was gaining as I was busy bringing my baby up in the best possible way (love is blind and I was so blinded by my daughter’s love that I could not see anything else, not even myself 😅).
March 2017 was when that blindfold got opened by a friend here who mentioned to me how much fat I had become (much more than in the above second picture 😬). Though I felt sad then, I thank her with all my heart now as that was the reason I got motivated to start losing weight (Thus began my fight with fat to become fit.) That rhymed! 😄
Then, from March 2017 to November 2017, I lost almost 9 kgs of weight. Will share how I did it as pointers so that it’s easy for you all to read.
* Followed “3 miles walk by Leslie Sansone” video on YouTube which is a heart healthy walk while standing in a place. I do this even now when I don’t get time to walk outdoors. I keep the video and follow her for atleast 30 mins which covers 2 miles in a day. I found time for this when my daughter slept and did it everyday without fail.
* Along with this, I did an hour of brisk walking outdoors in the evenings while pushing the stroller with my daughter in it. It not only gave me the much needed fresh air but also sunlight to my body.
* Started portion control while eating healthy meals instead of eating out and eating late at night. I saw how that helped in my weight loss too. Eating dinner before 8 is what I follow even now. Gives us ample time to digest the food before sleeping.
* I also stopped sitting in a place and forced myself to move throughout the house when I felt like sitting idle. Sitting in a place was one of the major reason that I had gained weight. So this helped me maintain my weight loss.
* Lemon juice has really helped me in my weight loss journey. Just squeeze one Indian lemon and add little water making it to a glass. Don’t add anything else. Drink it on empty stomach or anytime of the day when you remember. It will not only aid in digestion and weight loss but gives you the much needed Vitamin C boost to the body.
* I also want to add that the first couple of kgs took the longest time. After that I lost the rest of the weight very quickly. So don’t get disheartened within a week. Atleast do these walks for two months and you will definitely see the result.
And as I lost those 9 kgs, I conceived my son in November 2017 which was a great surprise and a miracle too. It showed me how the walking and healthy eating had affected my body and I conceived naturally without any medication this time. The third picture is just before conceiving my son. See how much I had reduced.
During my second pregnancy, I was much more aware of my body due to Birth Village – The natural birthing center where I consulted and delivered my son. It was a natural VBAC which is “Vaginal birth after C section”. Though it is considered risky, my confidence in the Birth Village team was so much that I was not worried at all.
I ate healthy and walked throughout my pregnancy, even took part in the pregnancy workouts and dance sessions, making it a very happy kind of pregnancy. 😍 All thanks to the BV team!
I delivered my son in August 2018. This time around, I knew I had to take care of myself too post partum and took time everyday for some walks. Again, the “3 miles walk” video became my best friend which helped me reduce my postpartum weight.
In the above pictures, the first one is when my son was about an year old in 2019. The second picture is on his second birthday in August 2020 followed by this recent picture during my daughter’s bday in Feb 2021.
The second picture is when I had again lost focus on myself and got so busy taking care of both the kids that I hardly ate. This led to a massive weight loss which can be seen from my face. I realized if I go this way, it will affect adversely on my health (All thanks to my Amma this time who realized on video calls that I was reducing much more that I should be and neglecting myself. Mothers’ always know us, no matter how far they are. ❤️).
So now, I am eating well but eating healthy along with brisk walking daily for atleast an hour (combining outdoors and indoors) and also not sitting for long in a place. I make sure I walk inside the house whole day while listening to my daily shlokas and favorite songs. Also, after finishing cooking and household chores before 5 in the evening, I dedicate the rest of the time till night to walking. My son has been keeping me active too by asking me to play football with him and also since he loves dancing, he asks me to join him as well (even though I am the world’s worst dancer, it does make my little boy happy and that is all that matters. 😍)
So this third picture is the me now and I feel really good about myself. Though not the ideal kind of “slim and trim” body or face (and have those chubby cheeks too 😄), I am healthier and fitter now than ever before as I am taking care of myself well. Though late but as they say, better late than never, I realized that I should take care of myself too and not get drowned in becoming a wife or a mother. So, self love is very important as well. ❤️
Hope you all enjoyed reading this long writeup and hope it will be helpful to atleast some of you. Happy and healthy cooking – with walking! 😄
Click on the image to save the recipe on Pinterest
As a kid, I was always excited about my birthday (was pampered a lot by my parents and my bday was celebrated the whole of December 😅). And now there is a “mini me” here, (everyone says she’s just like me – super hyper talkative 😂) who’s even more excited about her birthday. So much that she’s been waiting for it since last year. Everyday I used to get the same question, how long for February, Amma? 😄
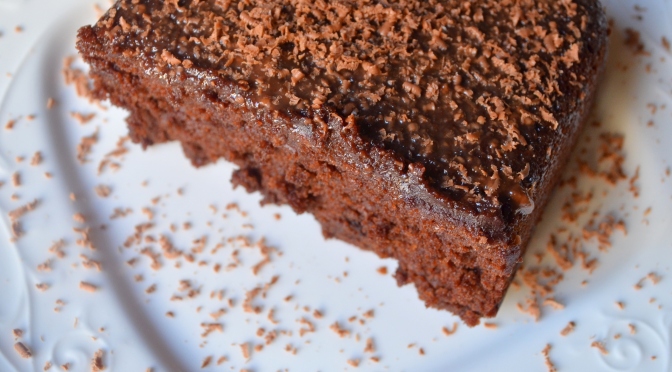
So now, when Mr Feb is finally here, I decided to announce it to her that her birthday month has finally arrived (much to my relief 😅) by baking her favorite chocolate sponge cake. Just like me, she too loves chocolate cake very much and this cake tastes as yummy as the McCafe ones here in Qatar (my fav chocolate cake is theirs and I go mmm yummm when I take each bite 😂😂 When will I grow up? 😅). Baking a similar one at home was my goal but did not know I would get the exact same taste and texture even with wheat flour. One of the bakes that I am very happy about and the way my kids enjoy it, it increases my confidence in the recipe each time I bake it. ❤️❤️
My daughter loved this surprise cake and even took it in her snack box to school to show her friends. She’s now eagerly waiting for her birthday on Feb 15th (right after Valentine’sday😍) which she will celebrate with her small kiddo gang from our lane (her daily evening playmates, her source of joy ❤️). Now that Feb has arrived, her next question is when will 15th come (the never ending story 😁). My solution to that – I have made a small calendar and stuck it on the wall. Have asked her to strike off each day and countdown till her birthday. #momideas 💡😄
Anyhow while I find solutions to her queries, hope you bake and enjoy this cake. Do let me know if you have any doubts. Will be a pleasure to help. Happy and healthy cooking! ❤️
RECIPE:
Ingredients: { 1 Cup = 250 ml }
Dry ingredients:
1 Cup Whole wheat flour or Atta
1/4 Cup unsweetened Cocoa powder
1/2 tsp Baking powder
1/2 tsp Baking soda
1/4 tsp Salt
Wet ingredients:
3/4 Cup Jaggery powder
1/2 Cup Hot water
1/2 Cup Milk
1/4 Cup Ghee
1/2 Tbsp Vinegar
Step by step recipe:
1. Preheat the oven at 180 C for 10 mins.
2. Sift the dry ingredients together in a bowl using a sieve.
3. Keep it aside.
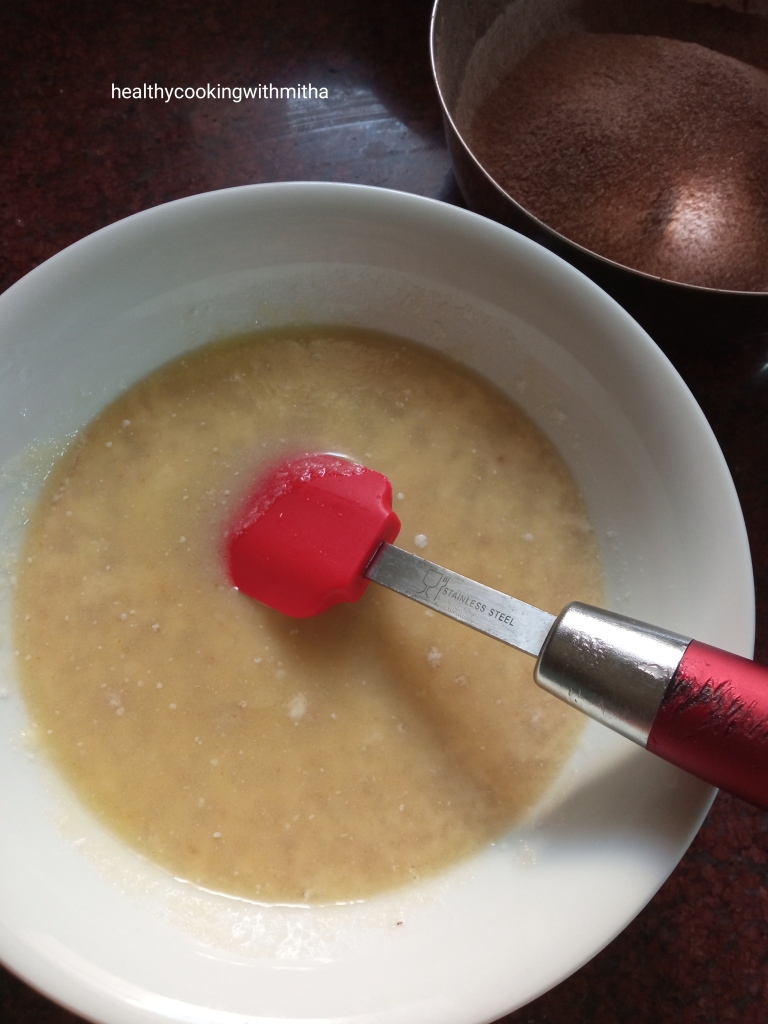
4. In another bowl, add jaggery powder, hot water, milk (at room temperature), ghee and vinegar. Mix using a spatula.
5. Now add the dry ingredients to the wet ingredients. Mix only till you can’t see any dry flour specks. Do NOT over mix the batter as it can lead to dense cakes.
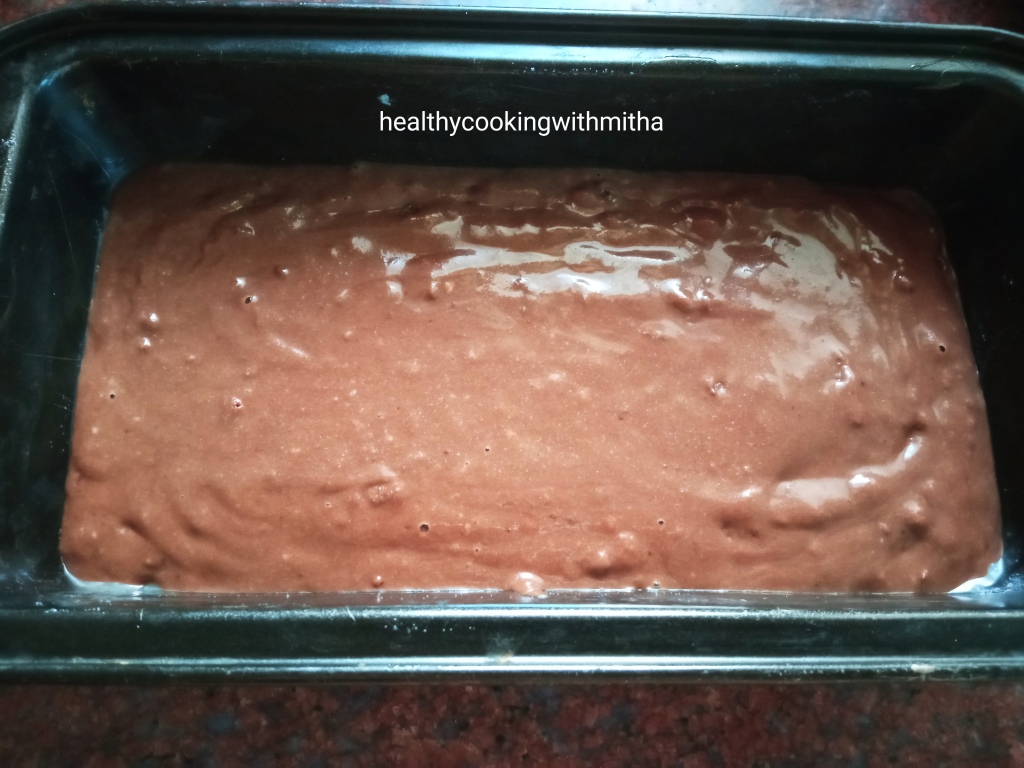
6. Add the batter to a greased cake pan (or lined with parchment paper). My rectangular loaf pan is 20 cm * 4 cm. Level the batter using a spatula.
7. Bake in a preheated oven at 180 C for 30 to 35 mins in the center rack of your OTG or with both rods on or bake mode in conventional oven. In my oven it took exactly 30 mins. Might vary depending on your oven type. Once done, a toothpick inserted in the center of the cake must come out clear or with crumbs. Should not be wet.
8. Allow it to cool. Invert onto a plate. Frost with melted chocolate- milk mixture. Have shared the process to do it in this Chocolate brownie recipe. Then grate chocolate over it. Slice and serve.
I had cut it into two halves. This is one of the halve.
Notes:
* I use Pillsbury brand of wheat flour for all my bakes. It really comes well with Pillsbury. I have tried with other brands but the texture of cakes, bread, pav and cookies is best with this.
* Please use milk at room temperature and not cold.
* If you don’t have jaggery powder, you can also substitute with cane sugar or brown sugar. Else just grate and powder jaggery in a mixer.
* When you add vinegar to the mixture, it will curdle. Don’t worry about it as it will give very spongy cake.
* When the cake is hot, it will crumble easily on slicing. Allow it to cool well atleast for an hour and then slice for firm slices.
* If frosting, check this Dates Chocolate brownie for easy melted chocolate frosting recipe which I have shared at the end of the step by step pictorial.
* If you are new to baking, here are some tips:
# Always preheat your oven at 180 C for atleast 10 mins. Temperature might be 200 C also. It varies according to the recipe but for cake, it’s usually 180 C.
# For whole wheat cakes, do sift the dry ingredients using a sieve for a soft texture of the cake.
# Do NOT overmix the batter. Just mix till you don’t see dry flour specks. Over mixing can lead to dense cakes.
# Do NOT open the oven door atleast till 25 mins into the baking time. Opening the oven door in between can lead to temperature variations leading to uneven baking.
# Always insert the toothpick or skewer in the center of the cake for accuracy. It should come out clear or with crumbs. Wet means it’s not done yet.
I have tried to note down as much points as possible so that it’s easy for you all to follow but if you still have any doubts, either comment here or message me on my Facebook page Healthy cooking with mitha or on my Instagram handle and I would be happy to help.
Update: I just baked chocolate cupcakes with this batter and it comes out perfect with flat top, super spongy, soft and delicious. It gets done in 20 mins at 180 C in my oven and yields 10 cupcakes with the measurement given above. Look at how excited my kids were to see their favorite cupcakes. They loved it a lot. ❤️❤️
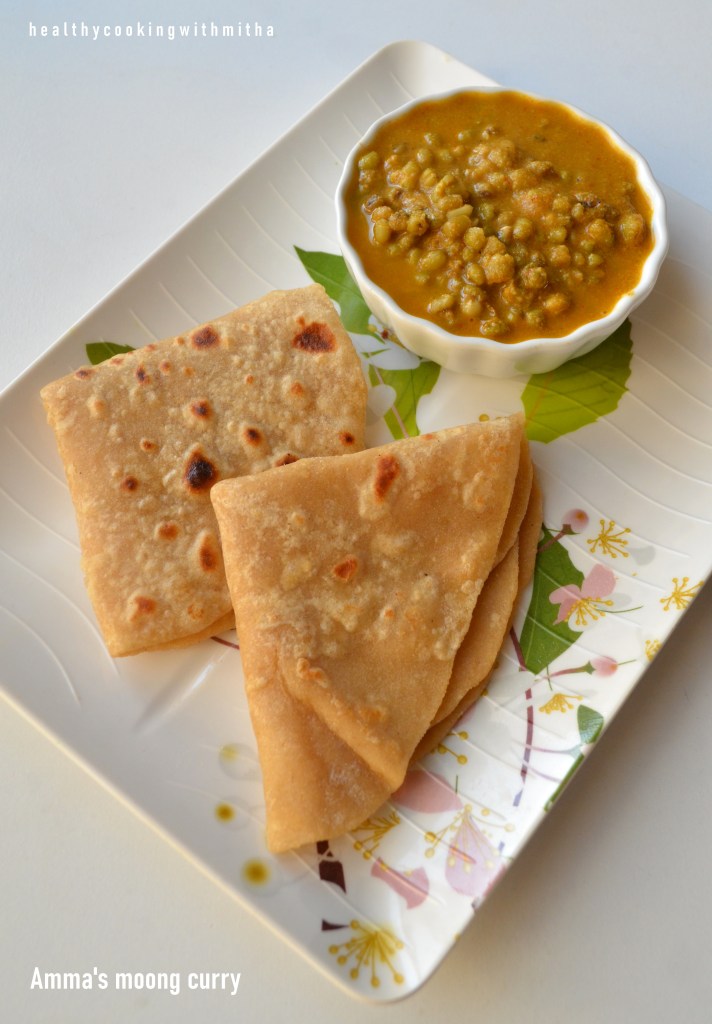
All of us have a special kind of liking towards our mother’s cooking and I am sure you all will agree that no matter which Masterchef cooks for us, our Amma’s food is the best. Why not, as she makes everything with a secret ingredient in it – Love. ❤️
My Amma too used to cook so well and the flavours of all her dishes are still in my taste buds. This moong curry was one among them and I used to take it with puris in my lunch box during my school/ college days. My friends used to love it too and I used to take extra boxes of it for them as well. The precious memory of those days is forever etched in my heart and I remember it each time I make this curry. ❤️
Now Amma can’t cook like before as she suffers from muscular dystrophy in her legs. Although she’s strong most of the days and remains happily engaged all day, there are times when she falls into self doubting sadness and I have to convince her my best that she is still very much loved and an important part of our lives. Right now, she’s going through a difficult phase and this post of mine is to cheer her up in my little way, by adding her recipe on my blog.
Amma, this is for you. ❤️ I am coming in few months to make this curry for you and you have to tell me if it tastes as good as yours or not. 😍 Loads of love to you Amma. 😘 Please be happy always as that is what makes me happy too. ❤️ Sharing some words for you which I found as best to describe our love for each other. Hope it cheers you up. 😍
Now to Amma’s recipe. Hope you all try her way of moong curry too. Tastes amazing with puris, chapatis or even with rice. Happy and healthy cooking!
RECIPE:
Ingredients:
1 Cup dried whole green gram/ whole moong
1 Tbsp Oil
2 tsp Red chilli powder or to taste
Salt to taste
For the ground paste:
1/4 Cup Coconut (freshly grated or desiccated)
6 to 8 sprigs of Coriander leaves
1/2 a large Tomato
1 small sized Onion
2 Cloves
1 Cardamom
1 small piece of star anise
1/2 tsp Cumin seeds or Jeera
1/4 tsp Turmeric powder
Step by step recipe:
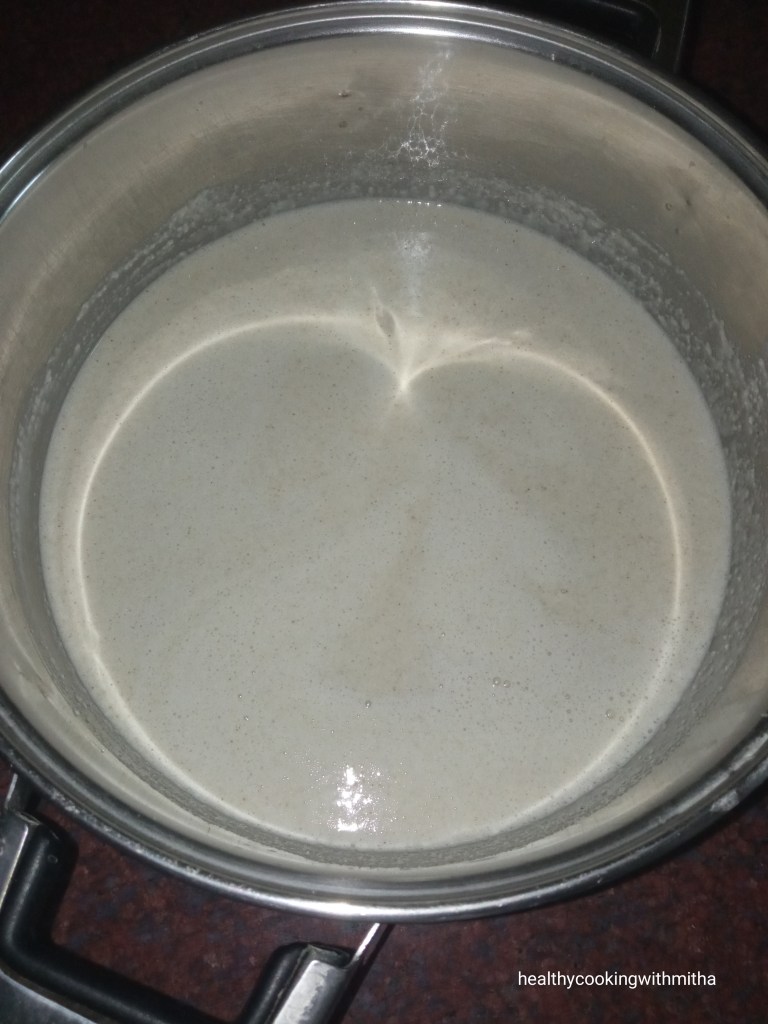
1. Soak whole moong in atleast thrice the amount of water overnight or for 6 to 8 hours. When soaked, drain the water. Add fresh water enough to soak it in a pressure cooker and cook until soft. Takes 3 to 4 whistles on high in my electric stove top. Might vary depending on your cooking range.
2. Add ingredients to grind in a mixer.
3. Grind adding about 1/4 Cup water or as needed to a smooth paste. Now heat oil in a pan and add the paste. Also add red chilli powder and cook till the raw smell goes away. (About 5 mins and this paste splatters. So be careful and mix continually.)
4. Now add the cooked moong and salt. Bring it to boil and cook for 5 to 8 mins. Adjust consistency of the gravy.
5. Serve hot with Puris, Chapatis or rice meals.
Notes:
* The gravy thickens when kept at room temperature as moong absorbs a lot of water. So if serving later, add water that time to adjust gravy consistency.
* Star anise and coriander leaves make this masala very aromatic. So don’t skip it.
* The masala splatters while cooking. So be careful while sauteing.
* I also sprout moong and make this same curry.
* You can also check my mother’s other three recipes –
Click on the image to save the recipe on Pinterest
Just finished sending off my little girl to school (she has classes every alternate week) and before my son wakes up in a while, I thought of finishing off this blog. As soon as he wakes up, all he would want is to cuddle me and sit like that for an hour (Wish I could share a picture of that scene 😍) until he gets hungry, asking me to go make “bobbo” (dosa) for him. 😄 This tiny man of mine is such a loving one that I call him my “lover boy”. 😍 Seriously, the way he hugs me, holds me and kisses me, I feel so so loved. I realize how these moments matter in our lives and how kids can brighten our day by their sweet gestures. ❤️
Talking about gestures, as you can see from the picture of the dosa, my daughter is holding the plate. It was supposed to be my usual (boring 😁) kind of click until this girl saw her Amma clicking in the regular way and being the typical Aquarian (An unique sign ❤️) that she is, said, ” Amma, let me hold this and see, how many likes you will get for your blog!” 🤣🤣
She is a huge fan of vlogs and loves making videos herself. Looking at her interest at making videos, I wonder from where she has got this. I can’t imagine facing camera and dread taking even my pictures, let alone videos. 😂 But the confidence in which she presents herself, talking with so much enthusiasm, makes me feel proud of her. Atleast she is not camera shy like me and loves herself. Hope she can be a YouTuber like she wishes to be in future. ❤️
So here’s the little millet dosa presented by my soon to be 6 year old daughter. You can never say it is made of millets and tastes just really delicious. A great way to add the healthy millet in your diet. Hope you all try this. Happy and healthy cooking! ❤️
RECIPE:
Ingredients: { About 10 to 12 dosas }
1 1/2 Cups Little millet (Kutki/ Saamai)
1/2 Cup Urad dal (I use split ones)
1 tsp Fenugreek seeds (Methi)
Salt to taste
Ghee or oil to cook the dosas
Step by step recipe:
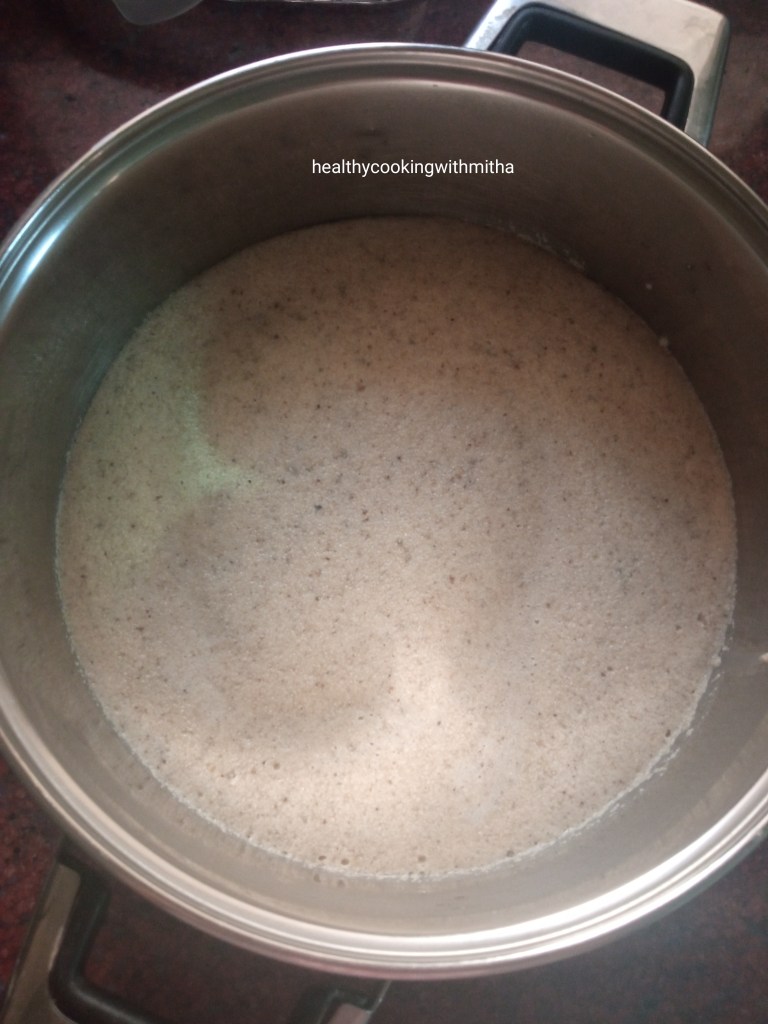
1. Soak Urad dal with Methi in a large bowl for about 4 hours. Also soak little millet in another bowl for 4 hours.
2. Now drain water from both completely. Grind Urad dal- Methi with about 3/4 Cup water to a smooth paste. Pour in a large vessel. Now add the soaked millet with about 1/4 Cup water in the mixer.
3. Grind the millet to a smooth paste too. Add this to the Urad dal dal paste. Add salt and mix well with hands.
4. Keep covered at room temperature for about 8 hours. Might take longer during winters. Always love to look at the well fermented batter in the morning. 😍
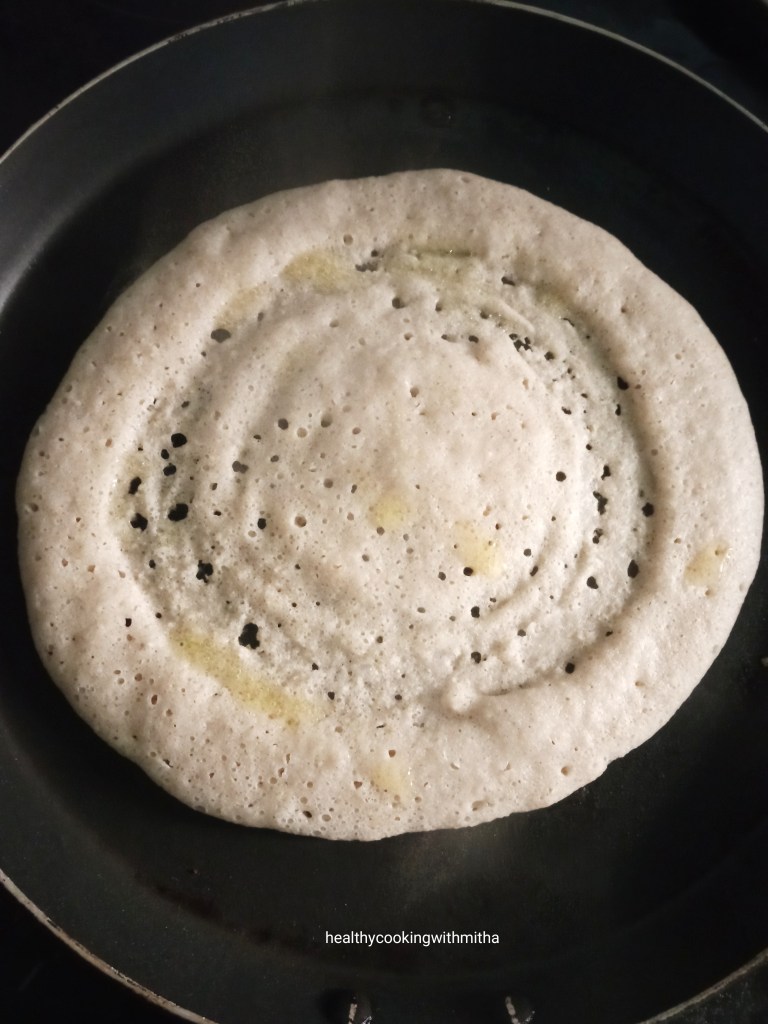
5. Now heat a dosa tawa and pour a ladle of dosa batter. Spread using behind the ladle like regular dosas. Add ghee or oil and cook till the dosas turn crisp.
6. Remove and serve with a chutney of your choice.
Notes:
* As can be seen from the picture, I have used Manna brand of Little millet which is readily available here, in Qatar. For readers’ from Qatar who ask me the source, I got them from Lulu hypermarket, Barwa City. Also available in Grand hypermarket, Wakra and all Lulu outlets.
* This dosa comes out crispy when cooked one side till the underside turns brown.
* Making this dosa with ghee adds such a wonderful flavour to this dosa.
Traditional recipes always attract me as I believe in going the age old ways to live a healthy life. Simple, homemade food combined with regular exercise even if brisk walk for atleast 30 mins a day is enough for our good health instead of any diets. Having said that, I do indulge in restaurant food and store bought goodies sometimes (especially sweetsfor the sweet loverin me ❤️) which I believe is necessary too for a change in tastebuds.
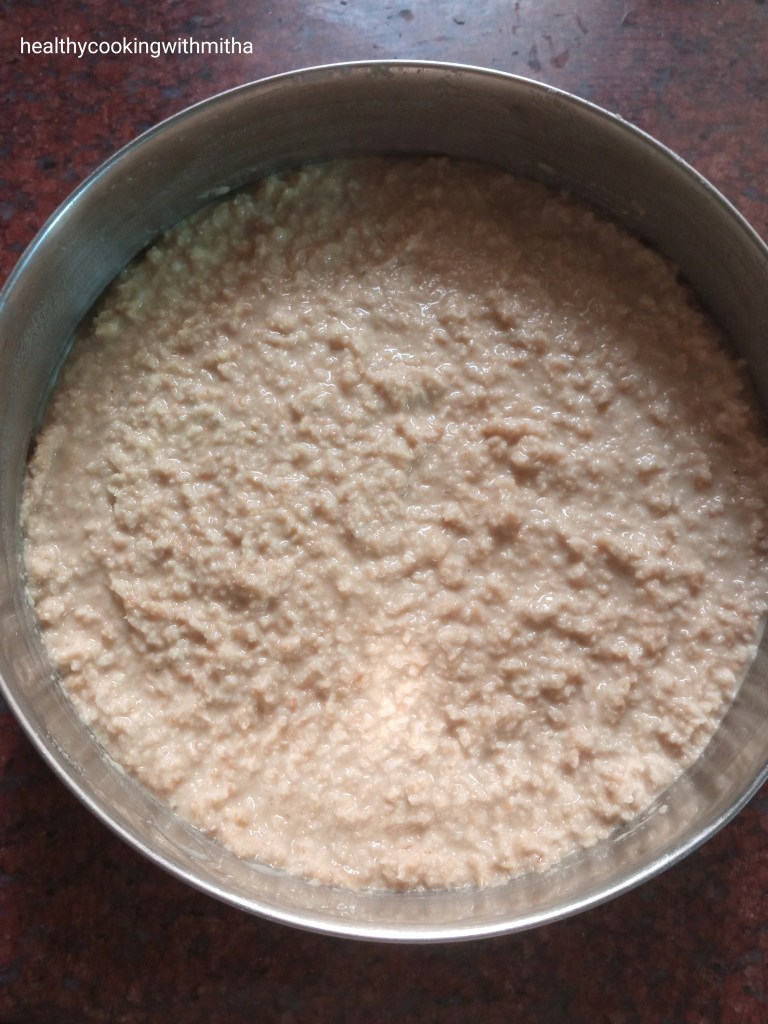
But finally, making sweets at home gives me happiness and specially simple and tasty Konkani sweet like this one, which is filling and doubles up as a great evening snack too. I learned to make this from my dear friend Sreeja Shenoy whom I came to know through Facebook food groups. She says she resonates with my feelings in each of my posts and feels close to me (how sweet of her ❤️) while for me, her posts take me back to my days in Kochi as her food is Kerala Konkani style.
So when she posted this broken wheat sannan, I knew I had to try this and saved the post immediately. And how amazing does it come out! So so delicious. Cannot believe this simple sweet can have such an amazing texture and flavour.
Thank you so much Sreeja for this recipe. A definite keeper and will surely be making this whenever I crave for something sweet. My kids loved it a lot too which made it even more special. ❤️
Also, I want to thank you and your sister Ambratha for always encouraging me with your kind words. It means so much to me that I am always filled with gratitude. Much love to both of you. ❤️❤️🙏🙏
Hope you all will try this recipe. Happy and healthy cooking! ❤️
RECIPE:
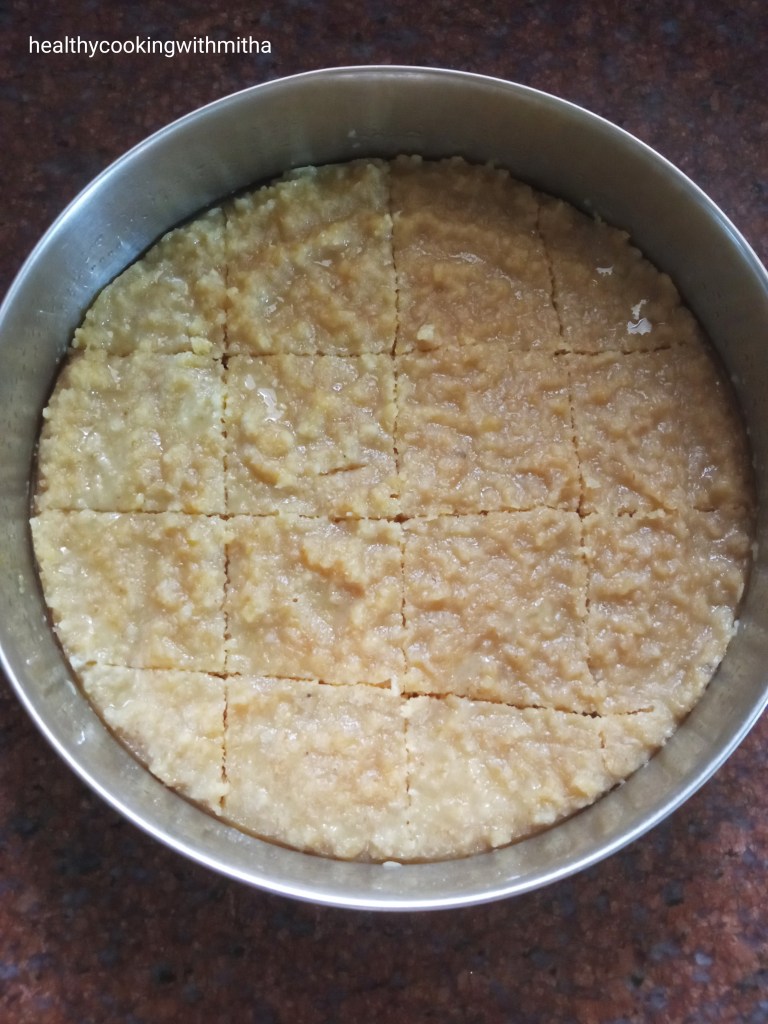
Ingredients: { Makes about 12 squares of 5 cm each }
1 Cup Broken wheat / Gonva Khan/ Dalia
3/4 Cup Coconut (freshly grated or desiccated)
3/4 Cup Jaggery
Seeds from 2 Cardamom pods
A pinch of Salt
Ghee to grease the bowl
Step by step recipe:
1. Soak 1 Cup Broken wheat for 3 to 4 hours in thrice the quantity of water.
2. Now drain the water completely and add the broken wheat to a mixer. Also add 3/4 Cup Coconut, 3/4 Cup Jaggery and seeds of 2 cardamom pods.
3. Add a pinch of salt and grind to a semi coarse paste. Don’t add water at first while grinding as soaked broken wheat leaves water while grinding. Only if required, add 1 Tbsp at time. It took me about 4 Tbsp to grind it to a thick semi coarse batter.
4. Now grease a vessel with ghee and pour this mixture to the vessel. Level using a spoon and spread evenly. My vessel is of 18 cm diameter.
5. Steam for about 20 mins till a knife inserted in the center comes out clear. Cool down. Slice and serve.
Notes:
* I used Patanjali brand of Broken wheat or Dalia.
* Soaking the broken wheat for atleast couple of hours ensures that the broken wheat turns soft and grinds quickly.
* The amount of jaggery can be changed according to your taste.
* You can grind to a smooth paste too but grinding coarsely gives a bite of coconut which tastes delicious.
* It takes me exactly 20 mins to steam. You can check by inserting a knife in the center. If it comes out clear, it’s done.
* Remember to level the mixture evenly in the bowl for it to steam evenly.
* Grease the bowl well with ghee so that the pieces comes out in perfect shapes.
In my last post of Ragi Jaggery ladoos, I had mentioned about our relocating back to India but I had never expected my readers to comment and message me with their best wishes. It really made me so happy that people actually take time to read the full writeup and also write such heartfelt words for me. ❤️ I always consider my readers to be a part of my extended family and the love showered on me in the past couple of days proves that my readers feel the same, which means the world to me. Thank you dear readers. Love and blessings is what I need the most now. ❤️🙏
I had actually decided to stop blogging for a while as I am not in the right frame of mind to write. Most of the families we know will be separated, even us, as only me and kids will shift back as of now. But we knew this since a year, were mentally prepared for it and specially as I have a great support system in my parents, we are not much worried. But there are many families who don’t have that and hearing their situations make me feel very sad too. Praying that God blesses all of them and they can survive this change well. 🙏
Sorry that this is turning out to be such a emotional write-up which is why I did not want to blog but I guess you all will understand, like always. ❤️
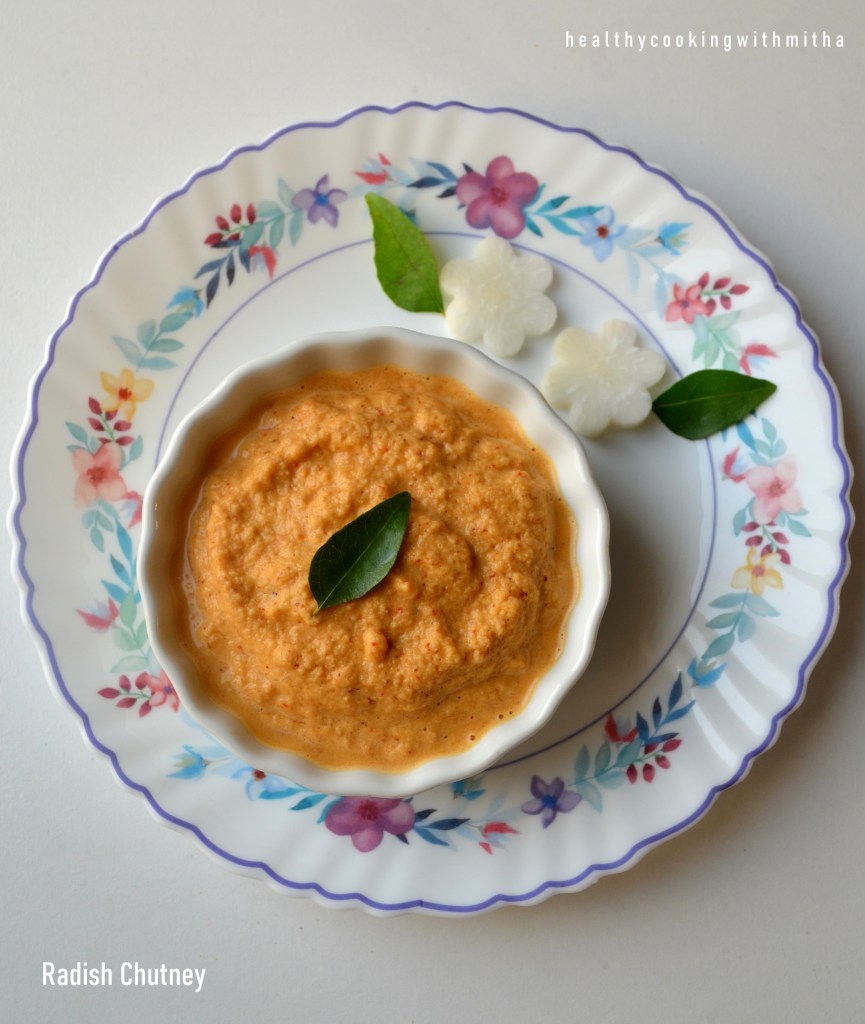
Coming to this chutney, it is my way to sneak radish in my kids’ diet as they love dosas with chutneys. So making them eat vegetable in this form too. I learned this chutney long back from a cookbook but have changed it to suit our tastebuds. Comes out very tasty and you can never say it has radish in the chutney.
Hope you all try and love this chutney. Happy and healthy cooking! ❤️
RECIPE:
Ingredients:
1 Cup peeled and grated Radish
1/4 Cup Coconut
1 Tbsp Coconut Oil (+ 1 tsp)
4 Red chillies
1 tsp Urad dal
1 tsp Cumin seeds
1/4 tsp Hing or Asafoetida powder
Salt to taste
Step by step recipe:
1. Heat 1 Tbsp Oil in a pan. Add grated Radish and saute on medium flame till the raw smell of radish goes away and the radish turns dry. Takes about 5 mins. Now remove from flame and allow it to cool.
2. Now add the radish to a mixer along with coconut. In that pan, heat 1 tsp Oil and add Hing, 1 tsp Urad dal and 1 tsp Cumin seeds. Also add red chillies. Fry till Urad turns brown. Allow it to cool.
3. Now add the fried chilies, Urad dal, cumin seeds to the radish- coconut. Also add salt and about 1/4 Cup Water or as needed. Grind to a smooth paste. This is a thick chutney. Remove to a serving bowl.
Notes:
* Do fry the radish till the rawness goes away. Else the chutney will have the raw taste.
* This chutney is not seasoned with mustard seeds but you can season if needed.
Click on the image to save the recipe on Pinterest
I can’t believe till some time back, I thought making ladoos were the most difficult among sweets. Now, if you give me 15 mins, I can make ladoos for you. 😄 That’s the change which practice has brought in me. Now I can understand the real meaning of “Practice makes a man perfect”. Though not perfect by looks (I am reaching there 😬), these ladoos come out looking like ladoos 😂 and tastes so delicious that my kids love it a lot. So I thought it was worth sharing with all of you.
Hope you all try these healthy and delicious ladoos. Happy and healthy cooking! ❤️
RECIPE:
Ingredients: {Makes about 12 ladoos}
1 Cup Ragi or finger millet powder
3/4 Cup Jaggery powder
1/4 Cup + 2 Tbsp Ghee
2 Tbsp Raisins
Step by step recipe:
1. Heat 2 Tbsp Ghee in a pan and add 2 Tbsp Raisins. Fry till the raisins puff up. Remove to a bowl.
2. Now melt 1/4 Cup Ghee in the pan and add 1 Cup ragi flour. On medium flame, saute the flour in the ghee. Saute till the ghee and ragi flour combines well.
3. Now, keep sauteing on medium flame till the mixture comes together as shown below. It will take about 6 to 8 mins. The mixture turns aromatic and raw smell of the flour goes away.
4. Remove it in the bowl where we had put the raisins. Also add 3/4 Cup jaggery powder.
5. Mix well and allow it to cool slightly. When it still warm, bind to make ladoos. I am attaching some pictures that I took when making these ladoos. Hope it helps all of you.
Keep it in your palm and open close your fingers. Keep doing it till it forms round shape.
6. Repeat the same with the rest of the mixture. Enjoy the ladoos!
Notes:
* Store in a moisture free container at room temperature. Stays well for atleast 2 to 3 days. Mine gets finished off before that.
* Don’t reduce the amount of ghee or you won’t be able to bind the ladoos well.
* Add little ghee to the mixture and on your palms if you find it difficult to form ladoos.
* Do remember to saute the ragi flour well in the ghee so that there is no raw taste in the ladoos.
* These ladoos are very soft when freshly made but turns hard as they cool down and tastes much better when kept for little while.
You can check all recipes with Ragi that I make regularly like Ragi idlis, Ragi dosas, Ragi cake, Ragi cookies, Ragi Malpua in this Ragi recipes collection.