Easy Kadala Curry | Kerala style chickpeas curry | Quick lunch box idea

Meet my “friend” (๐Ÿ˜€) who’s my go-to quick fix curry with no much hard work involved yet comes out lip smackingly delicious and a huge favourite of my family – Kadala Curry. I learnt to make it from our Konkani neighbour, Padma akka in Kochi. She used to bring freshly steamed puttu and Kadala Curry with love for us whenever she made it and it tasted so heavenly that I still have that etched in my food memory. โค๏ธ

When I asked her how to make it (imagining it to be a long, laborious recipe), it amazed me as to how simple it really was to make this curry. As is said by someone (don’t know who ๐Ÿ˜ฌ), Simple is Beautiful โค๏ธ and in this case delicious too. ๐Ÿ˜€

Since then, it is a commonly made curry at my place and the only way I make my chickpeas. I had also shared it in my old blog in 2013 and here is the picture from my archives. (In the same plate too. My favourite plate that is! ๐Ÿ˜)

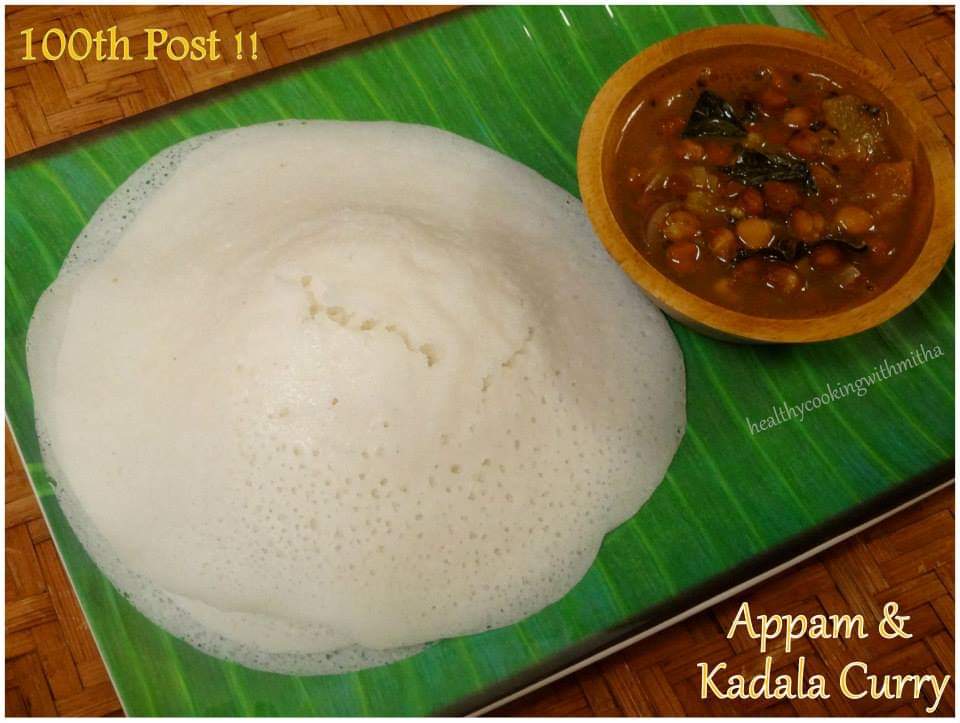
It was my 100th post on that blog which is no longer available now. Feels really sad sometimes that all my hard work went for a toss but console myself that I could start afresh and got this new, better version of the blog. Also, learned a lesson about how not to give my precious blog in anyone’s hands and learnt to handle everything single handedly. That does make me feel good and proud of myself too. ๐Ÿ˜Š

Sharing her easy recipe with all of you. Hope you all try and love it. Makes a wonderful combination with chapatis and a great idea for lunch box. Happy and healthy cooking! โค๏ธ

RECIPE:

Ingredients:

1 Cup dried Black chickpeas/ Kala Chana

1 large sized Onion { or about 6 shallots }

1 medium sized Tomato

1 Tbsp Coriander powder

2 tsp Red chilli powder or to taste

Salt to taste

For seasoning:

1 Tbsp Coconut oil

1 tsp Mustard seeds

A sprig of curry leaves

Step by step recipe:

1. Soak dried chickpeas in atleast double the water overnight or for 8 hours. Drain the water.

2. Add to a pressure cooker along with thinly sliced Onions, finely chopped tomatoes and salt to taste. Pour water till it soaks the chickpeas and cook till it turns soft. { Takes 4 to 5 whistles on high for me on my electric stove top. Varies according to cooking range. }

3. Now open the cooker after it cools down. Keep the cooker on the stove top and add coriander powder along with red chilli powder. Bring to a boil.

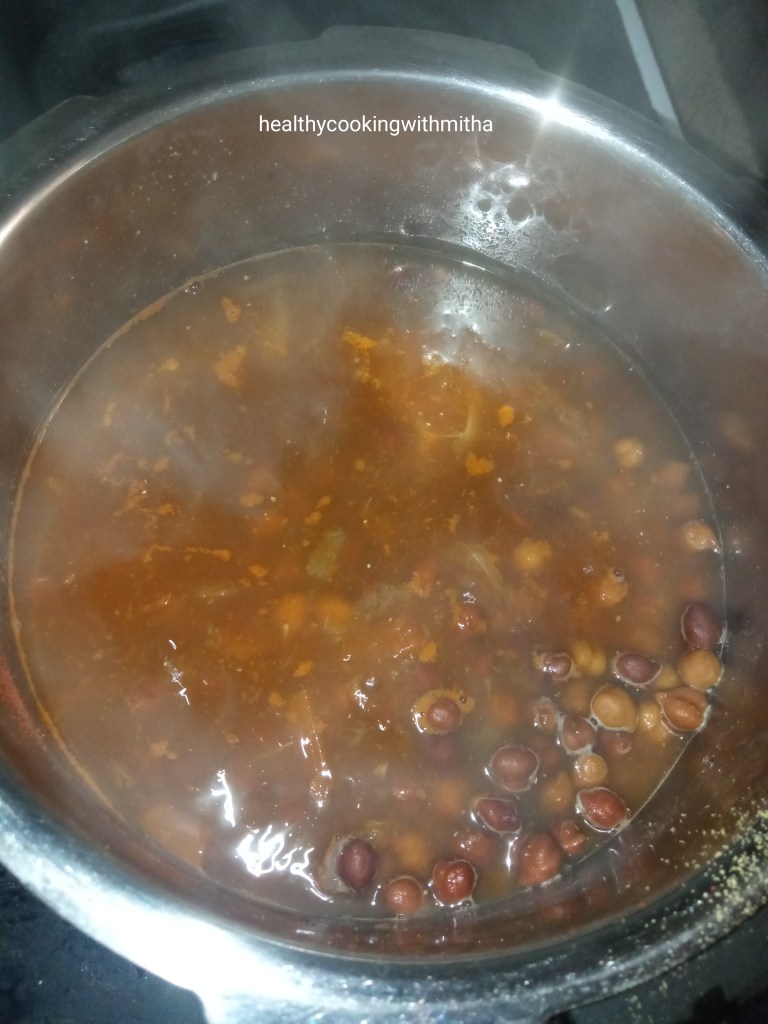
4. Mash the chickpeas slightly using the back of a ladle or potato masher to make the gravy turn thick. Boil on medium flame for 5 to 8 mins till the gravy thickens.

5. Heat oil in a pan. Splutter mustard seeds. Add curry leaves and fry till crisp. Pour this seasoning over the curry.

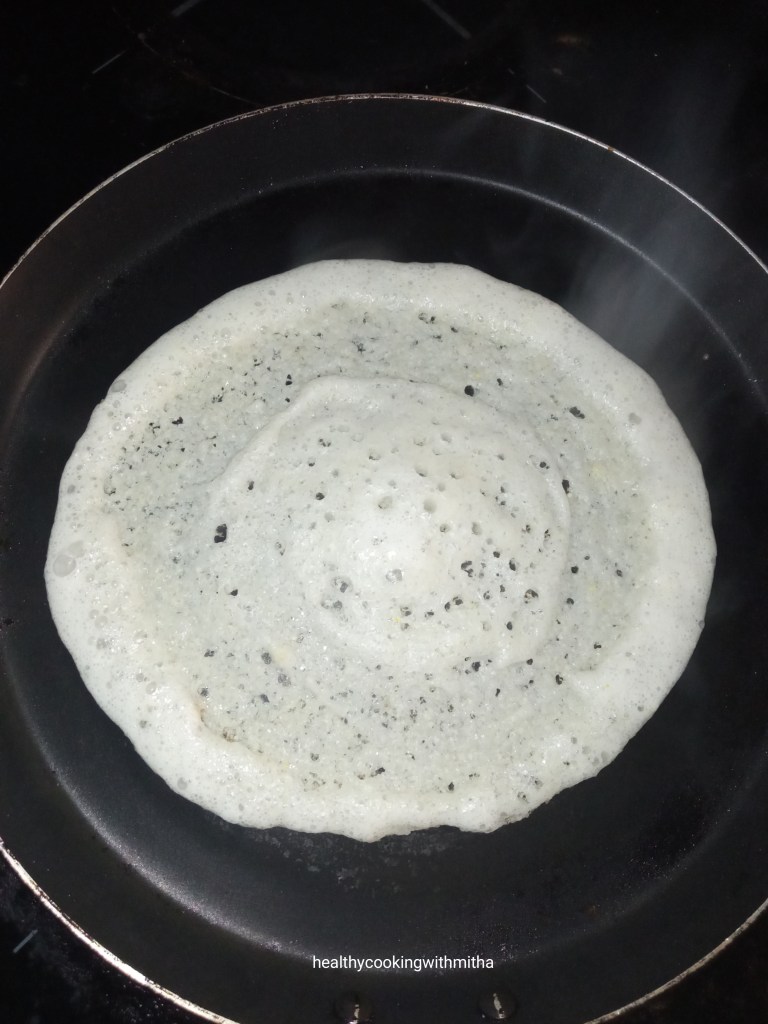
6. Mix well and serve hot with chapatis/appams/ puttu/ dosas.

Notes:

* The main flavour of this curry comes from the coriander powder – red chilli powder combination. So do a taste test and add accordingly as it varies with your brand of both the powders. It may require more or less than I have mentioned.

* Cooking chickpeas till soft is important so that it can be mashed easily and the gravy turns thick.

* Curry leaves in the seasoning makes this curry very aromatic. Don’t skip it.

Urad – Jowar dosa | No rice dosa

Click on the image to save the recipe on Pinterest

I have already posted some of the “no rice” dosas that I make and Broken wheat – mixed dal dosa has been a favorite among my readers. Many have tried and sent me pictures. Makes me so happy when readers try and love my healthy recipes. โค๏ธ

I have also been getting messages to post more of such dosa recipes which don’t contain rice since they have a diabetic in the family and would like to avoid rice in their diet. So here is a crispy dosa with Urad dal and Jowar flour. I brought Jowar flour only recently but we all loved it in these dosas. The kids hardly knew the difference and enjoyed it like regular dosas (much to my surprise and happiness too โค๏ธ).

Ragi Urad idli and dosas are a commonly made breakfast in my house after reading about the health benefits of millets many years back. My kids having eaten it as their first food (yes, I gave them dosas and idlis instead of ragi porridge) love it very much. So I would like to tell all of you (specially to new parents) to include millets in your kids’ diet as early as possible so that they don’t reject later. They are very beneficial to thier growing bodies, also keeps us full for long time which avoids mid meal hunger pangs.

Health benefits of Millets: Gluten free, Rich in vitamins, minerals and antioxidants, Rich in Iron and folic acid.

Hope you all try this healthy and delicious dosa too. Happy and healthy cooking!

RECIPE:

Ingredients: { makes about 14 dosas }

2 Cups Jowar flour / Sorghum flour

1 Cup Urad dal ( I use split ones )

1 tsp Methi / Fenugreek seeds

Salt to taste

Step by step recipe:

1. Wash well and soak Urad dal along with Methi in enough water for atleast 4 hours. Drain water from it and add to a mixer. Also add about 3/4 Cup water.

2. Grind to a smooth paste. Pour in a large bowl.

3. Take Jowar flour into another bowl. Add water to make a smooth, lump free slightly thick batter. It took me 2 Cups water for 2 Cups Jowar flour.

4. Mix both batters well also adding salt.

5. Keep it covered at room temperature for atleast 8 hours. Might take upto 12 hours for batter to ferment during winters.

Love it when well fermented batter welcomes me in the morning ๐Ÿ˜

6. Heat a dosa pan and add a ladle of dosa in the pan. Spread into a thin dosa using the back of the ladle. Cover and cook. Add ghee or oil when the dosa cooks. Cook till the dosa is batter free on the surface and the underside turns brown.

7. Remove and serve with a chutney of your choice.

Notes:

* I serve these dosas with Mint Coriander chutney. Just grind coconut with ginger, green chillies, mint leaves, coriander leaves, curry leaves, tamarind and salt to a smooth paste. You can season with mustard seeds and curry leaves in oil over it. I don’t season as my daughter does not like it.

* Be careful while adding water to Jowar flour. Add 1 Cup water first and mix well. Then add 1/2 Cup at a time to bring it to thick consistency. Took me about 2 Cups water for 2 Cups Jowar flour.

* For making dosas crisp, add ghee or oil and cook till the dosas turn really brown in the underside.

* Leftover batter can be refrigerated and used the next day.

* Be mindful of the climate and grind early during winters as it will take time to ferment during cold weathers.

* Our favorite dosas without rice: Broken wheat – mixed dal dosa and Masoor dal dosa.

* Our favorite idlis without rice: Urad Moong dal Idli and Ragi Urad idli. (you can make dosas too with both these batters)

* Other recipes with Jowar flour: Instant Jowar Vegetable Bhakri, Jowar Idlis

* All my Millet recipes: Millet recipes collection

* All my “no rice” dosas “No rice” Dosa recipes collection

Click on the image to save the recipe on Pinterest

Mushti Polo | Traditional Konkani style soft dosa

My 25th dosa on my Dosa Corner page!! And what’s better than this dosa, our very own Mushti Polo which I have grown up eating almost every week as a kid. This super soft dosa with raw mango chutney is a combination that brings back all the nostalgia of childhood (and how carefree and fun that was! ๐Ÿ˜)

Though I never realized the value of how much my grandmother and mother tried to make us eat healthy then, I understand it very well now after becoming a mother. Guess that’s what is called “Life is a full circle!” (also, I remember my mother’s dialogue whenever she got angry ” You will know this after you become a mother in future ๐Ÿคฃ๐Ÿคฃ).

Yes, I truly understand now. ๐Ÿ˜‚ All these traditional recipes are all that we need in our life to eat healthy. Dosas especially being fermented or probiotic food and very good for our body. Pair it with a chutney or sambar and it is a complete meal in itself.

Hope you all try this dosa. All amchis know this dosa. It is actually called Mushti dosa meaning all ingredients are added in fist measurement using hands (Mushti is fist in Konkani). I thank my Amma for sharing her recipe with me. โค๏ธ Happy and healthy cooking!

RECIPE:

Ingredients: { Makes about 8 dosas }

1 Cup Raw white rice ( I use any medium grain rice available here )

3 Tbsp Urad dal ( I use split ones )

1 Tbsp Methi / Fenugreek seeds

1/2 Cup thick or thin Poha / Beaten rice

1/2 Cup fresh or desiccated Coconut

Salt to taste

Ghee or oil to cook the dosa

Step by step recipe:

1. Take rice, Urad dal and Methi in a large bowl.

2. Wash well and soak in enough water for atleast 4 hours. Now drain the water and add to a mixer. Also add poha and coconut.

Note: I don’t wash poha as it’s really clean here. You can wash it in running water and then add if it has grains in it.

3. Add about 1 Cup of water along with salt and grind to a smooth paste. Pour into a large bowl.

4. Keep it in a warm place at room temperature for about 8 to 10 hours. Since it is winter season, you may need to ferment even upto 12 to 14 hours for the batter to ferment well.

5. Now heat a dosa pan and add a ladle of batter in the center of the pan. Do not spread this dosa. Cover and cook on medium flame adding oil or ghee till the surface cooks.

6. Remove and serve hot with a chutney of your choice.

Notes:

* I make Ambuli Chutney or Raw Mango chutney with this. Since we don’t get raw mangoes readily here, I use the ones leftover from pickle jars.

* Just grind three to four small mangoes from pickle jars (or about 1/4 Cup of fresh raw mango) with 1/2 Cup Coconut, 3 to 4 red chillies, Hing and salt with water to a smooth paste. This is a thick chutney.

* You can substitute Hing with 3 to 4 garlic cloves instead. I use Hing during fasting or Pooja days and garlic on other days.

* You can also use green chillies instead of red chillies.

* This dosa is a thick one and to be roasted only on one side on medium flame.

* I get many queries about the kind of rice I use. I just use raw white rice of any brand which is available here. Not basmati nor any idli/ dosa rice. Just medium grain white rice which we get from nearby supermarket.

* You can check all my 25 dosas on my Dosa Corner page.

Drumstick leaves Aloo Roti | Easy snack and lunch box idea

Finding healthy evening snacks are the most difficult for me as most of the snack ideas that are available online are deep fried ones or with bread. Though I bake my own wheat bread and we enjoy it with fresh cream cheese spread, still I have to think of varieties each day to feed my kids who get bored very quickly. ๐Ÿ˜€

I am also sorry that I always write about my kids. It’s because all my recipe ideas are inspired by what they like and I keep making the dishes they absolutely love. โค๏ธ Hope it is helpful to mothers like me who want to make their kids eat healthy yet get run out of ideas.

These rotis were found on a day when I had leftover drumstick leaves potato curry and I had to make something quick for the kids. I just added wheat flour and made rotis with it. The kids loved it so much that it has now become a regular in our place whenever I get drumstick or Methi leaves (best way to get leaves in their tiny tummies ๐Ÿ˜๐Ÿ˜).

This is very filling, yet tasty and very healthy. Best part is it stays soft after many hours. So you can give for lunch box too. Hope you all try and love it too. Happy and healthy cooking! โค๏ธ

RECIPE:

Ingredients: { Makes 5 Rotis }

1 Tbsp Ghee

1 tsp Jeera/ Cumin seeds

1 Cup mashed Potatoes (Pressure cook potatoes till soft, peel and mash well)

1/4 Cup Drumstick leaves / Moringa leaves

1/4 tsp Turmeric powder

1/2 tsp Red chilli powder

1/2 tsp Garam masala powder

2 Cups Wheat flour

1/2 Cup Water

Salt to taste

Ghee to cook the rotis

Step by step recipe:

1. Heat ghee in a pan (I use my iron kadhai for this recipe.). Add Jeera. Fry little and add mashed potatoes along with drumstick leaves, Turmeric powder, Garam masala powder, red chilli powder and salt. Mix everything well and cook for two mins.

2. Allow it to cool. Then add wheat flour and water to make a smooth dough. You can add a pinch of salt to this if needed.

3. Make small balls of this dough, dust in dry wheat flour and spread using a rolling pin into rotis of medium thickness (slightly thicker than chapatis).

4. Cook on a hot tawa and use ghee while frying both sides.

5. Remove from flame and serve with mint chutney and curd.

Notes:

* I serve this with Pudina Lehsun chutney and curd. Makes a great combination.

* You can substitute drumstick leaves with Methi or fenugreek leaves too.

* I make and keep these in a steel container and it stays soft even after many hours. So really good idea for lunch boxes.

* The dough also can be made beforehand and refrigerated in an airtight container. Lasts well for a day.

* I add 1/4 Cup leaves to 1 Cup mashed potatoes and 2 cups wheat flour. You can increase the quantity of leaves if you want. I find this ratio good for my kids as the taste is not very overpowering while it gives them the nutrition too.

* You can also check the spicy idlis with drumstick leaves which we Konkanis call Mashinga palle sannamuddo.

* Do try these rotis or your regular parathas with Pudina Lehsun chutney. Tastes amazing.

* One more snack idea which is very filling and my kids’ favorite are these Masala Oats Parathas. Very delicious!

Ragi Butter Cookies | easy recipe using Jaggery

Click on the image to save the recipe on Pinterest

The above picture is of “melt in the mouth” Ragi Butter cookies before two storms struck in ๐Ÿ˜…. Will come to that later. Right now, I just want to thank my school friend Anvy Susan Thomas who is a great baker ( I am her huge fan! ๐Ÿ˜) for this amazing recipe of hers. She has an instagram page homemadebyanvy where she makes us drool with her delicious bakes.

As all of you know, I love baking and I bake atleast one kind of goodies everyday for my family (my daily dose of happiness โค๏ธ). One of my regular bakes are these Ragi Butter cookies which turns out so good that you will never realize you are enjoying a healthy version of cookies. The kids are HUGE fans of it and you can see what I meant by storm strucking in. Here is my 5 year old daughter slowly coming in the frame to grab one of these cookies (storm no 1 ๐Ÿ˜‚).

Click on the image to save the recipe on Pinterest

And when she gets her share, how could the little one be left far behind? Here is storm number 2, my two year old son grabbing the cookies. I loved their cute hands on the cookies that it became my favorite picture too. โค๏ธโค๏ธ

Click on the image to save the recipe on Pinterest

These cookies are very easy to bake and turn out too good to be true. You won’t feel like getting cookies from outside once you bake them, that’s for sure. I always believe that it’s best we bake and make everything possible at home since we don’t know what kind of ingredients have gone in store bought ones.

Hence sharing one of my most favorite cookies. I whole heartedly thank my friend Anvy @homemadebyanvy for this recipe. Hope you all try it out too. Happy and healthy baking! โค๏ธ

RECIPE:

Ingredients: { 8 Cookies }

100 grams salted Butter (add a pinch of salt if using unsalted)

1/3 Cup powdered Jaggery

1/2 Cup Ragi flour or Finger millet powder

1/2 Cup Whole wheat flour or Atta

1/2 tsp Baking soda

Step by step recipe:

1. Soften butter by keeping it at room temperature for little time. (Do NOT melt it in microwave or so.) Just place it at room temperature till it turns soft. Now add jaggery and mix both together using a spatula till they combine.

2. Now sieve ragi flour, wheat flour and baking soda over it.

3. Using hands, mix everything well till it forms a dough like shown below. Refrigerate it for 15 to 20 mins.

4. Preheat the oven at 180 C (350 to 375 F) for 10 mins. Make small balls of this dough and flatten with your fingers (like making pedas). Make lines over it with knife as shown. Place over a greased (with butter or ghee) oven proof plate. Keep distance between them as they increase in width as they bake.

5. Bake in the center rack of your OTG or with both rods on if using a conventional mode oven at 180 C (350 – 375 F) for 10 to 12 mins. Mine gets done exactly at 12 mins. Each oven is different. So in some ovens it may take upto 20 mins for it to bake completely. The surface will be smooth to touch and will be dough free. Also will have a golden tinge on the edges.

6. Allow it to cool slightly and enjoy the cookies.

Notes:

* They are very soft when they are right out of the oven but harden as they cool down. So do not keep a lot of time in the oven thinking the cookies are not done yet. Once the surface is free from dough and they are smooth to touch, they are ready to be removed from the oven.

* I used salted Butter for this recipe. Add a pinch of salt to the mixture if using unsalted butter.

* Also, don’t melt the butter. Just soften it by keeping it at room temperature.

* Refrigerating the dough is very important. Please don’t skip it.

* Place the cookies at little distance before baking as they increase in width as you can see from the pictures.

* Do grease the oven proof plate well with ghee or butter so that it does not stick to the plate.

* Bake in the center rack of your OTG or with both rods on if using a conventional mode oven. It is very important for even baking of the cookies.

* Mine gets done exactly at 12 mins. Might vary depending upon your oven. But don’t open the oven door before 8 mins into the baking time or else it will leave to uneven baking.

* Store in an air tight container at room temperature. Mine has never lasted beyond a day as my family finishes it off before that. ๐Ÿ˜€

* You may also want to try this Ragi chocolate cake which is my kid’s favourite (and her friends love it as well ๐Ÿ˜…). One of the most tried recipe by my readers.

Click on the image to save the recipe on Pinterest

Brinjal Rava fry on tawa and Upkari

Even though my kids eat almost everything that I cook ( touchwood!), my 5 year old daughter is slightly choosy when it comes to vegetables. So my mommy brains have to work overtime to make her eat some of the veggies. ๐Ÿ˜…

Brinjal is a vegetable she won’t eat if I make a regular curry with it (wish I could capture her face and show you all when she hears it’s brinjal curry for dinner ๐Ÿ˜‚). I don’t blame her at all as I myself never used to eat any vegetable as a kid except for a few chosen ones like potato, elephant yam and beetroot. So I can totally understand her. ๐Ÿ˜ƒ

But once I happened to make these rava fries for a change and she absolutely loved it. So now I make it regularly even as an evening snack. She loves munching on it and I am happy that a healthy vegetable is filling her with nutrition.

Hope you all will try this as well. Happy and healthy cooking! โค๏ธ

RECIPE:

Ingredients:

3 small variety Brinjals or 1 large Purple Brinjal

1/4 tsp Turmeric powder

A pinch of Hing or Asafoetida

Salt to taste

1/4 Cup Rava or Semolina (or as needed)

1 tsp Red chilli powder

Step by step recipe:

1. Wash the brinjals well and chop off the stem. Slice brinjals thinly for the rava fry and finely chop for upkari. Add both into separate bowls of water.

2. Now drain water and add Turmeric powder, Hing and salt. Mix well.

3. In a plate, take rava and mix red chilli powder in it. Roll the brinjal slices one by one over the rava mix.

4. Heat tawa and place these onto the tawa. Drizzle coconut oil while cooking both sides on medium flame till it turns brown in colour and the brinjal turns soft.

5. Serve with rice meals.

Notes:

* For Brinjal Upkari, fry about 4 to 5 finely chopped Garlic pods in oil till it turns brown and add finely chopped brinjal to it. Add red chilli powder and salt. Cook till it turns soft. Don’t add water at all.

* For the rava fry, slice brinjals very thinly. It helps them cook easily and also turns crispy.

* You can make this with any variety of brinjals.

Carrot Kismuri | Konkani style salad

Click on the image to save the recipe on Pinterest

Most days, our dinner is just ukde pej (matta rice cooked soft, eaten with its gruel) and couple of accompaniments to go with it. As much as it may seem from my posts that I cook a lot, our daily meals are very simple and basic.

One of the reason why I don’t (or rather can’t) cook elaborate meals are my kids who hardly give me time in the kitchen (I know it’s hard to believe ๐Ÿ˜€). My son pulls my dress (he literally roams around behind me with his fingers clutching my dress ๐Ÿ˜‚ #fevicolkajod ๐Ÿ˜…) asking me to play football with him while my daughter who loves colouring asks me to draw something for her to colour (One is making me a footballer and the other, an artist ๐Ÿ˜ฌ๐Ÿ˜ฌ).

But my time passes very well and both the activities are so good to calm the mind. Never knew drawing is such a stress reliever. And about football, try playing it with a two year old who knows only to laugh when you kick the ball. It’s such precious source of happiness that I can’t thank God enough for blessing me with both of them. โค๏ธ

And on days when they don’t leave me to cook at all, this carrot kismuri or Konkani style salad is our accompaniment for the day. Very quick to make, hardly taking 10 mins and tastes heavenly with pej and some pickle to go with it. The kids love it very much which makes it a perfect side dish for busy days.

Hope you all try and love it too. Happy and healthy cooking!

RECIPE:

Ingredients:

2 large Carrots, peeled and grated (about 2 Cups grated carrots)

3 Green chillies or to taste

1/4 Cup freshly grated Coconut

3 Tbsp finely chopped Coriander leaves

Juice from 1 1/2 Indian lemons

Salt to taste

For seasoning:

1 tsp Coconut oil

1/2 tsp Mustard seeds

A pinch of Hing or asafoetida

One sprig of curry leaves

Step by step recipe:

1. Take the grated carrots in a large mixing bowl. Add grated coconut, green chillies, salt and lemon juice.

2. Now heat oil in a pan and splutter mustard seeds, add Hing and curry leaves. Fry till curry leaves turn crisp. Pour seasoning over the carrots. Mix everything well. Done!

3. It’s really that simple. Serve along with white rice and rasam or matta rice gruel with some pickle. Trust me, it tastes delicious!

Notes:

* You can add finely chopped onions to this too but I skip as after a while, it starts smelling. If made without onions, I can make even couple of hours beforehand and keep at room temperature.

* Some people add a tsp of Urad dal to the seasoning but I prefer only mustard seeds in it.

* If you add soaked moong dal and cucumbers to this, it becomes Kosambari which is another accompaniment that I make regularly. You can check the recipe here.

Click on the image to save the recipe on Pinterest

Palak Paneer with simple vegetable pulao | Easy meal ideas

Palak paneer reminds me of only one person, someone who is very close to my heart and to whom I owe everything in life – My Amma โค๏ธ. This is her favorite dish and I have so many memories with her love for Palak paneer. Each time I make it, I only wish she was here with me, just to see her eat with so much happiness. ๐Ÿ˜

One of the first memories of Palak paneer and my Amma is when she was admitted in hospital during my 4th semester engineering exams due to Vertigo. It was one of my most difficult days as I could not bear to see her suffer and wanted to take care of her but I had my exams on.

Finally I decided to stay in the hospital with her and study, no matter what happens. Those days, when I used to come back after my exams, I brought her favorite foods to cheer her up. One of them was Palak paneer from a nearby restaurant. The glow on her face while eating it is still in my memories. Can never forget the small ray of happiness which this curry brought in those sad times. โค๏ธ

And guess what? My 4th semester exam results were my most scored one in my entire engineering studies. I always say it’s only due to Amma’s blessings. ๐Ÿ™

After that, I learned to make palak paneer from my aunt Anita Pai mai who was also the reason I started my blog. She encouraged me a lot during my initial cooking days. Amma loved my palak paneer so much that she said it tasted even better than restaurant ones. So whenever I visit them, I definitely make it for her. Just to see the glow on her face. ๐Ÿ˜

I had even made it for her and sent it with my brother when he had come here to Qatar on vacation. Here is a picture from my Facebook memories. Palak paneer with Coconut burfis and Til ki Burfi which travelled from Qatar to India, from a daughter to her mother, with loads of love. โค๏ธโค๏ธ

This post became quite a long one but I always wanted to write about these memories as they are very close to my heart. I know Amma will have tears in her eyes while reading this. Loads of love to you Amma. Don’t know when we can meet next but I will definitely make your favorite Palak paneer for you when we meet. โค๏ธ

Hope you all try this curry with pulao. I thank Anita Pai mai for her recipe. Happy and healthy cooking!

RECIPE:

Ingredients:

300 grams Palak or Spinach leaves (about half a large bunch)

200 grams Paneer cubes

4 green chillies

1 Tbsp Ghee

1 tsp Cumin seeds/ Jeera

1 inch Ginger piece, finely chopped

4 to 5 Garlic cloves, finely chopped

1 medium sized Onion, finely chopped

1 large Tomato, finely chopped

1/4 tsp Turmeric powder

1 tsp Garam masala powder

1/2 tsp Red chilli powder

Salt to taste

Step by step recipe:

1. Clean the spinach leaves well and wash under running water till the dirt goes away.

2. Now heat water with salt in a large pan. Add these leaves and bring to a boil.

3. As soon as it boils and the leaves start changing colour, immediately remove the leaves and wash it in cold water. Allow it to cool down.

4. Meanwhile heat ghee in a pan and add cumin seeds. When it changes colour, add Ginger and garlic. Fry for a minute. Add onion and fry till it turns translucent.

5. Now add finely chopped tomatoes and fry till it turns soft. Mash using the ladle. You can also puree tomatoes and add. Now add Haldi powder, Garam masala powder and red chilli powder.

6. Mix well. Grind the palak leaves along with green chillies and little water to a smooth paste. Add to this. Also add paneer cubes and salt.

7. Cook till the palak leaves changes colour and turns dark green. Remove from flame. Serve with rotis or rice. I usually make my simple vegetable pulao with it.

Notes:

* For vegetable pulao, soak basmati rice for about half an hour. In a pan, add ghee. Also add cloves, cardamom pods, bay leaf and some cashews. Fry till cashews turn brown. Now add drained rice along with frozen or fresh vegetables (about 1 cup for every 2 cups rice used). Cook in enough water adding salt till the rice turns soft. You can also add little milk and saffron when the rice is almost cooked for a richer version of pulao.

* Don’t cook the palak leaves in water as it will lose the nutrients. Just blanch it ie add to the hot water, bring to a boil and immediately drain and wash in running water in a colander. This helps retain the colour of palak leaves.

* I add the stalk part of palak too as it is healthy. Some people add only the leaves and discard the stalk/ stem. I feel if you grind it to smooth paste, then there is no problem in using the stem as well. In fact it gives a thickness to the gravy along with being nutritious too.

* Red chilli powder can be added only if needed since we are already adding green chillies while grinding.

* I used to add milk to the gravy towards the end when I started making palak paneer but now I don’t add as I feel it masks the palak flavour. You can add milk towards the end or garnish with fresh cream if you like it.

* You can substitute paneer with boiled chickpeas for Chole Palak and with boiled cubed Potatoes for Aloo palak or even with mushrooms for Kumbh Palak.

* Our favorite combination with Palak paneer is Vegetable pulao. I also make chapatis and it tastes great with this curry too.

Charmbure dosa |Puffed rice Dosa | Both soft and crispy dosas with one batter

Click on the image to save the recipe on Pinterest

In my house, breakfast any day is either any variety of dosa/Idli or upma/poha. I make upma/ poha only on days when I have dosa batter handy for kids (they are HUGE dosa fans and for them breakfast means only bobbo or iddi {dosa/idli}). So, any new variety of dosa instantly grabs my attention and I have to try it out.

In one of the Konkani food groups that I am in, an amazing cook Anusha Mallya shares beautiful pictures of her dishes and I am always mesmerized specially by her dosa pictures. The dosas look so attractive that I had to try it as well. I saw that it had more rice than I regularly use and also had puffed rice in it which I found unique. So there I went as a dosa explorer (like Dora – the explorer, I could be Mitha – the dosa explorer ๐Ÿ˜…๐Ÿ˜…).

And imagine my excitement when it came out so well. Like magic, I could make it super crispy (the way my daughter likes it), medium crispy for my son and husband, soft ones for me (ek teer se teen nishaane! ๐Ÿ˜‚) In all three ways, the dosa tasted amazing. It is definitely a keeper of a recipe. Thank you Anusha for your great recipe share! ๐Ÿ™

Hope you all try and love it too. If nothing, a wonderful change from the regular breakfast. Do try with tomato chutney. They make a great combination. Happy and healthy cooking! โค๏ธ

RECIPE:

Ingredients: { Makes about 25 dosas }

3 1/2 Cups Raw white rice or Idli rice or Dosa rice

1 Cup Urad dal (I use split ones)

2 tsp Methi or fenugreek seeds

1/2 Cup Bhel or puffed rice or Charmbure

Salt to taste

Step by step recipe:

1. Wash well and soak rice in atleast double the amount of water for atleast 4 hours. Wash well and soak the Urad dal along with Methi for atleast 4 hours. Now drain and add the Urad dal- Methi to the mixer.

2. Grind with about 3/4 Cup water to a smooth paste. Water amount depends on your mixer. Pour in a bowl. Now add the rice to the mixer along with puffed rice.

3. Grind the rice-puffed rice mixture to a smooth paste. It took me 3/4 Cup water to grind this too. Mix both the batters with hands adding salt.

4. Ferment the batter overnight or for atleast 8 hours.

Look at that well fermented batter ๐Ÿ˜

5. Now heat a dosa pan and pour a ladle of batter onto it and spread into circle.

6. Cover and cook till dosa cooks. Add ghee while it cooks. Flip and cook for about half a minute.

7. Serve hot with a chutney of your choice. I have served with my Amma’s tomato chutney.

Notes:

* I use any variety of raw white rice available here for my dosas and idlis.

* Puffed rice gives it the crispy texture but also a softness if the dosa is made thick. If you don’t have puffed rice, substitute with equal amount of flattened rice or poha.

* If you like extra crispy dosa, cook till the underside turns really brown and looks like this.

* If you like soft dosas like set dosas, just pour a ladle and don’t spread much. Also cook only one side. It will turn out like this.

* Below, I have made the dosas medium crispy. So these dosas can be made in three ways which is the best part of this batter.

* I have served it with my Amma’s style of tomato chutney and it makes a great combination.

Click on the image to save the recipe on Pinterest

Mashinga palle sannamuddo | Drumstick leaves spicy idlis Konkani style

I love cooking alone in the kitchen and look for the time when my kids are super busy with their naughtiness, then sneak myself into the kitchen to cook. When I cook, some dishes bring back such beautiful nostalgic memories that they bring so much happiness in my heart. Memories are really a wonderful way to relive those precious moments which can never come back but will be a treasure in us forever, bringing us joy when we think of them. โค๏ธ

Sannamudhos were regularly made by my grandmother and I used to wait for it to be steamed to enjoy them as soon as it came out of the pedavan or steamer with coconut oil. Even now, when I make them, I eat them the same way just to relive those childhood memories. Here is a glimpse of the sannamudhos from the pedavan which my father had gifted me many years back when I was coming here to Qatar. Love it so much. Also, see how cute it looks. ๐Ÿ˜

Here, even though we live in Industrial area, the residents have planted many variety of trees and one among them is drumstick tree. My husband plucks the leaves from a large tree near our house and I make sannamudhos as soon as I get them. The aroma of these idlis are one of it’s kind. The whole house smells heavenly when it steams. โค๏ธ

Hope you all try and love them. Drumstick leaves are very healthy and medicinal. So I always try to add it regularly in our diet. Konkanis know this recipe but sharing for those who are new to it. Happy and healthy cooking! โค๏ธ

RECIPE:

Ingredients: {Makes about 13 idlis}

2 Cups Drumstick leaves/ Moringa leaves/ Mashinga pallo

1 Cup Idli Rava/ Rice Rava

Salt to taste

For the masala paste:

1/2 Cup fresh or desiccated Coconut

1 tsp Tamarind paste

5 to 6 Kashmiri long red chillies or to taste (fried in 1 tsp oil)

Coconut oil to grease the idli plates

Step by step recipe:

1. Remove the leaves from the stems. Add to a bowl. Wash well. Drain and keep aside.

2. Take idli rava in a bowl. Wash well, drain and keep aside.

3. Now grind together coconut, fried red chillies and tamarind paste with little water to a smooth paste. Add this to the idli rava mixture.

4. Add about 1/2 Cup water (I wash the mixer and add that water.) to form a thick batter. Add salt and mix well.

5. Now mix in the drumstick leaves. It is a thick mixture just like how it is shown below.

6. Grease idli moulds with coconut oil and add the mixture evenly in the moulds.

7. Steam for 20 to 25 minutes or till a knife inserted in the center of the idli comes out clear.

Just love this pedavan or steamer gifted to me by my dad ๐Ÿ˜

8. Enjoy it piping hot with coconut oil or with rice and dalitoy or rasam. Makes such an heavenly combo!

Notes:

* You can substitute drumstick leaves with Methi leaves or finely chopped palak leaves. This sannamudho can be made adding only onion or a mix of onion plus cabbage too.

* I add two cups of leaves for 1 Cup of idli rava. You can reduce the amount of leaves if you don’t have that much available but this quantity gives an amazing aroma as well as flavour to these idlis.

* The amount of red chillies I have mentioned is apt for us as the idlis turn out medium spicy. If you like them more spicy, then you can also add chilli powder before you mix in the leaves.

* Do steam them well atleast for 20 mins on high flame, else there can be rawness in the idli rava.

* Idli rava absorbs water when kept for a while. So if you keep the mixture to rest, it will absorb all the water and you might need to add a little more water to bring it to thick consistency. If steamed immediately, only 1/2 Cup water is needed.

* These idlis are traditionally had with rice and any curry like dalitoy (Konkani style dal) or rasam. You can also enjoy them as it is but don’t forget to dip in it coconut oil or drizzle over it for that heavenly flavour.

Join me in my journey with a foodie husband and hungry kiddos while I make them eat healthy!