Tag Archives: Easy

Wheat Butter Cookies | Easy wheat jaggery cookies using 5 ingredients

As I start writing, I can’t believe this year has almost come to an end. 2020 has been a huge life changing year for me. A year which taught me many things. A year where I understood myself more than ever and an unforgettable year for sure. If you ask me why, it is the time I got being home bound , which otherwise was always filled with the chaos of busy life.

Would love to share some positives that this year has brought in my life with all of you.

# Restarted listening to music (my long lost love ❤️), all thanks to my favorite singer Arijit Singh and Spotify which was my best friend all throughout the year. Music is truly healing and I don’t know why I had forgotten it all these years. 2020 can be called the “musical” year of my life for the amount of songs that I have heard this year. 😅

# Found love in birds and nature ❤️. With all the time in the world, I started observing the birds sitting in the backyard and would spend hours there without getting bored looking at them fluttering around. Along with that, I found an amazing Insta handle of our family friend, @mvbhaktha through whom I saw many beautiful varieties of birds. Sharing one of my favorite here. The innocent eyes of the bird is which attracts me the most. 😍

# Got a little more closer to my Krishna by listening to his bhajans and also by reading more about the unconditional true love that Radha had for Krishna. It taught me the way to love truly in life, without any expectations and always praying for the happiness of our loved ones, no matter what happens. ❤️

# There are two youtubers who deserve mention as I spent most parts of these last few months looking at their videos. One is Patrick Micheal and the other is Shivesh Bhatia. Looking at Patrick sing, his magical voice, feeling the lyrics of the song, touches you so emotionally that my eyes welled up many a times listening to him. His singing is definitely very special and I am very happy to have found such a soulful singer. Sharing my playlist here if you like to listen too. It is mostly malayalam and tamil songs though.

# Shivesh Bhatia from “Bake with Shivesh” is a delight to look at and he is a boy with so much knowledge about baking that I am amazed each time. He has been my inspiration to bake and the Chocolate Chip cookies on my blog are his recipe. When I want to divert myself towards something productive, Shivesh videos it is!

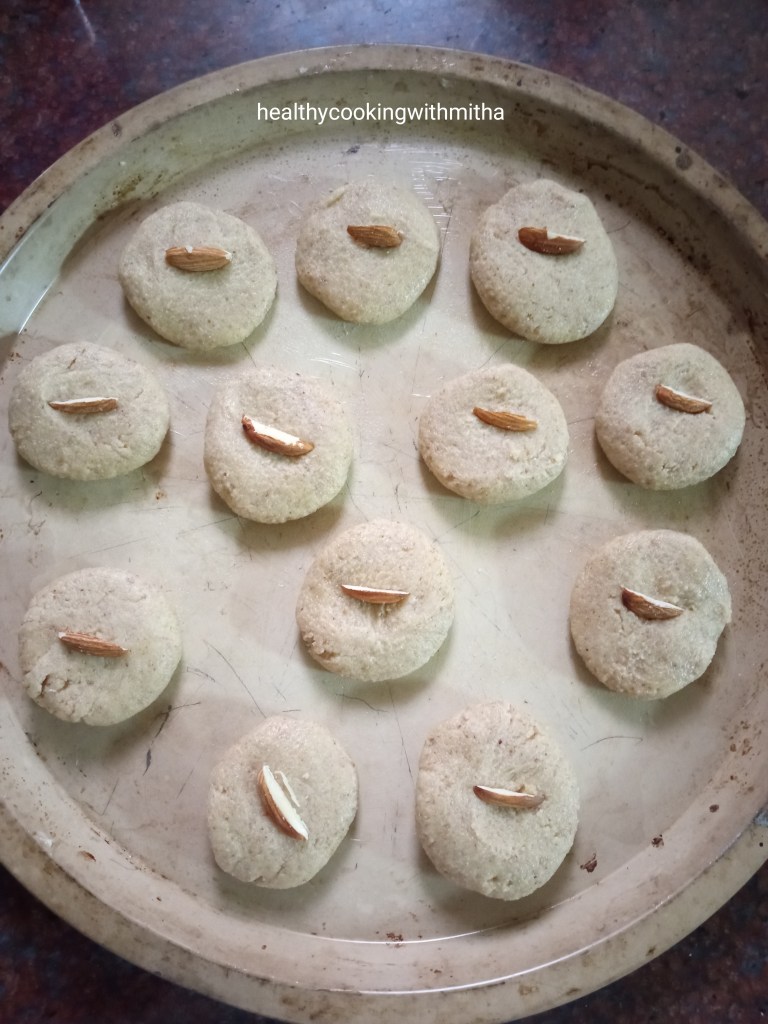
Finally after all the talking about my year (hope it was not boring 😄) , I want to share about these cookies which are not only my kids’ favorite but became my neighbor’s son, Ryan’s favorite too. I had shared some with them for Christmas wondering if they would like it as it is made with wheat flour and jaggery. But when I got a message the next day by Ryan’s mother saying he loved it so much that he is sad that it got over, I felt so happy that he loved it and promised to bake again for him.

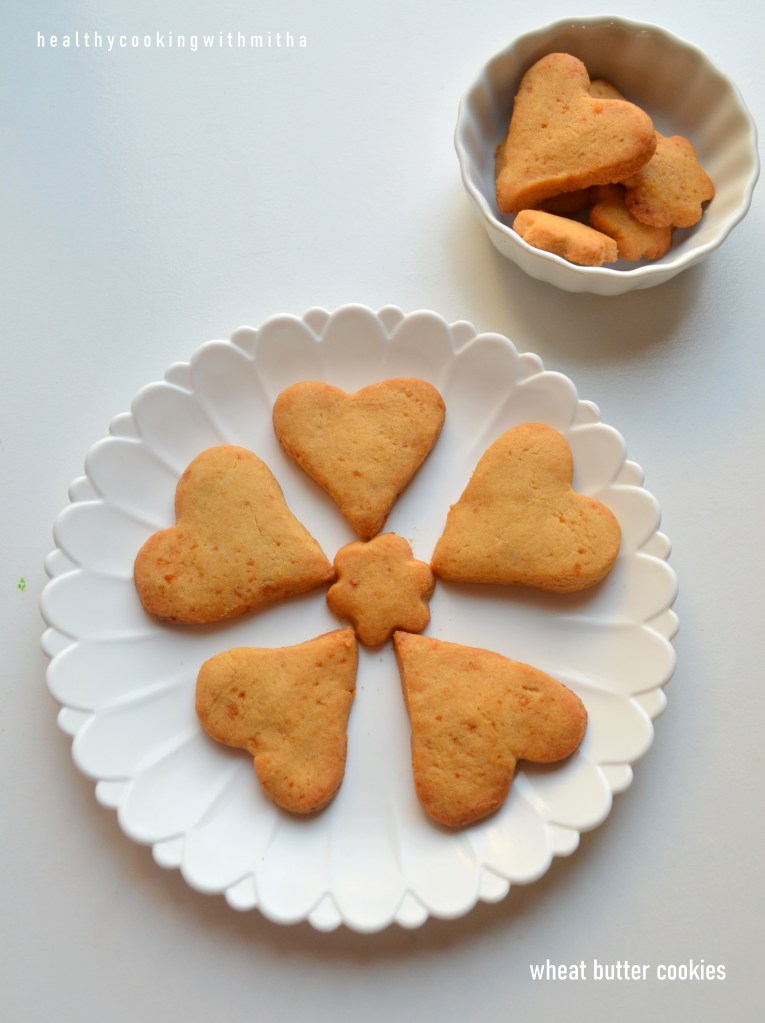
So I baked them again for him yesterday and these cookies are definitely special because of that. Ryan gave me a beautiful memory with these cookies forever and I will never forget how much he loves these. Also, it has given me confidence to try more cookies for next year. A new zeal for baking! ❤️

Here’s wishing all of you a very happy new year in advance. Hope you all have a wonderful year ahead filled with love and happiness. Loads of best wishes. Happy and healthy cooking! ❤️

RECIPE:

Ingredients: { Makes about 10 cookies }

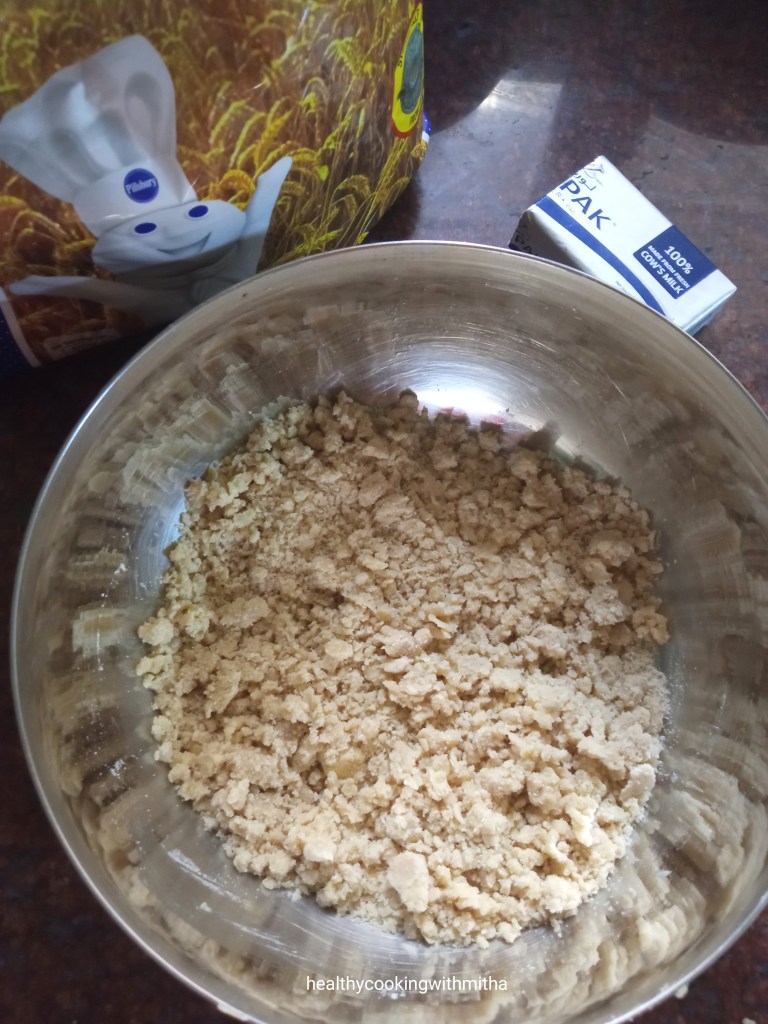
1/2 Cup Wheat flour or Atta (I use Pillsbury brand)

50 grams salted Butter (1/4 Cup)

3 Tbsp Jaggery powder

1/2 tsp Baking powder

1 Tbsp Milk

Step by step recipe:

1. Take wheat flour in a bowl. Add cold butter, directly out of the fridge, cut into small cubes into it. Mix with your fingertips till the butter and wheat flour mix well resembling coarse texture. (Make sure there are no large chunks of butter and all the butter has been incorporated well into the wheat flour.)

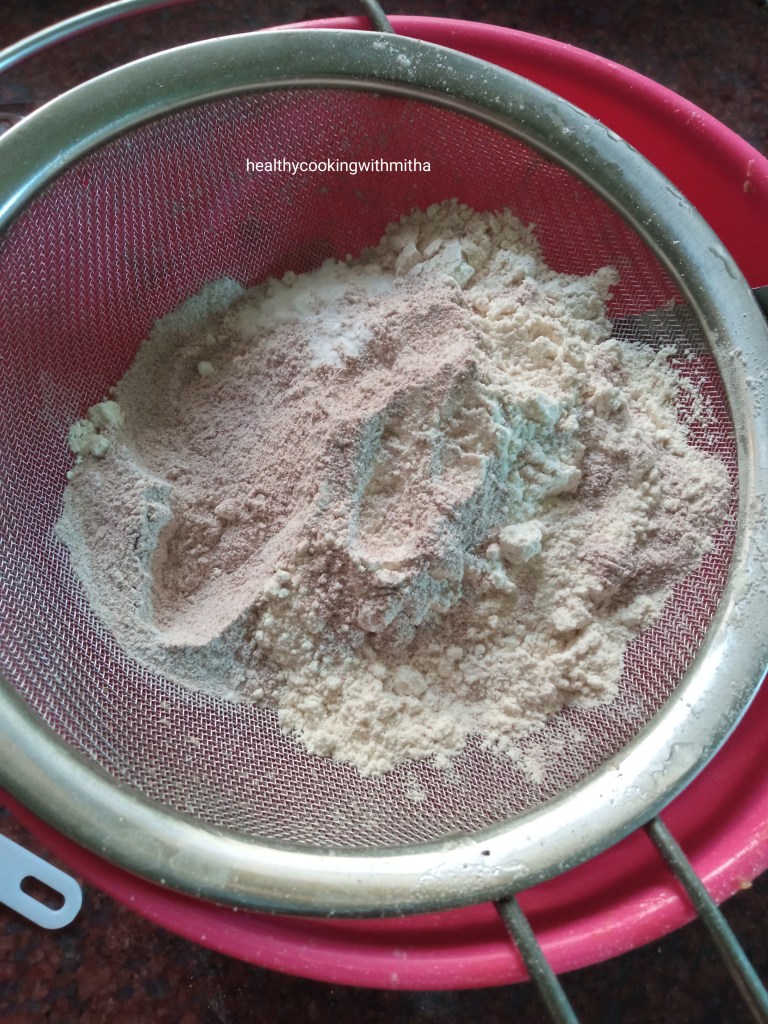
2. Now add baking powder and jaggery powder to this. Sieve it if the baking powder or jaggery has big granules.

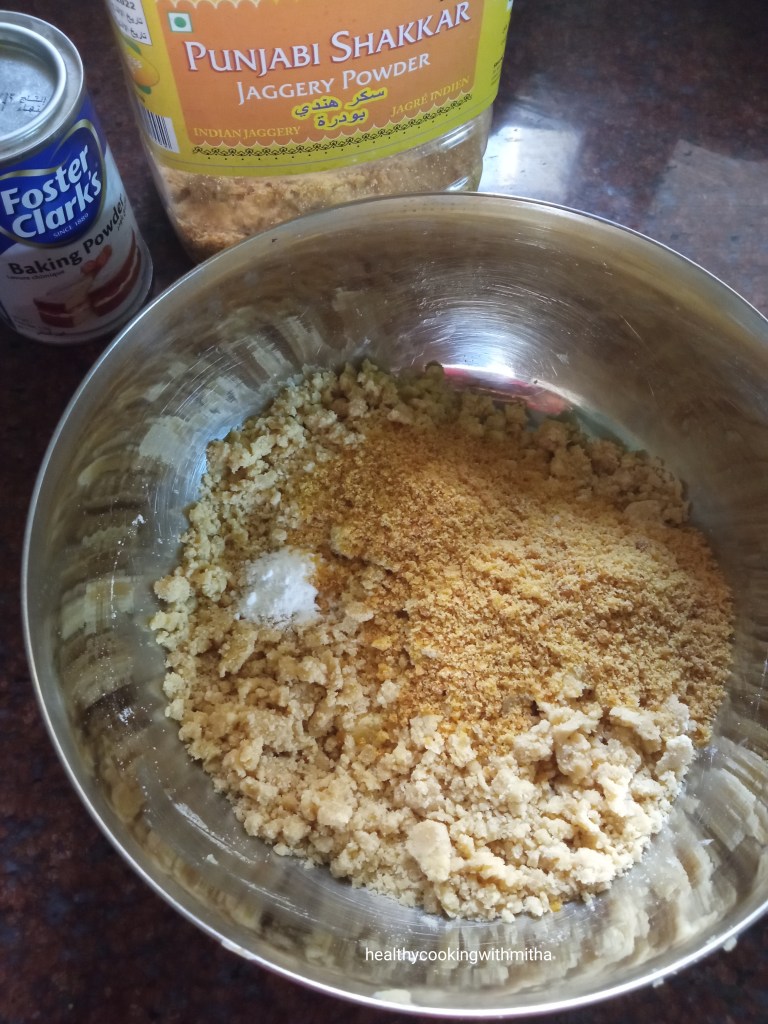
3. Mix once really well. Then add milk and bring the dough together. The dough will be little sticky. Refrigerate this dough for atleast 15 mins.

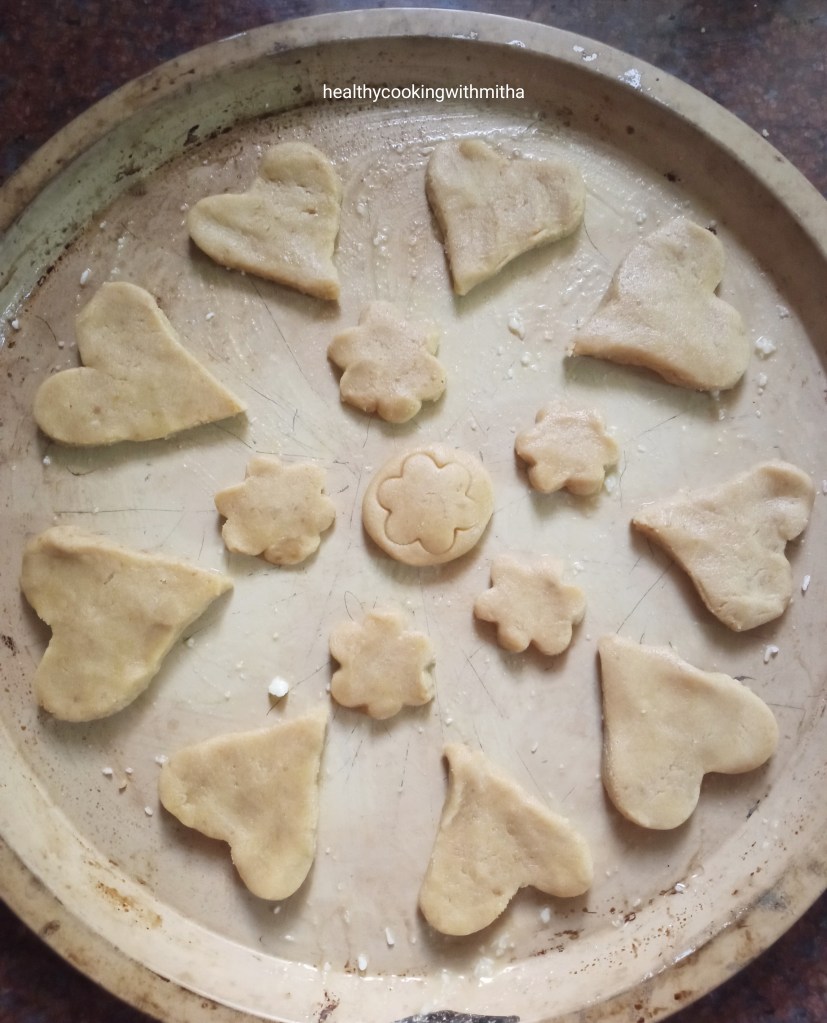
4. Preheat the oven at 180 C for 10 mins. Remove the dough from the fridge and make small balls out of it. Flatten it and cut using cookie cutter into different shapes. Place them on a greased (generously with ghee or butter) oven proof tray.

5. Bake in the center rack of your OTG (or bake mode or with both rods on in your conventional mode oven) at 180 C for 10 to 12 mins. The sides of the cookies will turn slightly brown and the surface will change colour to pale golden. The center surface of the cookies will also be hard and not soft. If you bake more than 12 mins, it will turn crispy.

6. Allow it to cool down. It will harden as it cools. Initially it will be very soft but will turn crispy as it is kept at room temperature. Enjoy the cookies!

Notes:

* Store in a container free from moisture. Will last for 3 to 5 days if handled well.

* I always use only Pillsbury brand of wheat flour for all my cakes, cookies and bread. It gives a great flavour and perfect bakes. Have tried with other brands but it does not give the desired result.

* I used salted butter. Add a pinch of salt if using unsalted butter.

* Don’t melt or soften the butter. Take it directly out of the fridge, cut into small cubes and mix into the wheat flour, crushing the butter with your finger tips. Make sure there are no large chunks of butter left in the mixture.

* Don’t add more milk then mentioned as it can lead to the mixture being very sticky. If by mistake, your mixture has become sticky, refrigerate longer and it will be easier to handle.

* Jaggery powder can be reduced too to make it plain biscuits. The sweetness in this measurement is not much though.

* Refrigerating the dough is very important to give it that firmness so that the dough can be easily handled while shaping them into cookies.

* These cookies turn soft if made in big sizes (like my heart shaped ones) and crispy if made in small sizes (like the flower shaped ones).

* If you have under baked the cookies by mistake (you realize the cookies are breaking after it has cooled down), preheat the oven and bake for 3 to 4 minutes again and it will be firm.

* If you over bake these cookies, they can turn very crispy.

* Best is to keep an eye after 10 mins and take them out when they turn brown at the edges. Remember that since they are small, cookies continue to cook on the tray even after removed from the oven. So best is not to over bake the cookies.

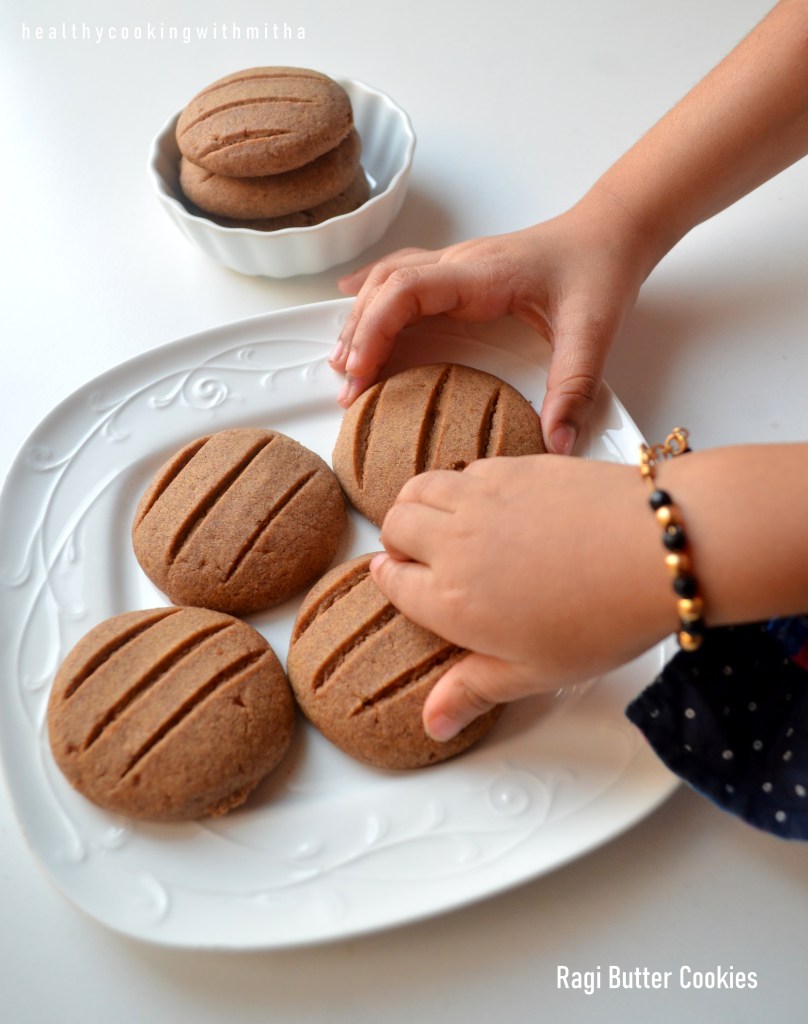
* These are two other cookie recipes which are a huge hit with my readers:

Ragi Butter Cookies and Almond Butter Cookies

I have tried to note down as much points as possible so that it’s easy for you all to follow but if you still have any doubts, either comment here or message me on my Facebook page Healthy cooking with mitha or on my Instagram handle and I would be happy to help.

Ragi Malpua | Quick sweet idea | Healthy snack for kids

I have already shared a chocolate cake, cookies, idlis and a dosa with Ragi flour. You can check all the recipes here. This recipe of Ragi Malpua was my first post on my old blog and one of my first trials with Ragi flour back in 2013. Now when my kids love it, it makes me very happy (one of my successful experiments 😄).

These little rolls of yumminess comes handy during their “Amma, we are hungry. Give us something right now!” kind of hunger 😂. Yes, as a mother, we always have to be ready as such hunger pangs can strike anytime (proportional to their naughtiness 😬). I quickly make these Ragi malpuas and they enjoy it while playing. Seeing them eat happily is one of the best moments in the day for me. ❤️

I never realized how someone else’s happiness can be more important than mine before becoming a mother. But now, all I think is how to make them happy (even though I do scold them if they get extra naughty 😁) and all my wishes have got replaced by theirs too. My daughter asked me yesterday what wish do I have in life (she was talking about her wish to be a princess 😆😍). I said I no longer wish for anything as nothing is in our hands and all depends on God’s will, but I do wish and pray that all your wishes get fulfilled. She was so happy with that answer that she gave me a tight hug saying thank you. It made my day! 🥰

Both of them fill my heart with their talks, smiles, naughtiness and love. Can’t imagine my life without them. ❤️❤️

Here’s sharing their favorite snack, these Ragi malpuas. Hope you all try and love it too. Happy and healthy cooking! ❤️

RECIPE:

Ingredients: { Makes 3 Malpuas }

4 Tbsp Ragi / Finger millet flour

2 Tbsp Atta/ Wheat flour

1 Tbsp Jaggery

Salt to taste

5 Tbsp Milk

For the filling:

1/4 Cup Desiccated or Fresh Coconut

1 Tbsp Honey or as needed

1 Tbsp finely chopped Dry fruits ( I use a mix of cashews, almonds and pistachios)

1/4 tsp Cardamom powder

Ghee to cook the malpua

Honey and Pistachios for garnish

Step by step recipe:

1. Take ragi flour, wheat flour, jaggery and salt in a bowl.

2. Mix it once using a spoon. Now add milk, one spoon at a time and make a thick batter free from lumps. Keep it aside.

3. Now for the filling, take coconut in another bowl. Add honey, finely chopped dry fruits and cardamom powder. Mix well.

4. Now heat a dosa pan well. Then reduce flame to medium. Add about two spoons of the malpua batter in the center of the pan. Spread in round shape. Add ghee and cook till the surface cooks.

5. Flip and cook for a minute.

6. Remove into a plate and fill with the filling. Roll and serve. Drizzle with honey on top and garnish with chopped pistachios.

Notes:

* I have not skipped wheat flour in this recipe as it needs little wheat flour for that soft yet firm texture.

* You can increase the amount of honey on the filling or jaggery in the batter for more sweet malpuas. I prefer it in this quantity.

* Skip jaggery in the batter if you don’t have much sweet tooth.

* They are best enjoyed as soon as made. Keeping them for little while can make it dry.

* Don’t make the batter very thin. The batter is free flowing yet thick. It took me 5 Tbsp milk for 4 Tbsp Ragi flour and 2 Tbsp wheat flour to get the perfect consistency.

* This snack is really handy as it is healthy as well as tastes delicious. Hardly takes 10 mins to make too.

* You can check all my Ragi recipes here.

Healthy Biscuit Pudding | Easy 10 minute recipe using hung curd and Jaggery

If you are amazed at the above picture, you are not alone. I too have been coming back to look at it every few minutes 😅. Can’t believe my hands holding the pudding over our Tulsi plants could look so beautiful 😂. Have to thank Mr Husband for his idea and also the captures (his plant love speaks!). The Tulsi bushes are also growing so well now due to winters here in Qatar which makes for a perfect backdrop. Doesn’t the pudding look so pretty? 😍

An inside look of the deliciousness 😍

It is Qatar National day on December 18th and I dedicate this simple yet delicious dessert to Qatar 🇶🇦 where I am living since more than 9 years now. Sharing a collage of pictures which I took during my first year here, the 21 year old me, little silly, very naive, a cry baby, super talkative, amazed at the tall buildings, astonished at stylish people, scared of escalators (yes, that’s true 😬) and wondering if I will ever fit in here. 😅

These are two of my favorite places here. The view of the Doha skyline from Corniche with the gleaming blue waters in between and Villagio mall which has a small stream of water flowing right in midst of the mall with a boat taking you for small rides. There is also a park next to this mall which has a beautiful lake where I could just sit for hours looking at the ducks moving around freely (my bird love speaks 😍). There are also the goodies we got during our first visit to the Corniche on National day celebrations. I was as happy as a kid to get these stickers and notepad that I had clicked all this to show Amma. 😀

This country has really seen me changing. From the silly, naive, talkative girl (who wanted to chat with everyone around) to a woman now, who thinks more than she speaks, does not want many people close to her, happy in her own little world. I actually have only a handful of friends apart from my family and very few special ones whom I love to love, in my life. That’s my precious circle and I can do anything for them. 😍 (That’s me and I know only to love to the extreme and nothing less than that. ❤️)

I can go on and on but I guess it’s time to give a break to my thoughts and keep it for the next time. I don’t know how many of you are from Qatar but I wish all my readers from Qatar a very Happy National day 🇶🇦. We residents know how well our King has taken care of this country and it’s people, even in the toughest times of blockade and we are all proud of him. I don’t know how long I would be here but this country will be in my heart forever. 🇶🇦 ❤️

Now to the recipe finally. 😂 Do try this delicious dessert and you are sure to love it. Happy and healthy cooking!

RECIPE:

Ingredients: { Serves 2 }

For Hung curd layer:

2 Cups thick full fat Curd/ Yogurt (to make about 1 1/2 Cups Hung curd)

1/2 Cup Jaggery powder/ grated Jaggery

For chocolate layer:

About 35 grams Chocolate (I used Lindt. You can use Dairy milk or any other brand.)

1 Tbsp Milk

2 Tbsp finely chopped Walnuts

For Biscuit layer:

2 to 4 Digestive biscuits (or as needed as per your container.)

1/2 Tbsp Instant coffee powder

2 Tbsp Water

Step by step recipe:

1. Make hung curd using 2 Cups Yogurt. You can see the full step by step pictorial here in my Jaggery Shrikhand recipe. Now, add jaggery powder to it and mix well. (Sieve if jaggery powder contains granules) Keep aside.

This is Jaggery Shrikhand which tastes yummy as it is too! 😍

2. Now take chocolate (your regular chocolate like dairy milk/ galaxy) in a microwave safe bowl. Microwave on high power for 1 to 2 mins till the chocolate turns soft.

3. Add about 1 Tbsp milk to it. Also add finely chopped Walnuts to it. Mix well. Keep aside.

4. Mix instant coffee powder with water till it dissolves. Dip one of the digestive biscuit into it and keep in a bowl.

5. Add a layer of the Jaggery Shrikhand over it.

6. Top it with the melted chocolate- walnut mixture.

7. Again repeat a layer of biscuit dipped in coffee solution, jaggery Shrikhand and melted chocolate- walnut mixture. Garnish with biscuit pieces and a hint of Jaggery Shrikhand. Serve that time itself or chill and serve.

Notes:

* If you don’t have hung curd or don’t know how to make it at home, check my step by step pictorial in the Jaggery Shrikhand recipe. Once you make hung curd, the assembling of this pudding hardly takes 10 mins to make.

* Just make sure you use full fat yogurt which is not very sour.

* Use any biscuits which is available in your house. I wanted to make it healthy, so I used Digestive biscuits. But digestive biscuits dipped in coffee solution does give a wonderful flavour.

* Make sure you don’t add a lot of coffee solution in the pudding or the pudding can turn bitter (once I added a little of leftover coffee solution over it and it had a slight bitter aftertaste.). Just dip the biscuits in the solution and add to the bowl.

* The layers are:

1. Biscuit dipped in coffee solution
2. Jaggery Shrikhand layer
3. Melted Chocolate- walnut mixture


Repeat again as much as your bowl as hold. With the measurements I have given, it makes one small bowl of the pudding serving two.

* Walnuts give a wonderful crunch and flavour to the pudding. But you can skip or substitute with other nuts if you don’t have.

* I enjoy this pudding as soon as I make it but if you like it chilled, you can refrigerate for an hour. It also helps the layers set very well and turns firm.

* I sometimes add a layer of sliced bananas to this making it a Banana chocolate pudding.

* Makes for a great make ahead dessert for parties. A lot healthier than whipping cream and sugar based puddings too. You won’t know the difference too as hung curd gives it that creamy flavour.

Almond Butter Cookies | Easy 4 ingredient healthy recipe using wheat flour and jaggery

Click on the image to save the recipe on Pinterest

When I posted the Ragi Butter Cookies which was my friend Anvy’s recipe, she asked me if I had tried the almond cookies that she had shared on her Insta handle, Homemade by Anvy. I told her I don’t have almond meal with me (it sounded so exotic 😬) but I did have loads of almonds with me (which I had bought to eat daily to increase my memory. Now if anyone would remind me to eat them 😂).

So she told me almond meal was nothing but powdered Almonds (my plinggg moment!! 🤣). So I had to try it and imagine my happiness when it came out so good. I already made them thrice in the past week as it tasted so heavenly and since it was so easy to make with only 4 ingredients. Also, never knew homemade almond cookies could turn out so pretty. Could not keep the beauties down. 😍

Click on the image to save the recipe on Pinterest

Off they went into my kids’ “choti bhook waala dabba” (their snack box for mid meal hunger and mine too for my sweet tooth 😬).

Click on the image to save the recipe on Pinterest

It has been only an year since I joined Instagram and as much I like it, there have been times when I wanted to just come out of it as I had a tendency of over sharing stories. Finally, got rid of that habit ( some self control that was 😄) and now just using instagram to post my recipes while following some amazing accounts like that of Anvy’s.

Thank you so much dear Anvy @homemadebyanvy for yet another great recipe of yours. We absolutely love it! ❤️

Hope you all try it too. You will definitely love it. Happy and healthy baking!

RECIPE: { My 1 Cup = 240 ml }

Ingredients: { Makes about 12 cookies }

100 grams Salted Butter ( 1/4 Cup + 3 Tbsp) (Add a pinch of salt if using unsalted butter)

3/4 Cup Whole wheat flour or Atta

1/2 Cup finely powdered Almonds (or Almond meal)

1/4 Cup Jaggery powder

Sliced Almonds for garnish (optional)

Step by step recipe:

1. Soften butter by keeping it at room temperature for little time. (Do NOT melt it in microwave or so.) Just place it at room temperature till it turns soft. Now add jaggery and mix both together using a spatula till they combine. Also add the finely powdered Almonds.

2. Now add wheat flour and mix using hands till it forms a dough. It will come together and will be slightly sticky. Refrigerate for about 15 mins. It will turn firm.

3. Meanwhile preheat the oven at 180 C for 10 mins. Take small balls of the dough and flatten with your fingers. Place them on a greased (with ghee/butter) oven proof tray leaving space among them as it increases width on baking. Decorate each with slices of almonds.

4. Bake in the preheated oven at 180 degree Celsius (350 – 375 F) for 10 to 14 mins in the center rack of your oven or with both rods on in your conventional oven. Mine gets done at 14 mins.

The colour of the cookies are brown and not the colour above. It is due to the reflection of my kitchen lights that the cookies have a light shade in the picture. I still added it to show how much the cookies increased in width after baking.

5. Remove and allow it to cool completely. As you keep it to rest, it turns hard but not very hard as butter cookies are supposed to be melt in the mouth and on the softer side.

Notes:

* Store the cookies in a dry, air tight container and it lasts well for two to three days. Mine gets finished off by my family before that. Will last longer if handled well, free from moisture.

* They are very soft and break upon touching on warm. As they cool down, they will harden but still not very hard like store bought ones as we have used only butter. The texture is melt in the mouth softer version of cookies.

* These cookies do not need baking soda nor baking powder. They still grow in width during baking process. I too was amazed the first time I tried it as I always thought cookies needed either baking soda or powder.

* Baking time depends on your oven. In some ovens, it can be done at 10 mins while in my OTG, it takes 14 mins. So keep an eye but don’t open the oven door before atleast 10 mins into the baking time. Else it will lead to uneven baking.

* Do refrigerate the dough for atleast 10 to 15 mins as it helps combine the ingredients well and also helps us form cookies well without sticking in our hands.

* Place the cookies in the center rack of your OTG or with both rods on if using microwave with conventional mode oven.

* I have not replaced butter with ghee or oil in this recipe. So can’t say about the outcome.

* For making powdered Almonds, just put the almonds in a mixer and pulse it in regular intervals till it turns into fine powder. Keep checking in between so that it does not leave oil and become a paste.

* Leave space between cookie dough while keeping on the tray as they increase in width as they bake.

* When they fully bake, you can see the surface is free of raw dough and edges are slightly golden in colour. It is enough. You can remove the cookies out of the oven.

* Garnishing with almond slices are optional. Avoid the slices if making for kids less than 2 years as it can be a choking hazard. Else just finely chop and garnish. Anyhow, the cookies tastes good even without it.

* You can check my Healthy Cakes and Cookies compilation.

* For beginners in baking, you can check my Baking Basics for beginners post.

I have tried to note down as much points as possible so that it’s easy for you all to follow but if you still have any doubts, either comment here or message me on my Facebook page Healthy cooking with mitha or on my Instagram handle and I would be happy to help.

Click on the image to save the recipe on Pinterest

Easy Kadala Curry | Kerala style chickpeas curry | Quick lunch box idea

Meet my “friend” (😀) who’s my go-to quick fix curry with no much hard work involved yet comes out lip smackingly delicious and a huge favourite of my family – Kadala Curry. I learnt to make it from our Konkani neighbour, Padma akka in Kochi. She used to bring freshly steamed puttu and Kadala Curry with love for us whenever she made it and it tasted so heavenly that I still have that etched in my food memory. ❤️

When I asked her how to make it (imagining it to be a long, laborious recipe), it amazed me as to how simple it really was to make this curry. As is said by someone (don’t know who 😬), Simple is Beautiful ❤️ and in this case delicious too. 😀

Since then, it is a commonly made curry at my place and the only way I make my chickpeas. I had also shared it in my old blog in 2013 and here is the picture from my archives. (In the same plate too. My favourite plate that is! 😍)

It was my 100th post on that blog which is no longer available now. Feels really sad sometimes that all my hard work went for a toss but console myself that I could start afresh and got this new, better version of the blog. Also, learned a lesson about how not to give my precious blog in anyone’s hands and learnt to handle everything single handedly. That does make me feel good and proud of myself too. 😊

Sharing her easy recipe with all of you. Hope you all try and love it. Makes a wonderful combination with chapatis and a great idea for lunch box. Happy and healthy cooking! ❤️

RECIPE:

Ingredients:

1 Cup dried Black chickpeas/ Kala Chana

1 large sized Onion { or about 6 shallots }

1 medium sized Tomato

1 Tbsp Coriander powder

2 tsp Red chilli powder or to taste

Salt to taste

For seasoning:

1 Tbsp Coconut oil

1 tsp Mustard seeds

A sprig of curry leaves

Step by step recipe:

1. Soak dried chickpeas in atleast double the water overnight or for 8 hours. Drain the water.

2. Add to a pressure cooker along with thinly sliced Onions, finely chopped tomatoes and salt to taste. Pour water till it soaks the chickpeas and cook till it turns soft. { Takes 4 to 5 whistles on high for me on my electric stove top. Varies according to cooking range. }

3. Now open the cooker after it cools down. Keep the cooker on the stove top and add coriander powder along with red chilli powder. Bring to a boil.

4. Mash the chickpeas slightly using the back of a ladle or potato masher to make the gravy turn thick. Boil on medium flame for 5 to 8 mins till the gravy thickens.

5. Heat oil in a pan. Splutter mustard seeds. Add curry leaves and fry till crisp. Pour this seasoning over the curry.

6. Mix well and serve hot with chapatis/appams/ puttu/ dosas.

Notes:

* The main flavour of this curry comes from the coriander powder – red chilli powder combination. So do a taste test and add accordingly as it varies with your brand of both the powders. It may require more or less than I have mentioned.

* Cooking chickpeas till soft is important so that it can be mashed easily and the gravy turns thick.

* Curry leaves in the seasoning makes this curry very aromatic. Don’t skip it.

Drumstick leaves Aloo Roti | Easy snack and lunch box idea

Finding healthy evening snacks are the most difficult for me as most of the snack ideas that are available online are deep fried ones or with bread. Though I bake my own wheat bread and we enjoy it with fresh cream cheese spread, still I have to think of varieties each day to feed my kids who get bored very quickly. 😀

I am also sorry that I always write about my kids. It’s because all my recipe ideas are inspired by what they like and I keep making the dishes they absolutely love. ❤️ Hope it is helpful to mothers like me who want to make their kids eat healthy yet get run out of ideas.

These rotis were found on a day when I had leftover drumstick leaves potato curry and I had to make something quick for the kids. I just added wheat flour and made rotis with it. The kids loved it so much that it has now become a regular in our place whenever I get drumstick or Methi leaves (best way to get leaves in their tiny tummies 😍😍).

This is very filling, yet tasty and very healthy. Best part is it stays soft after many hours. So you can give for lunch box too. Hope you all try and love it too. Happy and healthy cooking! ❤️

RECIPE:

Ingredients: { Makes 5 Rotis }

1 Tbsp Ghee

1 tsp Jeera/ Cumin seeds

1 Cup mashed Potatoes (Pressure cook potatoes till soft, peel and mash well)

1/4 Cup Drumstick leaves / Moringa leaves

1/4 tsp Turmeric powder

1/2 tsp Red chilli powder

1/2 tsp Garam masala powder

2 Cups Wheat flour

1/2 Cup Water

Salt to taste

Ghee to cook the rotis

Step by step recipe:

1. Heat ghee in a pan (I use my iron kadhai for this recipe.). Add Jeera. Fry little and add mashed potatoes along with drumstick leaves, Turmeric powder, Garam masala powder, red chilli powder and salt. Mix everything well and cook for two mins.

2. Allow it to cool. Then add wheat flour and water to make a smooth dough. You can add a pinch of salt to this if needed.

3. Make small balls of this dough, dust in dry wheat flour and spread using a rolling pin into rotis of medium thickness (slightly thicker than chapatis).

4. Cook on a hot tawa and use ghee while frying both sides.

5. Remove from flame and serve with mint chutney and curd.

Notes:

* I serve this with Pudina Lehsun chutney and curd. Makes a great combination.

* You can substitute drumstick leaves with Methi or fenugreek leaves too.

* I make and keep these in a steel container and it stays soft even after many hours. So really good idea for lunch boxes.

* The dough also can be made beforehand and refrigerated in an airtight container. Lasts well for a day.

* I add 1/4 Cup leaves to 1 Cup mashed potatoes and 2 cups wheat flour. You can increase the quantity of leaves if you want. I find this ratio good for my kids as the taste is not very overpowering while it gives them the nutrition too.

* You can also check the spicy idlis with drumstick leaves which we Konkanis call Mashinga palle sannamuddo.

* Do try these rotis or your regular parathas with Pudina Lehsun chutney. Tastes amazing.

* One more snack idea which is very filling and my kids’ favorite are these Masala Oats Parathas. Very delicious!

Ragi Butter Cookies | easy recipe using Jaggery

Click on the image to save the recipe on Pinterest

The above picture is of “melt in the mouth” Ragi Butter cookies before two storms struck in 😅. Will come to that later. Right now, I just want to thank my school friend Anvy Susan Thomas who is a great baker ( I am her huge fan! 😍) for this amazing recipe of hers. She has an instagram page homemadebyanvy where she makes us drool with her delicious bakes.

As all of you know, I love baking and I bake atleast one kind of goodies everyday for my family (my daily dose of happiness ❤️). One of my regular bakes are these Ragi Butter cookies which turns out so good that you will never realize you are enjoying a healthy version of cookies. The kids are HUGE fans of it and you can see what I meant by storm strucking in. Here is my 5 year old daughter slowly coming in the frame to grab one of these cookies (storm no 1 😂).

Click on the image to save the recipe on Pinterest

And when she gets her share, how could the little one be left far behind? Here is storm number 2, my two year old son grabbing the cookies. I loved their cute hands on the cookies that it became my favorite picture too. ❤️❤️

Click on the image to save the recipe on Pinterest

These cookies are very easy to bake and turn out too good to be true. You won’t feel like getting cookies from outside once you bake them, that’s for sure. I always believe that it’s best we bake and make everything possible at home since we don’t know what kind of ingredients have gone in store bought ones.

Hence sharing one of my most favorite cookies. I whole heartedly thank my friend Anvy @homemadebyanvy for this recipe. Hope you all try it out too. Happy and healthy baking! ❤️

RECIPE:

Ingredients: { 8 Cookies }

100 grams salted Butter (add a pinch of salt if using unsalted)

1/3 Cup powdered Jaggery

1/2 Cup Ragi flour or Finger millet powder

1/2 Cup Whole wheat flour or Atta

1/2 tsp Baking soda

Step by step recipe:

1. Soften butter by keeping it at room temperature for little time. (Do NOT melt it in microwave or so.) Just place it at room temperature till it turns soft. Now add jaggery and mix both together using a spatula till they combine.

2. Now sieve ragi flour, wheat flour and baking soda over it.

3. Using hands, mix everything well till it forms a dough like shown below. Refrigerate it for 15 to 20 mins.

4. Preheat the oven at 180 C (350 to 375 F) for 10 mins. Make small balls of this dough and flatten with your fingers (like making pedas). Make lines over it with knife as shown. Place over a greased (with butter or ghee) oven proof plate. Keep distance between them as they increase in width as they bake.

5. Bake in the center rack of your OTG or with both rods on if using a conventional mode oven at 180 C (350 – 375 F) for 10 to 12 mins. Mine gets done exactly at 12 mins. Each oven is different. So in some ovens it may take upto 20 mins for it to bake completely. The surface will be smooth to touch and will be dough free. Also will have a golden tinge on the edges.

6. Allow it to cool slightly and enjoy the cookies.

Notes:

* They are very soft when they are right out of the oven but harden as they cool down. So do not keep a lot of time in the oven thinking the cookies are not done yet. Once the surface is free from dough and they are smooth to touch, they are ready to be removed from the oven.

* I used salted Butter for this recipe. Add a pinch of salt to the mixture if using unsalted butter.

* Also, don’t melt the butter. Just soften it by keeping it at room temperature.

* Refrigerating the dough is very important. Please don’t skip it.

* Place the cookies at little distance before baking as they increase in width as you can see from the pictures.

* Do grease the oven proof plate well with ghee or butter so that it does not stick to the plate.

* Bake in the center rack of your OTG or with both rods on if using a conventional mode oven. It is very important for even baking of the cookies.

* Mine gets done exactly at 12 mins. Might vary depending upon your oven. But don’t open the oven door before 8 mins into the baking time or else it will leave to uneven baking.

* Store in an air tight container at room temperature. Mine has never lasted beyond a day as my family finishes it off before that. 😀

* You may also want to try this Ragi chocolate cake which is my kid’s favourite (and her friends love it as well 😅). One of the most tried recipe by my readers.

Click on the image to save the recipe on Pinterest

Brinjal Rava fry on tawa and Upkari

Even though my kids eat almost everything that I cook ( touchwood!), my 5 year old daughter is slightly choosy when it comes to vegetables. So my mommy brains have to work overtime to make her eat some of the veggies. 😅

Brinjal is a vegetable she won’t eat if I make a regular curry with it (wish I could capture her face and show you all when she hears it’s brinjal curry for dinner 😂). I don’t blame her at all as I myself never used to eat any vegetable as a kid except for a few chosen ones like potato, elephant yam and beetroot. So I can totally understand her. 😃

But once I happened to make these rava fries for a change and she absolutely loved it. So now I make it regularly even as an evening snack. She loves munching on it and I am happy that a healthy vegetable is filling her with nutrition.

Hope you all will try this as well. Happy and healthy cooking! ❤️

RECIPE:

Ingredients:

3 small variety Brinjals or 1 large Purple Brinjal

1/4 tsp Turmeric powder

A pinch of Hing or Asafoetida

Salt to taste

1/4 Cup Rava or Semolina (or as needed)

1 tsp Red chilli powder

Step by step recipe:

1. Wash the brinjals well and chop off the stem. Slice brinjals thinly for the rava fry and finely chop for upkari. Add both into separate bowls of water.

2. Now drain water and add Turmeric powder, Hing and salt. Mix well.

3. In a plate, take rava and mix red chilli powder in it. Roll the brinjal slices one by one over the rava mix.

4. Heat tawa and place these onto the tawa. Drizzle coconut oil while cooking both sides on medium flame till it turns brown in colour and the brinjal turns soft.

5. Serve with rice meals.

Notes:

* For Brinjal Upkari, fry about 4 to 5 finely chopped Garlic pods in oil till it turns brown and add finely chopped brinjal to it. Add red chilli powder and salt. Cook till it turns soft. Don’t add water at all.

* For the rava fry, slice brinjals very thinly. It helps them cook easily and also turns crispy.

* You can make this with any variety of brinjals.

Carrot Kismuri | Konkani style salad

Click on the image to save the recipe on Pinterest

Most days, our dinner is just ukde pej (matta rice cooked soft, eaten with its gruel) and couple of accompaniments to go with it. As much as it may seem from my posts that I cook a lot, our daily meals are very simple and basic.

One of the reason why I don’t (or rather can’t) cook elaborate meals are my kids who hardly give me time in the kitchen (I know it’s hard to believe 😀). My son pulls my dress (he literally roams around behind me with his fingers clutching my dress 😂 #fevicolkajod 😅) asking me to play football with him while my daughter who loves colouring asks me to draw something for her to colour (One is making me a footballer and the other, an artist 😬😬).

But my time passes very well and both the activities are so good to calm the mind. Never knew drawing is such a stress reliever. And about football, try playing it with a two year old who knows only to laugh when you kick the ball. It’s such precious source of happiness that I can’t thank God enough for blessing me with both of them. ❤️

And on days when they don’t leave me to cook at all, this carrot kismuri or Konkani style salad is our accompaniment for the day. Very quick to make, hardly taking 10 mins and tastes heavenly with pej and some pickle to go with it. The kids love it very much which makes it a perfect side dish for busy days.

Hope you all try and love it too. Happy and healthy cooking!

RECIPE:

Ingredients:

2 large Carrots, peeled and grated (about 2 Cups grated carrots)

3 Green chillies or to taste

1/4 Cup freshly grated Coconut

3 Tbsp finely chopped Coriander leaves

Juice from 1 1/2 Indian lemons

Salt to taste

For seasoning:

1 tsp Coconut oil

1/2 tsp Mustard seeds

A pinch of Hing or asafoetida

One sprig of curry leaves

Step by step recipe:

1. Take the grated carrots in a large mixing bowl. Add grated coconut, green chillies, salt and lemon juice.

2. Now heat oil in a pan and splutter mustard seeds, add Hing and curry leaves. Fry till curry leaves turn crisp. Pour seasoning over the carrots. Mix everything well. Done!

3. It’s really that simple. Serve along with white rice and rasam or matta rice gruel with some pickle. Trust me, it tastes delicious!

Notes:

* You can add finely chopped onions to this too but I skip as after a while, it starts smelling. If made without onions, I can make even couple of hours beforehand and keep at room temperature.

* Some people add a tsp of Urad dal to the seasoning but I prefer only mustard seeds in it.

* If you add soaked moong dal and cucumbers to this, it becomes Kosambari which is another accompaniment that I make regularly. You can check the recipe here.

Click on the image to save the recipe on Pinterest

Mashinga palle sannamuddo | Drumstick leaves spicy idlis Konkani style

I love cooking alone in the kitchen and look for the time when my kids are super busy with their naughtiness, then sneak myself into the kitchen to cook. When I cook, some dishes bring back such beautiful nostalgic memories that they bring so much happiness in my heart. Memories are really a wonderful way to relive those precious moments which can never come back but will be a treasure in us forever, bringing us joy when we think of them. ❤️

Sannamudhos were regularly made by my grandmother and I used to wait for it to be steamed to enjoy them as soon as it came out of the pedavan or steamer with coconut oil. Even now, when I make them, I eat them the same way just to relive those childhood memories. Here is a glimpse of the sannamudhos from the pedavan which my father had gifted me many years back when I was coming here to Qatar. Love it so much. Also, see how cute it looks. 😍

Here, even though we live in Industrial area, the residents have planted many variety of trees and one among them is drumstick tree. My husband plucks the leaves from a large tree near our house and I make sannamudhos as soon as I get them. The aroma of these idlis are one of it’s kind. The whole house smells heavenly when it steams. ❤️

Hope you all try and love them. Drumstick leaves are very healthy and medicinal. So I always try to add it regularly in our diet. Konkanis know this recipe but sharing for those who are new to it. Happy and healthy cooking! ❤️

RECIPE:

Ingredients: {Makes about 13 idlis}

2 Cups Drumstick leaves/ Moringa leaves/ Mashinga pallo

1 Cup Idli Rava/ Rice Rava

Salt to taste

For the masala paste:

1/2 Cup fresh or desiccated Coconut

1 tsp Tamarind paste

5 to 6 Kashmiri long red chillies or to taste (fried in 1 tsp oil)

Coconut oil to grease the idli plates

Step by step recipe:

1. Remove the leaves from the stems. Add to a bowl. Wash well. Drain and keep aside.

2. Take idli rava in a bowl. Wash well, drain and keep aside.

3. Now grind together coconut, fried red chillies and tamarind paste with little water to a smooth paste. Add this to the idli rava mixture.

4. Add about 1/2 Cup water (I wash the mixer and add that water.) to form a thick batter. Add salt and mix well.

5. Now mix in the drumstick leaves. It is a thick mixture just like how it is shown below.

6. Grease idli moulds with coconut oil and add the mixture evenly in the moulds.

7. Steam for 20 to 25 minutes or till a knife inserted in the center of the idli comes out clear.

Just love this pedavan or steamer gifted to me by my dad 😍

8. Enjoy it piping hot with coconut oil or with rice and dalitoy or rasam. Makes such an heavenly combo!

Notes:

* You can substitute drumstick leaves with Methi leaves or finely chopped palak leaves. This sannamudho can be made adding only onion or a mix of onion plus cabbage too.

* I add two cups of leaves for 1 Cup of idli rava. You can reduce the amount of leaves if you don’t have that much available but this quantity gives an amazing aroma as well as flavour to these idlis.

* The amount of red chillies I have mentioned is apt for us as the idlis turn out medium spicy. If you like them more spicy, then you can also add chilli powder before you mix in the leaves.

* Do steam them well atleast for 20 mins on high flame, else there can be rawness in the idli rava.

* Idli rava absorbs water when kept for a while. So if you keep the mixture to rest, it will absorb all the water and you might need to add a little more water to bring it to thick consistency. If steamed immediately, only 1/2 Cup water is needed.

* These idlis are traditionally had with rice and any curry like dalitoy (Konkani style dal) or rasam. You can also enjoy them as it is but don’t forget to dip in it coconut oil or drizzle over it for that heavenly flavour.